Welcome to the rich, dark, and utterly delicious world of homemade Pumpernickel Loaves! This unique bread, renowned for its distinct flavor and chewy texture, is a true baking adventure. Our recipe explores the fascinating blend of traditional methods and surprising ingredients that culminate in a loaf that’s perfect for slathering with butter, creating hearty sandwiches, or serving as an impressive side to any meal. Prepare to embark on a journey that elevates simple flour and yeast into a culinary masterpiece, one that promises slices of deep, complex flavor with every bite.
If you’re a passionate baker eager to expand your repertoire of yeast bread, this beautiful, deep-hued Pumpernickel Bread is an absolute must-add to your baking list. It’s more than just a recipe; it’s an experience that connects you with centuries of baking tradition, adapted for the modern kitchen.

Mastering Homemade Pumpernickel Bread: A Journey of Flavor and Technique
The journey to crafting perfect homemade pumpernickel begins with an intriguing ingredient list that might initially raise an eyebrow. Prune butter, a robust espresso, dark molasses, and unsweetened chocolate – at first glance, this combination seems more suited for a dessert than a savory bread. Yet, these unconventional components are the secret to pumpernickel’s signature characteristics. Prunes, beyond being a natural preservative, contribute a subtle sweetness and critical moisture, enhancing the bread’s chewiness and extending its freshness. Espresso and molasses are not just for color; they infuse the loaf with deep, earthy undertones, while unsweetened chocolate adds another layer of profound bitterness and richness, balancing the slight sweetness from the other ingredients. Together, they create the complex, dark profile that defines authentic pumpernickel bread.
As renowned baker Lauren Groveman, whose method inspires this recipe, beautifully articulated, these ingredients provide an unparalleled dimension of flavor. Beyond the ingredients, the techniques employed in pumpernickel baking are equally captivating. The notion of hanging loaves in a sling for their final rise might seem unorthodox, but it’s a clever method to ensure even proofing and maintain the loaf’s shape, crucial for achieving that quintessential pumpernickel texture. This unique approach transforms bread-making into an art form, promising a truly interesting and rewarding baking experience.

Essential Tips for Crafting Authentic Pumpernickel Bread at Home
Creating an authentic pumpernickel loaf is a rewarding process that benefits from careful attention to detail. Here are some expanded tips to guide you through this unique baking journey:
- Embrace Your Mixer for Kneading: The dough for pumpernickel can be quite dense, owing to the rye flour and various enriching ingredients. Using a stand mixer, like a professional KitchenAid, for the kneading process can save you a lot of effort and ensure the dough develops the necessary gluten structure for a truly elastic crumb. While traditionalists might opt for hand-kneading, a powerful mixer guarantees consistent results without the strenuous workout.
- Caraway Seeds – A Personal Choice: Caraway seeds are a classic addition to pumpernickel, imparting a distinct aromatic and slightly peppery flavor. However, their strong presence isn’t universally loved. Feel free to adjust the amount or omit them entirely based on personal preference. This recipe offers the flexibility to tailor the flavor profile to your liking, ensuring everyone at your table can enjoy this rich bread.
- Visualize the Process with Video Guidance: Some techniques, especially the “sling” method for proofing, are best understood visually. Seeking out video demonstrations, such as the PBS episode where Lauren Groveman showcases her method to Julia Child, can be incredibly helpful. Watching an experienced baker execute these steps can demystify the process and boost your confidence in replicating them successfully in your own kitchen.
- Gather Your Unique Ingredients: Before you begin, ensure you have all the distinctive ingredients on hand. Prune butter (lekvar) is essential for color, moisture, and flavor; check the jam and preserves aisle of well-stocked supermarkets. Molasses, instant espresso powder, and unsweetened chocolate are equally crucial for achieving pumpernickel’s deep color and complex taste. Having everything pre-measured and ready will streamline your baking process.
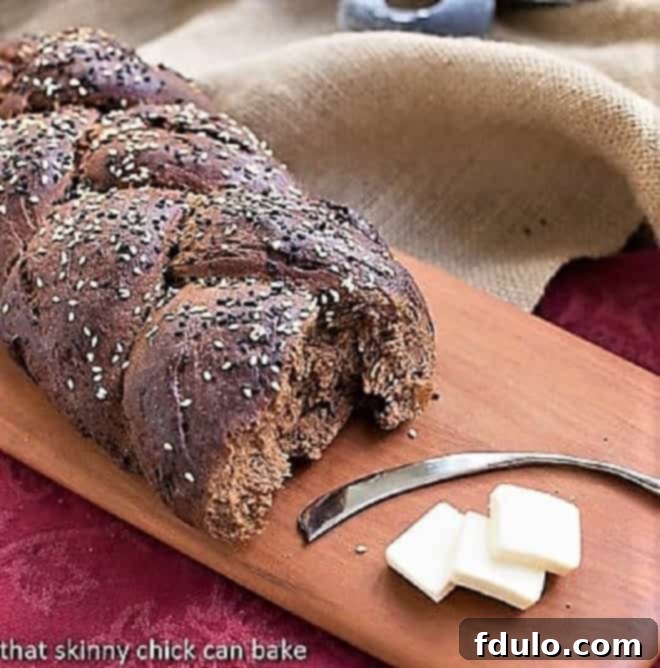
- Experiment with Shaping: While the recipe provides a traditional shaping method, don’t hesitate to get creative. I personally experimented by making one loaf the prescribed way and braiding the second, much like a challah. This allows for a delightful variation in presentation and texture, adding a personal touch to your homemade bread.
- Understanding the “Sling” Technique: The “sling” is perhaps the most unconventional but effective technique in this recipe. It involves suspending the shaped loaves in kitchen towels, allowing them to rise undisturbed. This method prevents the dough from spreading outward, encouraging an upward rise that results in a beautifully shaped loaf. If you’re curious to see this ingenious method in action, consider watching the recommended video demonstration online. It truly makes a difference in the final structure of the bread.
The Verdict: A Deep Dive into Pumpernickel Perfection
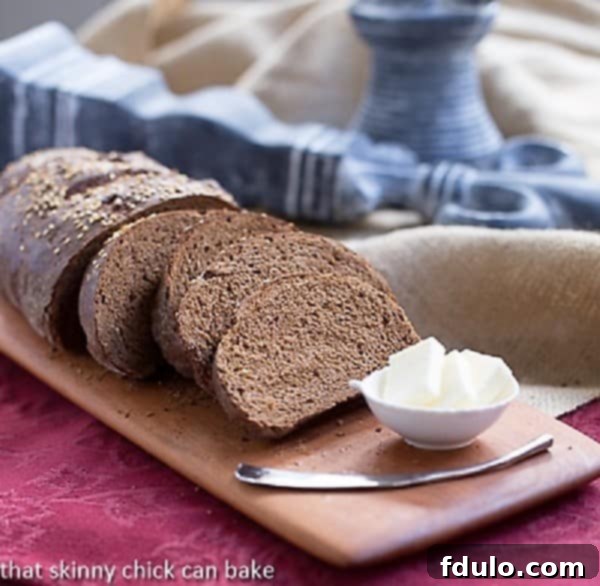
The moment of truth arrives when the freshly baked pumpernickel loaf emerges from the oven, its dark crust crackling and its rich aroma filling your kitchen. Sliced warm and adorned with a generous pat of creamy butter, it transforms into an unparalleled culinary delight. The distinctive flavor profile, a masterful blend of earthy rye, subtle sweetness from the prune butter and molasses, and a hint of bitterness from the espresso and chocolate, truly comes alive. It’s a taste that, once experienced, solidifies pumpernickel’s reputation as a bread with incredible depth and character. While I might not typically crave this specific variety, the experience of baking it and savoring its complex flavors, particularly thanks to the “Tuesdays with Dorie” group that encouraged this exploration, has been profoundly rewarding. It tastes exactly as authentic pumpernickel should – robust, hearty, and satisfyingly dense.
For those new to pumpernickel, it’s a revelation. For aficionados, it’s a testament to the power of traditional baking. And for my husband Bill, well, he gave it a look but didn’t take the bait. His loss! Nevertheless, this recipe proves that stepping outside your comfort zone in the kitchen can lead to incredibly delicious discoveries.
Once you’ve mastered these Pumpernickel Loaves, I encourage you to delve deeper into the satisfying world of homemade baking. Explore more of my Homemade Bread Recipes to continue your culinary journey and discover the endless possibilities that fresh, homemade bread offers.

Pumpernickel Loaves
45 minutes
40 minutes
1 hour 25 minutes
2 loaves
Rich, delicious Pumpernickel Loaves make a tasty breakfast, sandwich or dinner side!
Ingredients
- 3 to 4 tablespoons melted butter, for greasing
- 2 cups plain yogurt, at room temperature or, as a substitute, use tepid water (warm to the touch)
- 1 stick unsalted butter, softened and cut into small cubes
- 1/4 cup solid vegetable shortening, at room temperature
- 1/2 cup prune lekvar (also called prune butter: available in most well-stocked supermarkets with jams and preserves)
- 1/4 cup molasses
- 1 tablespoon instant espresso powder
- 1 cup boiling water
- 2 1/2 squares (2 1/2 ounces) unsweetened chocolate, broken
- 2 tablespoons ground caraway seeds
- 1 1/2 tablespoon whole caraway seeds
- 1 tablespoon fine table salt
- 2 1/2 packages active dry yeast
- 1/2 cup warm water
- Pinch of sugar
- 3 1/2 cups coarse rye meal (if unavailable, substitute medium rye flour)
- Up to 6 cups high gluten bread flour, including flour for dusting and shaping
- Glaze: 1 egg white beaten with 1 teaspoon water
- Topping: sesame seeds and/or caraway seeds (optional)
- Cornmeal (medium ground), for bakers peel
Instructions
- Brush an 8-quart bowl with melted butter and set aside to rise dough. Take out your pastry scraper, another large mixing bowl and a wooden spoon.
- In a large mixing bowl, combine the yogurt, cubed butter, shortening, lekvar and molasses. Dissolve instant espresso in 1 cup boiling water and pour into a small, heavy-bottomed saucepan.
- Add broken chocolate and melt chocolate in espresso over very low heat until smooth, stirring frequently. Add to mixing bowl with powdered and whole caraway seeds and salt. Dissolve yeast in 1/2 cup warm water with a pinch of sugar until creamy and pour into mixing bowl along with the rye meal. Stir to combine well.
- Using a wooden spoon, briskly stir in enough bread flour, 1/2 to 1 cup at a time until you create a mass that’s not easily stirred, but not dry. Turn the mass out onto a floured wooden board and knead until smooth and elastic, adding only as much flour as necessary to prevent dough from sticking to your work surface and hands.
- At the beginning of the kneading process, this dough will feel quite “pasty” because of the rye flour. As always, use a pastry scraper while kneading to scrape the dough off the board cleanly as you continue to knead in a sufficient amount of flour.
- When the dough is smooth and elastic, place it in the buttered rising bowl. Cover bowl with buttered plastic wrap and a clean kitchen towel. Let rise in a draft-free spot until doubled in bulk, about 2 1/2 hours.
- Punch down dough with several swift swats from the back of your hand to deflate the dough totally. Turn over dough, cover, and let rise again for 1 1/2 hours.
- Turn out fully risen dough onto a lightly floured board and use the blade of your pastry scraper to divide the dough in half. Work with half the dough at a time, keeping the other half covered.
- Lay two clean kitchen towels on your counter and sprinkle them with bread flour. Roll dough half into a 7×10-inch rectangle. Starting at the short end farthest from you, roll dough toward you, pinching to seal as you go.
- *Pinch to seal the ends and tuck under to attach to the bottom seam. Rotate and plump dough to finish shaping and place shaped loaf (seam side up) diagonally on a prepared towel.
- Form a sling by joining the corners of the towel furthest from the loaf. Secure the joined towel points within a closed drawer (in a quiet area) so the loaves hang undisturbed in their slings for 45 minutes.
- While bread is rising, position the rack in the second or third lowest shelf in the oven and, if using a sheet of quarry tiles or a pizza stone, place it on the rack. On the rack below this, place a heavy-bottomed, oven-proof pan, which will preheat along with the tiles. Sprinkle a baker’s peel or a flat cookie sheet with cornmeal. Thirty minutes before the end of the rise, preheat the oven to 450 degrees.
- If not using tiles or a stone, brush or spray 1 or 2 large (preferably dark steel) shallow baking sheets with vegetable oil and sprinkle the interior with cornmeal. After mixing egg white and water, pour into a small medium-mesh sieve into another bowl to remove excess coagulation and any bubbles created while mixing. Place glaze next to your work surface.
- Working with one loaf at a time, carefully release slings and gently turn out loaves from towels (smooth side up) onto the prepared baker’s peel or baking sheet at least 3 inches apart. Use your hands gently to plump loaf into a neat shape.
- Using a sharp serrated knife or a razor, slash tops of each loaf three times horizontally, going 1/3 inch deep into the dough. Using a pastry brush, paint tops and sides of loaves (excluding slashes) generously with glaze.
- Just before inserting the dough into the hot oven, carefully pour ¾ cup warm water into the pan beneath the rack used to bake the loaves, then shut the door while you go get the loaves. If baking with tiles, insert the peel all the way to the back of the oven and with one swift jerk pull out the peel, leaving loaves on the hot tiles (preferably with three inches between them). If not using tiles or a stone, place loaves into the hot oven on their baking sheets as directed.
- Bake loaves at 450 degrees for 10 minutes. Reduce heat to 350 degrees and bake for 30 minutes. Remove from the oven and place on wire racks to cool thoroughly before slicing, 2 to 3 hours.
Notes
Recipe from Baking with Julia.
Total time does not include proofing time.
*I shaped one loaf as written and for the second, I made 3 ropes from each half of the dough and braided them like a challah.
Nutrition Information:
Yield:
36
Serving Size:
1 slice
Amount Per Serving:
Calories: 195Total Fat: 7gSaturated Fat: 3gTrans Fat: 0gUnsaturated Fat: 3gCholesterol: 12mgSodium: 225mgCarbohydrates: 29gFiber: 2gSugar: 4gProtein: 5g
Nutritional information is provided as a courtesy and is an estimate only. Varying factors such as product types or brands purchased can change the nutritional information in any given recipe. To obtain the most accurate representation of nutritional information, you should calculate it with the actual ingredients used in your recipe. You are solely responsible for ensuring that any nutritional information obtained is accurate.
HOW MUCH DID YOU LOVE THIS RECIPE?
Please leave a comment on the blog or share a photo on Pinterest
