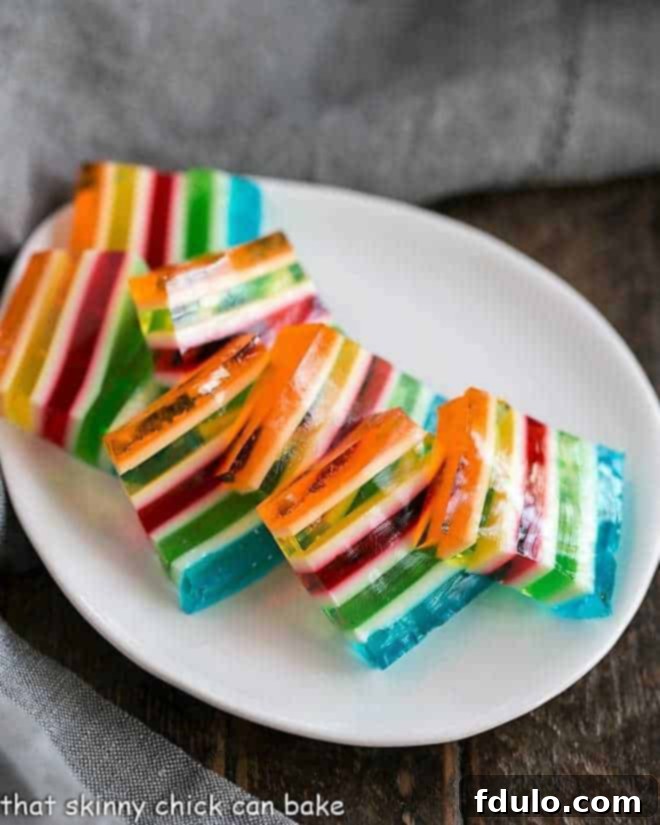
Unleash a wave of vibrant nostalgia and culinary charm with this mesmerizing Layered Jello Rainbow Salad. A spectacular display of colors, this dessert is more than just a treat; it’s a cherished holiday tradition and a guaranteed showstopper at any gathering. Imagine a festive table adorned with this stunning creation, its luminous layers reflecting the joy of the occasion. For Christmas, you can easily adapt it to feature striking red, green, and white layers, creating a truly unforgettable centerpiece that embodies the spirit of the season.
Often affectionately known as Ribbon Jello or Rainbow Jello, this captivating dessert requires surprisingly few ingredients: a variety of flavored gelatins, unflavored gelatin, sweetened condensed milk, and water. While the process itself is straightforward and doesn’t demand advanced culinary skills, it does call for a generous amount of patience. Each individual layer needs adequate time to chill and set perfectly, ensuring the distinct, clean lines that make this dessert so visually impressive. Don’t be deterred by the “time-consuming” aspect; the beauty of this recipe lies in its simplicity and the delightful anticipation it builds as each colorful stripe takes form.
Why You Must Make This Stunning Jello Dessert
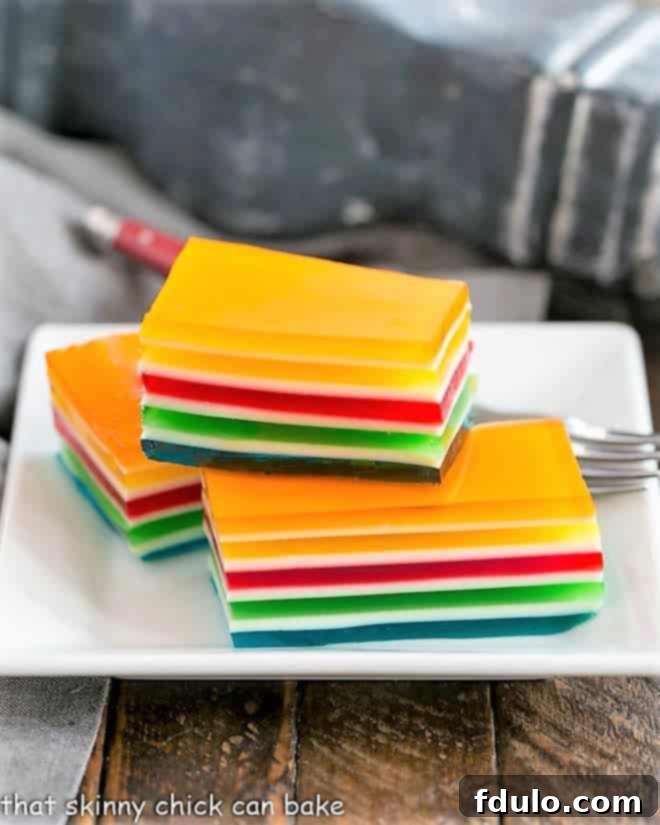
There’s an undeniable magic to presenting a dessert that looks as incredible as it tastes, and this Layered Jello Rainbow Salad perfectly fits the bill. It’s a recipe that marries ease with impressive results, making it an ideal choice for home cooks looking to create something truly special without complicated techniques. Here’s why this vibrant gelatin creation deserves a spot in your recipe collection:
- Effortless Execution (Just Requires Patience): While it might sound daunting with multiple layers, the actual steps for preparing each layer are incredibly simple. The most significant “work” involved is allowing each layer sufficient time to chill and set in the refrigerator. This hands-off approach makes it a perfect project for an afternoon at home, perhaps while you’re catching up on your favorite book or binge-watching a series.
- Minimal Ingredients: You’ll be amazed at how such a visually complex dessert can be crafted from just three core ingredients: flavored gelatin, unflavored gelatin, and sweetened condensed milk. This simplicity in ingredients means less shopping hassle and more focus on the fun of creation.
- A Guaranteed Kid-Pleaser: Prepare for squeals of delight and wide-eyed wonder! Children and grandchildren are absolutely captivated by the brilliant colors and playful appearance of this rainbow Jello. It’s not just a dessert; it’s an experience that brings smiles and excitement to the dinner table.
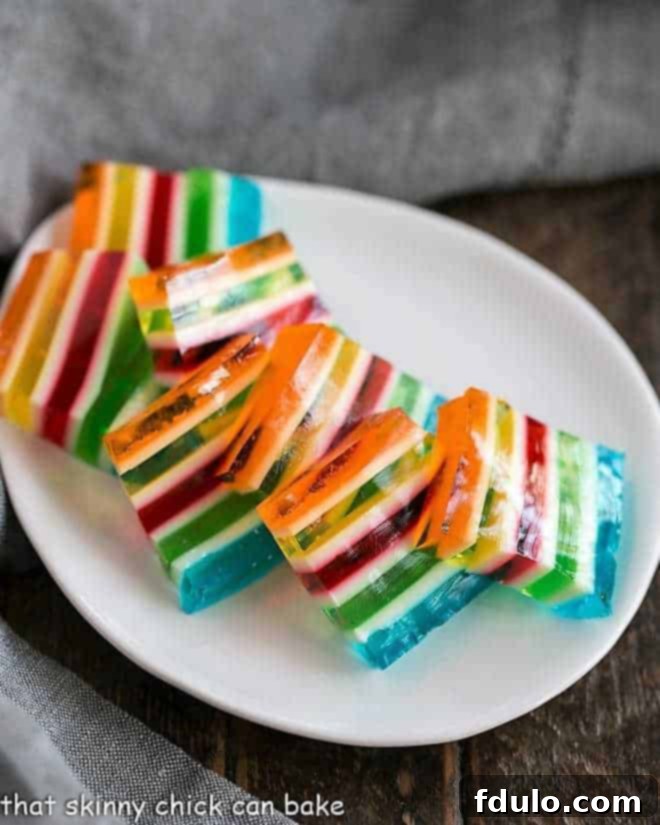
- Incredibly Fun and Versatile: Its whimsical nature makes it perfect for any celebration. You can cut it into classic squares, or use cookie cutters to create fun shapes like stars, hearts, or holiday-themed designs. This adaptability makes it suitable for birthdays, holidays, potlucks, or simply as a cheerful weekend treat.
- Customizable for Any Occasion: Beyond the rainbow, the color possibilities are endless. Choose school colors for a game day, patriotic red, white, and blue for national holidays, or pastels for Easter. This flexibility ensures your Jello salad is always perfectly themed.
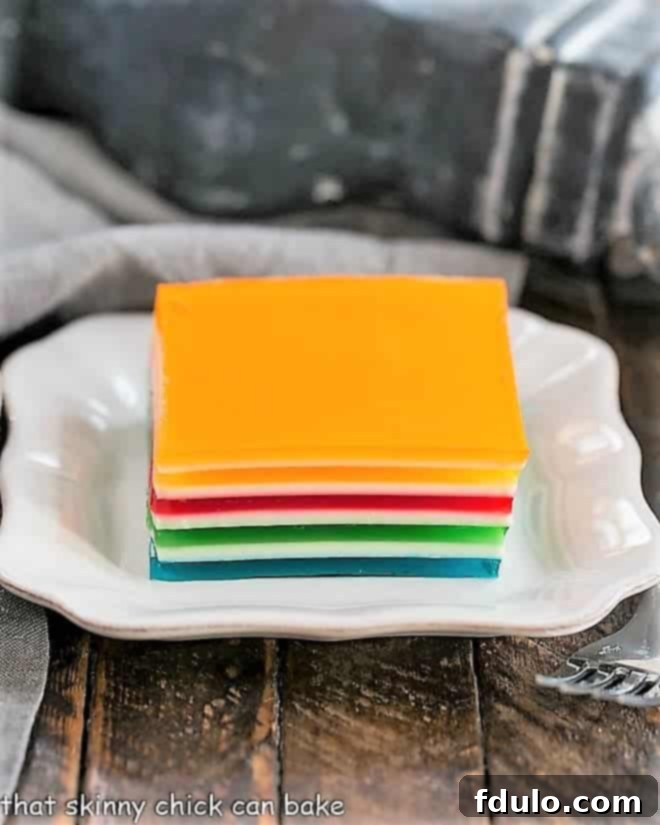
I recall with fondness my mother’s classic “1, 2, 3 Jello” from my childhood, a simple yet delightful three-layered dessert. This Layered Rainbow Jello Salad, often referred to as Ribbon Jello, takes that nostalgic concept to an entirely new level, boasting an impressive nine distinct layers! This intricate layering creates a stunning visual depth that truly sets it apart.
Despite its elaborate appearance, this layered rainbow Jello is remarkably easy to make, though it certainly demands your patience. The good news is that it’s an ideal make-ahead dessert; you can prepare it a day or two before serving, allowing it ample time to set perfectly and alleviating last-minute stress. Setting aside a relaxed afternoon at home to assemble this fun and festive treat will result in a spectacular dessert that will undoubtedly be the talk of your dinner table.
Expert Tips for a Perfect Layered Jello Salad
Crafting a flawless Layered Jello Rainbow Salad is all about precision and patience. Drawing from years of experience, I’ve gathered some essential tips to help you achieve beautifully defined layers and a dessert that truly shines. I once spent a free afternoon over Thanksgiving weekend meticulously assembling one of these, armed with five boxes of Jello, a box of unflavored gelatin, a can of sweetened condensed milk, a trusty Pyrex 9×13-inch pan, and liquid measuring cups. These are the insights I gleaned:
- Customize Your Colors for Any Event: This is where the fun truly begins! While a traditional rainbow is always a hit, don’t hesitate to adapt your color scheme. Think festive reds and greens for Christmas, vibrant reds, whites, and blues for the Fourth of July, or even your favorite team’s colors for a game day celebration. The possibilities for personalization are truly endless, allowing you to tailor this dessert to perfectly suit any occasion or theme.
- Individual Servings for Elegant Presentation: For a more refined touch or portion-controlled servings, consider preparing your ribbon Jello in individual parfait glasses, highball glasses, or small clear ramekins. This not only looks elegant but also makes serving a breeze.
- Understanding Unflavored Gelatin: Unflavored gelatin, like the popular Knox brand, is crucial for creating the solid, white layers of your dessert. You’ll typically find it alongside the flavored gelatins in the baking aisle of your grocery store. Its role is to help the sweetened condensed milk mixture set firmly, providing a delightful creamy contrast to the fruit-flavored Jello layers.
- Precision is Key for Success: Accurate measurement of all liquids and ingredients is paramount. Running out of the white sweetened condensed milk mixture mid-recipe can be a real setback, so measure diligently to ensure you have enough for all the white layers.
- Utilize Liquid Measuring Cups: For the best and most accurate results, always use liquid measuring cups (affiliate link) when measuring liquids. Dry measuring cups are designed for solid ingredients and can lead to inaccuracies when used for liquids, which could compromise the setting of your Jello layers.
- Read Through the Entire Recipe First: Before you even start boiling water, take the time to read the complete directions once or twice. Given the numerous steps and the critical chilling time required for each layer, understanding the entire process from start to finish will prevent mistakes and ensure a smooth preparation.
- Begin with a Colored Layer: For the most visually appealing final product, always start with a colored Jello layer at the bottom of your pan. This creates a vibrant foundation and enhances the overall “rainbow” effect.
- Embrace the ROY-G-BIV Principle for True Rainbows: If your goal is a classic, true rainbow Jello, remember the mnemonic ROY-G-BIV: Red-Orange-Yellow-Green-Blue-Indigo-Violet. While this particular version uses five main colors (Blue, Green, Red, Yellow, Orange), using this sequence as a guide will help you layer your Jello flavors in a harmonious and visually correct rainbow order.
- Re-liquefying Gelled Condensed Milk Mixture: If, while waiting for a colored layer to set, your sweetened condensed milk mixture starts to gel, don’t panic! Simply place the container (like a measuring cup or bowl) into a larger bowl of warm water and stir gently. It will quickly return to a pourable liquid state, ready for its next layer.
- Temperature Control is Crucial When Layering: Each Jello layer needs time to cool sufficiently before being poured over the previous, set layer. If a new layer is too hot, it will melt the layer beneath it, ruining your distinct stripes. Conversely, if it gets too cold, it will start to gel prematurely. Aim for a temperature that is cool to the touch but still liquid.
- Keep Hot Water Handy: A teapot filled with hot water is an invaluable tool for this recipe. It allows you to quickly reheat any gelled condensed milk mixture or to easily dissolve new packets of gelatin for subsequent layers without having to continuously boil fresh water.
- Exploring White Layer Alternatives: While sweetened condensed milk provides an easy, sweet, and creamy white layer, some variations use sour cream sweetened with sugar, or even a mix of sour cream and dry Jello powder for a colored creamy layer. I find the sweetened condensed milk method to be the most straightforward and delicious.
- Achieving Clean Slices: For neat, defined cubes or shapes, use a straight-edged knife (not serrated) that has been warmed slightly under hot water and wiped clean between each slice. This technique helps glide through the gelatin without dragging or tearing the layers.
Helpful Tools and Ingredients for Your Jello Masterpiece
To embark on your Layered Jello Rainbow Salad adventure, having the right tools and quality ingredients is key. Here’s what you’ll need to gather to ensure a smooth and successful creation:
- 9 x 13-inch Pyrex Dish – (Affiliate Link) A clear glass dish is highly recommended. Not only does it allow you to monitor the setting of each layer, but it also beautifully showcases the vibrant, distinct stripes of your finished Jello salad, adding to its visual appeal.
- Five Varieties of 3-ounce Boxes of Jello – (Affiliate Link) The fun part is choosing your colors and flavors! While the Amazon link is provided for reference, you’ll typically find a much wider and more affordable selection of Jello flavors at your local grocery store. Pick a rainbow of hues or customize your palette to match a holiday or party theme.
- Knox Unflavored Gelatin – (Affiliate Link) This is an indispensable ingredient for creating the opaque, creamy white layers that separate and highlight your colored Jello. You’ll find it conveniently located in the baking aisle, often right next to the flavored Jello boxes.
- Sweetened Condensed Milk – (Affiliate Link) This rich, thick milk is the secret to the delectable white layers. It combines with the unflavored gelatin to create a smooth, sweet, and firm layer. It’s crucial to use *sweetened condensed milk*, not evaporated milk, as they are not interchangeable in this recipe.
- Liquid Measuring Cups: Essential for accurate measurement of water and the sweetened condensed milk mixture.
- Whisk or Spoon: For thoroughly mixing your Jello and gelatin solutions.
- Saucepan: For boiling water.
- Large Mixing Bowls: To prepare your different Jello and milk mixtures.
Frequently Asked Questions About Jello Rainbow Salad
This is a common question, and one that sparks curiosity! My beloved mother-in-law, a retired Registered Nurse who attended nursing school in the 1950s, used to passionately advocate for gelatin as a decent protein source, especially for children. She speculated about its origins, perhaps even mentioning horse hooves, which always made me wonder. It turns out, Jello is primarily composed of four ingredients: gelatin, water, sweetener, and food coloring. The key component, gelatin, is a processed form of collagen. Collagen is a fibrous protein found abundantly in the connective tissues, bones, and skin of animals, providing structural integrity. Historically, gelatin could come from various animal sources. Today, the vast majority of gelatin produced globally, including that found in Jello, is derived from pigskin, with some also coming from cattle hides and bones. So, while not directly “bones” in the way some might imagine, it certainly originates from animal sources. The fascinating process of heating and cooling collagen strands during Jello preparation allows them to break apart and then reassemble into their characteristic triple helix formation, giving Jello its unique jiggle! This also means gelatin is a source of amino acids (the building blocks of protein), but it doesn’t contain all the essential amino acids, classifying it as an “incomplete” protein. And to clear up another common myth: Jello was never made from horse hooves. Thus, Jello is not a vegan-friendly product.
The hands-on preparation time for Ribbon Jello is surprisingly short, usually around 20-30 minutes for mixing the different layers. However, the crucial factor is the chilling time. With each of the nine layers requiring approximately 30 minutes to set, followed by an essential overnight chill for the entire dessert to firm up completely, the total hands-off time typically ranges from 12 to 14 hours. It’s a project that rewards patience and planning!
Once your Ribbon Jello salad is fully set, it must be kept chilled in the refrigerator. To prevent it from drying out or absorbing refrigerator odors, cover the pan tightly with aluminum foil or plastic wrap. While plastic wrap is fine, foil often provides a more secure seal and avoids direct contact with the Jello surface, which can sometimes mar the delicate top layer. Properly stored, this delightful Jello salad will maintain its freshness and integrity for 3 to 5 days, making it an excellent make-ahead dessert for parties and events.
Yes, absolutely! If you’re looking to reduce the sugar content, you can easily substitute regular flavored Jello with its sugar-free counterparts. The setting properties of sugar-free Jello are similar to regular Jello, so the layering process will remain the same. The sweetened condensed milk layers, however, will still contain sugar. If you need a fully sugar-free version, you would need to explore alternatives for the white layers, such as a sugar-free whipped topping stabilized with unflavored gelatin and a sugar substitute.
There are a few common reasons why Jello layers might not set. The most frequent culprit is insufficient chilling time. Ensure each layer gets its full 30 minutes in the refrigerator, and the final dessert chills overnight. Another factor can be the temperature of the subsequent layer being too warm, melting the layer beneath it. Always allow each Jello mixture to cool down significantly before pouring. Lastly, improper ratios of water to gelatin can impact setting. Double-check your measurements, especially for the unflavored gelatin, which is critical for firm layers.
The creation of this magnificent layered dessert is truly a labor of love that results in a breathtaking edible artwork. Have you ever tried your hand at making this layered Jello delight before? What wonderful colors or flavors did you choose for your layers, and what magical name does it go by in your household—Jello rainbow salad or perhaps Jello ribbon salad? Share your experiences and make this a beloved tradition in your home!
You May Also Like These Delightful Dessert Recipes
If you enjoyed crafting this colorful Jello masterpiece, you might also love exploring other fun and delicious dessert recipes:
- Dr. Pepper Jello Salad from Spend with Pennies
- Strawberry Panna Cotta
- 1,2,3 Jello
- Broken Glass Jello
- 5 Minute Whipped Chocolate Mousse
- Discover more of the Best Dessert Recipes
Stay connected and share your culinary adventures through social media! Follow me on Instagram, Facebook, and Pinterest. Don’t forget to tag me when you create one of my recipes! If you love the results, please consider leaving a 5-star rating in the recipe card below—your feedback truly helps!
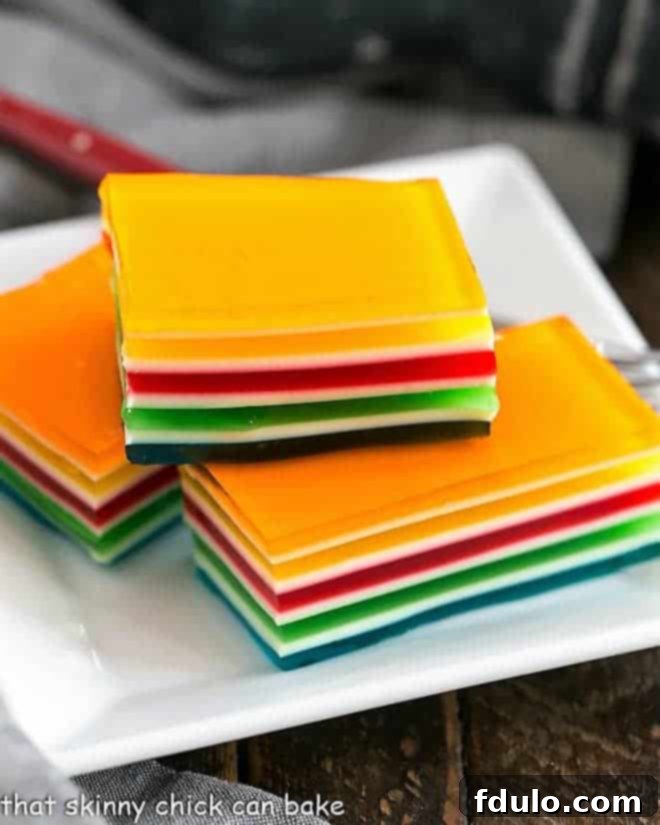
Layered Jello Rainbow Salad Recipe
20 minutes
20 minutes
12 servings
A vibrant layered Jello salad that will impress both young and old!
Ingredients
- 5 3-ounce packages of Jello, various colors and flavors
- 4-5 envelopes Knox unflavored gelatin
- 1 14-ounce can sweetened condensed milk
Instructions
- Mix 1st flavor of Jello with 1 teaspoon unflavored gelatin and 1 cup of boiling water. Let cool (not as important with the first layer), and pour into a 9 x 13-inch pan. I like using a Pyrex pan so I can see the layers.
- Refrigerate for 30 minutes while making the next layer.
- Mix 1 envelope of unflavored gelatin with ½ cup of boiling water and mix until dissolved. Add half a can of sweetened condensed milk* and another ½ cup of boiling water. Mix until combined.
- When the first layer has chilled, pour ¾ cup of the sweetened condensed mixture over the top. Chill for 30 minutes while you make the next colored layer.
- When layer two has chilled, pour layer 3, the second colored layer over the top. Chill for 30 minutes.
- When layer 3 is chilled, pour the rest of the sweetened condensed mixture over the top and chill for 30 minutes while making the next layer.
- If the sweetened condensed mixture has started to gel, just place the measuring cup in a bowl of warm water and mix until it liquefies. Use as directed.
- Since the sweetened condensed mixture has been used, you’ll need to make another batch from the rest of the can. Mix ½ cup boiling water with 1 envelope of unflavored gelatin, then mix in the rest of the sweetened condensed milk, then another ½ cup boiling water.
- Continue until you’ve used up all 5 boxes of Jello and all the sweetened condensed mixture in the same manner as before.
- After the last layer is poured, refrigerate overnight, covered with plastic wrap. Cut into squares or fun shapes to serve.
Notes
*Half a can of sweetened condensed milk is about ½ cup plus 2 tablespoons.
Total time does not include chilling time.
Recommended Products
As an Amazon Associate and member of other affiliate programs, I earn from qualifying purchases.
- 9 x 13-inch Pyrex casserole dish
- Pyrex Measuring Cups
- Unflavored Knox Gelatin
Nutrition Information:
Yield:
12
Serving Size:
1 slice
Amount Per Serving:
Calories: 73Total Fat: 2gSaturated Fat: 1gTrans Fat: 0gUnsaturated Fat: 1gCholesterol: 8mgSodium: 29mgCarbohydrates: 12gFiber: 0gSugar: 12gProtein: 2g
Thatskinnychickcanbake.com occasionally offers nutritional information for recipes contained on this site. This information is provided as a courtesy and is an estimate only. This information comes from online calculators. Although thatskinnychickcanbake.com attempts to provide accurate nutritional information, these figures are only estimates.
Varying factors such as product types or brands purchased can change the nutritional information in any given recipe. Also, many recipes on thatskinnychickcanbake.com recommend toppings, which may or may not be listed as optional and nutritional information for these added toppings is not listed. Other factors may change the nutritional information such as when the salt amount is listed “to taste,” it is not calculated into the recipe as the amount will vary. Also, different online calculators can provide different results.
To obtain the most accurate representation of the nutritional information in any given recipe, you should calculate the nutritional information with the actual ingredients used in your recipe. You are solely responsible for ensuring that any nutritional information obtained is accurate.
HOW MUCH DID YOU LOVE THIS RECIPE?
Please leave a comment on the blog or share a photo on Pinterest
