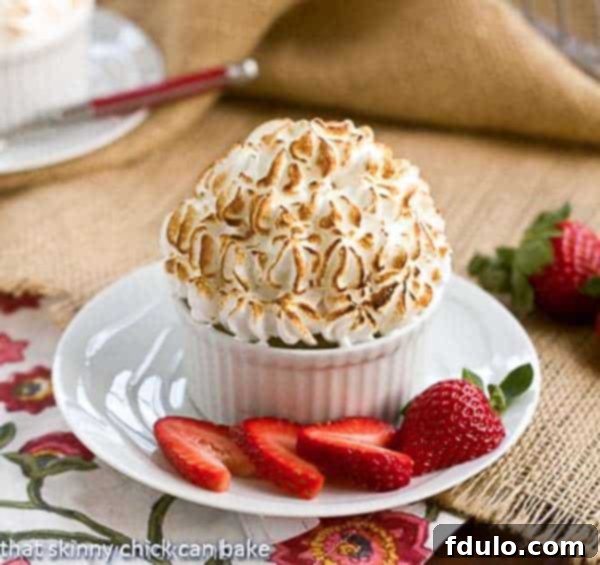
Individual Baked Alaskas offer a truly spectacular and elegant dessert experience, perfect for any special occasion. This captivating Baked Alaska recipe, with its blend of warm cake, chilled ice cream, and toasted meringue, evokes a sense of retro glamour, reminiscent of sophisticated dinner parties and festive gatherings from eras past. The artistry of piping on the fluffy meringue topping transforms a simple dessert into an impressive, personalized treat that will leave a lasting impression on your guests.

Why You Must Make These Individual Baked Alaskas
Baked Alaska isn’t just a dessert; it’s an event. When served in individual portions, it becomes an even more delightful experience. Here’s why this recipe deserves a spot on your next menu:
- Unforgettable Presentation: These are far from an ordinary dessert! Their stunning visual appeal, with golden-brown meringue peaks encasing a hidden frozen core, makes them truly special and a guaranteed conversation starter.
- Personalized Indulgence: Everyone loves having their own personal dessert. Individual portions eliminate the need for serving large slices, ensuring each guest receives a perfectly crafted, delightful treat. It adds a touch of bespoke luxury to your dining experience.
- Versatile for Any Celebration: While perfect for summer soirées, the striking contrast of hot and cold makes Baked Alaskas an ideal showstopper for holiday feasts, anniversaries, or any occasion that calls for something truly unique and celebratory.
- A Blend of Textures and Temperatures: The magic of Baked Alaska lies in its delightful dichotomy – a warm, soft meringue exterior gives way to a creamy, cold ice cream center, all resting on a tender cake base. This interplay of textures and temperatures creates an unparalleled culinary adventure with every bite.
In a world of constant digital connection, my mother and her friends connected through bridge club, church functions, and coffee mornings, where they eagerly shared the latest recipes. Our kitchen shelves overflowed with cookbooks, handwritten recipe cards, and newspaper clippings, all serving as endless sources of culinary inspiration. Sound familiar? It certainly echoes the spirit of my own kitchen today. Many of their most elaborate and gourmet dishes were reserved for their annual Progressive Dinner on New Year’s Eve, a tradition filled with anticipation and delightful surprises.
I can vividly picture them savoring a slice of Baked Alaska around 11 PM, champagne flutes clinking, amidst peals of laughter and merriment. They would conclude their festive gathering just in time to trek through the snowy streets, singing old show tunes, heading to an even grander gala to ring in the New Year at the stroke of midnight. Imagining such joyous scenes, I was inspired to create something equally fun and memorable: a batch of Individual Baked Alaskas, perfect for today’s celebrations.

Crafting Your Perfect Individual Baked Alaska Recipe
My family has always enjoyed a good Baked Alaska, and in true “Berg” tradition, the base was often a rich brownie, topped with classic vanilla ice cream and a cloud of meringue. For this rendition, I aimed for individual elegance. I started by placing perfectly cut rounds of tender pound cake at the bottom of 4-ounce ramekins. This created a sturdy yet delicate foundation for the star of the show: a luscious dome of strawberry ice cream, crowned with a beautifully toasted meringue.
Choosing the right ice cream flavor for this particular creation led to a lively debate with my daughter, Katie, right in front of the ice cream freezer at Target. While her father’s first choice would undoubtedly have been chocolate, Katie swiftly vetoed that option. Likewise, we both knew he wouldn’t be a fan of her preferred peppermint stick or mint chocolate chip. After much deliberation, we settled on strawberry, a vibrant and refreshing choice that proved to be absolutely perfect, especially with Valentine’s Day on the horizon. The bright fruitiness of the strawberry ice cream beautifully complements the sweet meringue and rich cake, creating a harmonious symphony of flavors.
Expert Tips for Flawless Individual Baked Alaskas
Achieving a perfect Baked Alaska might seem daunting, but with these expert tips, you’ll create stunning individual desserts every time. From selecting your base to torching the meringue, each step contributes to this impressive treat.
- The Pound Cake Foundation: While a homemade pound cake offers a delightful touch, I found that for this specific recipe, the homemade version wasn’t overwhelmingly spectacular in flavor. To streamline your process and ensure a consistently delicious base, consider a high-quality store-bought pound cake. A Sara Lee pound cake from your grocer’s freezer section or a fresh bakery-made version would be an excellent, fuss-free alternative that delivers great flavor and texture. Ensure the cake is dense enough to hold its shape.
- Efficient Cake Preparation: To save both time and minimize dirty dishes, begin by slicing your pound cake into uniform pieces that match the desired thickness for your ramekins. Only after slicing, use a round cookie cutter that fits perfectly into your 4-ounce ramekins to cut out individual cake bases. If you don’t have a cutter, a drinking glass with a suitable diameter can work just as well. Remember, other firm cakes or even brownies can also make excellent bases for these individual treats.
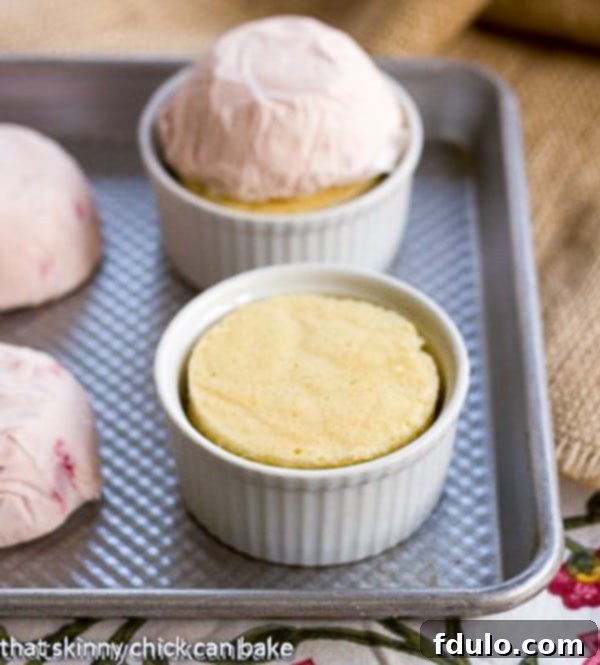
- Perfect Ice Cream Domes: For a truly professional presentation, form six perfect domes of your chosen ice cream. A small, round bowl, roughly the same diameter as your ramekins, makes an excellent mold. Line the bowl with plastic wrap, firmly pack in the ice cream, and then use the plastic wrap to easily lift out the dome.
- Crucial Freezing Time: Once your ice cream domes are formed, place them on a baking sheet and refreeze them overnight. This extended freezing time is vital. It ensures the ice cream is rock-solid, which significantly minimizes melting when you apply and torch the meringue topping just before serving. A well-frozen core is key to the Baked Alaska’s magic.
- Personalize Your Flavors: Don’t limit yourself to strawberry! The beauty of individual Baked Alaskas is the freedom to experiment. Use your favorite ice cream flavor – vanilla bean, chocolate, coffee, or even a seasonal sorbet – to truly make these your own. Just ensure the flavor complements the cake and meringue.
- Advance Preparation for Ease: To make serving these stunning desserts less stressful, you can prepare the cake bases and freeze the ice cream domes the day before you plan to serve. This allows you to focus solely on the meringue and assembly on the day of your event, making entertaining a breeze.
- Meringue Application Made Easy: For an elegant finish like the one pictured, use a piping bag fitted with a star tip to pipe the meringue over the ice cream domes. However, if you’re short on time or prefer a more rustic look, simply spoon the meringue over the ice cream and use the back of a spoon or a small spatula to create charming swoops and peaks. The goal is to fully cover the ice cream.
- The Art of Toasting Meringue: The signature golden-brown exterior is achieved with a culinary torch. Carefully brown the meringue until it’s beautifully caramelized and lightly toasted, giving it a delightful texture and flavor. If you don’t have a torch, a very hot oven (around 500°F or 260°C) or broiler can be used for 1-2 minutes, but watch it constantly to prevent burning and ensure the ice cream doesn’t melt too much.
- Elegant Garnishing: A simple garnish can elevate the entire dessert. Adorn your individual Baked Alaskas with fresh, juicy, ripe strawberries or other seasonal berries. A sprig of mint or a dusting of powdered sugar can also add another note of sophistication and visual appeal.
This mini individual Baked Alaska recipe received my husband’s enthusiastic seal of approval, from the moist cake to the creamy ice cream and the perfectly toasted meringue. So, if you’re searching for an elegant, impressive, yet manageable dessert to truly wow your guests, give these individual frozen delights a try. You and your friends will adore these exquisite frozen treats!
Frequently Asked Questions About Baked Alaskas
A classic Baked Alaska is a sophisticated dessert composed of three distinct layers: a sturdy base of sponge cake (or pound cake, as in this recipe), a generous slab or dome of ice cream, and a final crown of fluffy meringue. This entire assembly is then briefly baked in a very hot oven or torched until the meringue achieves a beautiful, golden-brown toasted finish, while the ice cream remains frozen.
Surprisingly, no, the ice cream does not significantly melt during the brief baking or torching process. This is due to two key factors: first, the oven or torching time is incredibly short (just a few minutes at most), designed only to brown the meringue. Second, the meringue itself acts as a natural insulator, creating a protective barrier that shields the frozen ice cream from the intense heat.
This iconic dessert, also known as a Bombe Alaska, has an interesting origin story. It was reputedly created by Delmonico’s Restaurant in New York City in 1867 to commemorate the United States’ acquisition of Alaska from Russia the previous year. The “baked” refers to the meringue, and “Alaska” signifies the extreme cold of the ice cream hidden within.
Globally, Baked Alaska goes by several other intriguing names, including glace au four (ice cream in the oven), omelette norvégienne (Norwegian omelette), omelette surprise, and debil sibérienne (Siberian omelette), all pointing to its unique hot-and-cold nature.
Absolutely! The beauty of individual Baked Alaskas is that most of the preparation can be done in advance. You can prepare the cake bases and freeze the ice cream domes several days ahead. Even the meringue can be made a few hours before serving and kept chilled. The final assembly and torching are quick, making this an ideal make-ahead dessert for entertaining.
While a stand mixer or hand mixer is helpful for the meringue, the essential tools include 4-ounce ramekins, a round cookie cutter (or glass) for the cake, plastic wrap for molding ice cream, a baking sheet for freezing, and a culinary torch for browning the meringue. If you don’t have a torch, your oven’s broiler can be used with careful supervision.
More Frozen Desserts You’ll Love
If you’re a fan of the delightful chill and sweet indulgence of frozen desserts, explore these other fantastic recipes from my collection:
- Frozen Chocolate Mousse Cake
- Strawberry Cheesecake Ice Cream Pie
- Cheesecake Ice Cream
- Frozen Peanut Butter Pie
- S’mores Ice Cream Sundae
- Layered Ice Cream Cake
- Brownie Baked Alaska
- Frozen Chocolate Crepes
- Explore more delightful Dessert Recipes
Stay connected and share your culinary creations with me! Find me on social media @ Instagram, Facebook, and Pinterest. Don’t forget to tag me when you try one of my recipes! If you love the results, please consider leaving a 5-star rating in the recipe card below – your feedback means the world to me.

Individual Baked Alaskas
40 minutes
25 minutes
1 hour 5 minutes
6 servings
Baked Alaska in ramekins so everyone has their own dessert!
Average rating: 5 out of 5 stars based on 3 reviews.
- Delicious! – “So fun to have a mini version for dinner guests!” – Laura (October 8, 2024)
- Yummy! – “So easy and delicious! All I had to make was the meringue. My friends were impressed!” – Beth (January 8, 2022)
Ingredients
Pound Cake*:
- 2 sticks (1 cup butter, at room temperature)
- 1 ½ teaspoons vanilla extract
- 1 cup sugar
- 4 eggs (at room temperature)
- 1 ¼ cups cake flour
- ⅛ teaspoon salt
Toppings:
- 1 quart strawberry ice cream (amount will vary depending on how much ice cream you use)
- 6 egg whites
- ¼ teaspoon cream of tartar
- ¾ cups sugar
- Beautiful strawberries to garnish
Instructions
- To make the pound cake, line an 8 x 8-inch pan with nonstick foil. Set aside. Preheat oven to 350ºF (175°C).
- To make the pound cake batter, beat the butter and vanilla extract with the whisk attachment of an electric mixer until creamy, about 5 minutes.
- Add the sugar, ¼ cup at a time, and continue to beat until the mixture is light and fluffy, about 10 more minutes.
- Add eggs, one at a time, mixing until each is fully incorporated. On low speed, mix in the flour and salt until just combined.
- Spread the batter evenly in the prepared pan. Bake for 25-28 minutes or until a toothpick inserted in the center comes out clean. Cool completely on a wire rack.
- Set out 6 ½-cup capacity ramekins on the counter. Find a round cookie cutter that will fit snugly into the center of each ramekin. A 2 ¾ inch diameter cutter worked well for me.
- Once the pound cake is cool, use the cookie cutter to cut out circles. Gauge the size according to your ramekins. Place these cake rounds into the bottom of the 6 ramekins. Trim the bottoms if necessary so the cake does not rise higher than the top of the ramekin. You may use small pieces of cake if needed to completely fill the bottom of the ramekins.
- Place a scoop of ice cream on top of each piece of cake to form a dome. Refreeze the cake and ice cream for at least an hour until the ice cream is very hard. Alternatively, find a very small mixing bowl that, when inverted, fits over the cake but is not wider than the ramekin. Line the bowl with plastic wrap and pack in the ice cream. Wrap the ice cream completely with plastic and place on a baking sheet. Repeat 5 more times and refreeze these ice cream domes for at least one hour or overnight.
- When almost ready to serve, begin preparing the meringue. Beat the egg whites and cream of tartar to soft peaks using the whisk attachment of your mixer. Slowly add the sugar, one tablespoon at a time, while continuing to beat until the meringue forms stiff, glossy peaks.
- Place the meringue in a piping bag fitted with a star tip. If you prefroze your ice cream portions separately, place the ice cream domes on top of the cakes now.
- Quickly pipe meringue over each ice cream-topped cake, ensuring the ice cream is completely covered. You may also spread the meringue over the ice cream with a spatula and create decorative peaks with the back of a spoon.
- Using a kitchen torch, carefully brown the meringues until they are golden and lightly toasted. Serve immediately. You may also broil the meringues for about 2 minutes, but watch them very carefully to ensure the ice cream does not become too soft.
- Makes 6 servings.
Notes
*Store-bought pound cake can be used instead of homemade for convenience.
Recommended Products
As an Amazon Associate and member of other affiliate programs, I earn from qualifying purchases.
- KitchenAid 9-Speed Digital Hand Mixer
- Culinary Torch
- 4 Ounce Ramekins
Nutrition Information:
Yield:
6
Serving Size:
1
Amount Per Serving:
Calories: 571Total Fat: 11gSaturated Fat: 6gTrans Fat: 0gUnsaturated Fat: 2gCholesterol: 150mgSodium: 199mgCarbohydrates: 107gFiber: 2gSugar: 60gProtein: 13g
HOW MUCH DID YOU LOVE THIS RECIPE?
Please leave a comment on the blog or share a photo on Pinterest
