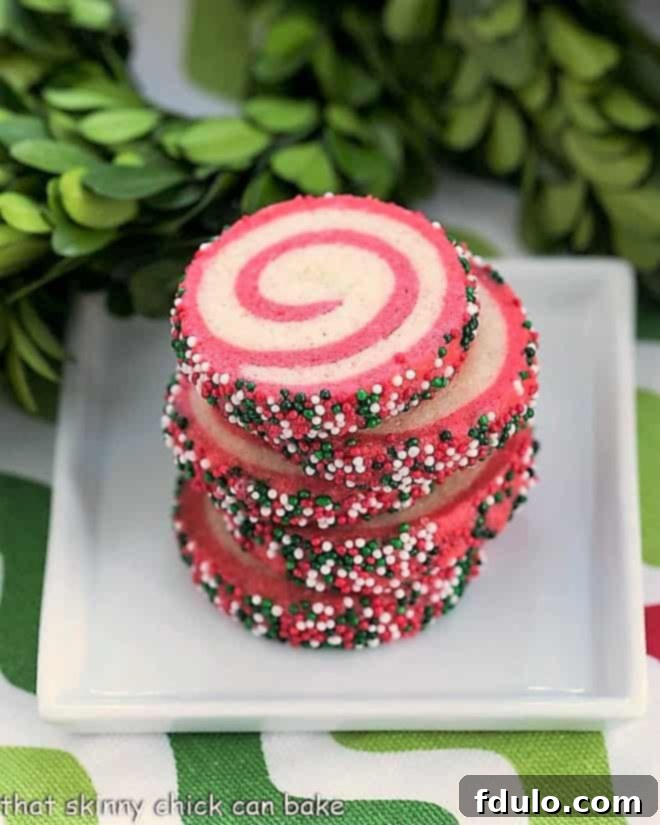
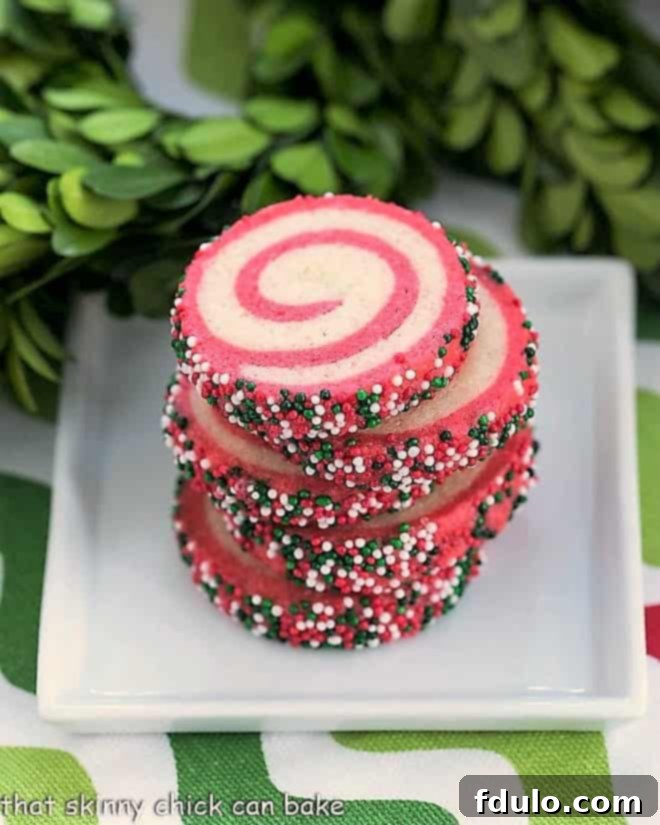
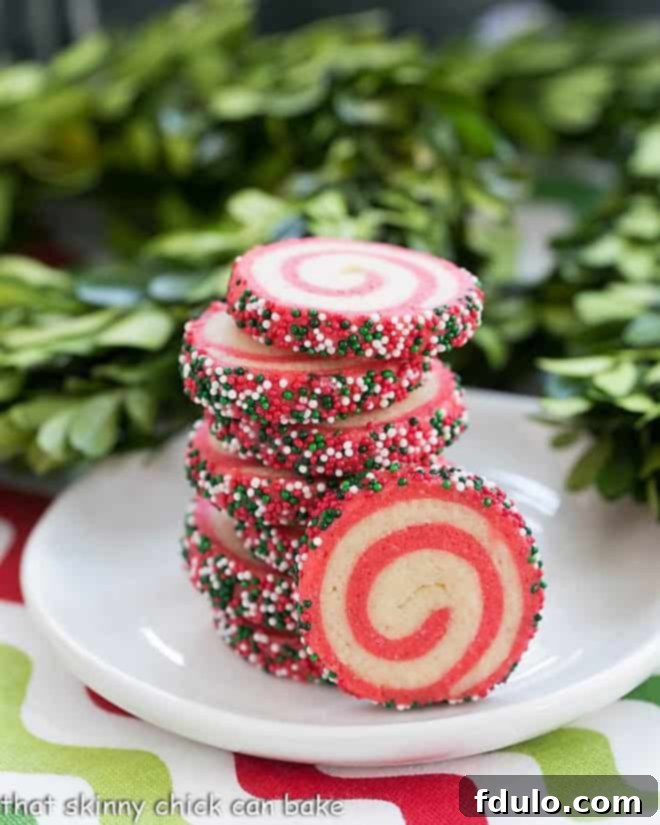
Get ready to elevate your holiday baking with these incredibly charming and utterly delicious Holiday Pinwheel Cookies! With their vibrant red and green spirals, these sweet, buttery treats are more than just cookies—they’re edible works of art that capture the festive spirit of the season.
This year, make your holiday dessert table truly unforgettable with a cookie that stands out from the ordinary. While these dazzling Pinwheel Cookies might require a little extra care and patience in the kitchen, we promise that every moment spent will be repaid tenfold in glowing compliments and delighted smiles. Prepare for rave reviews!
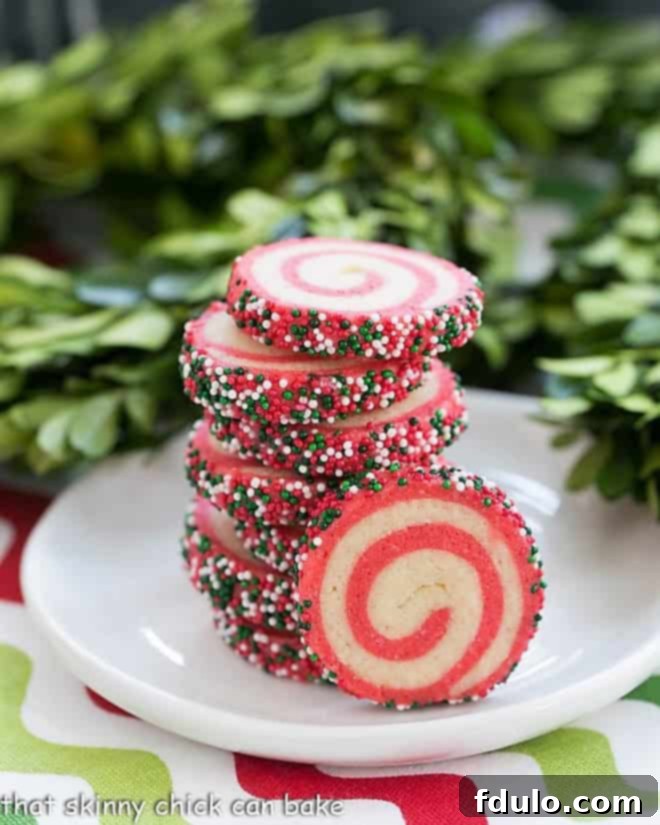
Why You Must Make These Festive Pinwheel Cookies This Holiday Season
The holiday season is synonymous with baking, and what better way to celebrate than with cookies that are as joyful to look at as they are to eat? Our Holiday Pinwheel Cookies are designed to impress, offering a sophisticated twist on traditional Christmas treats. Here’s why these should be at the top of your baking list:
- Visually Stunning: Last year, I was captivated by countless images of perfect pinwheel cookies on Pinterest – those gorgeous spirals of red and green dough truly embodied the festive spirit. This recipe allows you to recreate that stunning visual appeal right in your own kitchen, making these cookies a guaranteed showstopper at any holiday gathering or cookie exchange.
- Inspired by an Expert: This recipe is a delightful adaptation of the classic vanilla and chocolate pinwheels from the renowned dessert guru, Gale Gand. We’ve tweaked her brilliant technique to infuse the holiday magic with vibrant red and green hues, creating a truly unique and delicious cookie.
- Perfect for Make-Ahead Baking: One of the most convenient aspects of these pinwheel cookies is their freezer-friendly nature. You can prepare the dough logs in advance and store them in your freezer for up to three months. This means you can slice and bake fresh, warm cookies whenever the craving strikes or unexpected guests arrive, making holiday entertaining a breeze!
- Ideal for Gifting: Homemade holiday gifts carry a special charm, and these pinwheel cookies are perfect for sharing. Their intricate design and delightful flavor make them a thoughtful and impressive present for friends, family, and neighbors. While there’s a little time involved in the rolling and chilling process, the exquisite results are unequivocally worth the effort. For a different twist, you might also enjoy a date version or these festive cranberry pecan pinwheels!
- Unforgettable Flavor and Texture: Beyond their beauty, these cookies boast a sweet, buttery flavor and a tender, melt-in-your-mouth texture that is simply irresistible. Each bite offers a perfect balance of rich butter and subtle vanilla, making them a delightful treat for all ages.
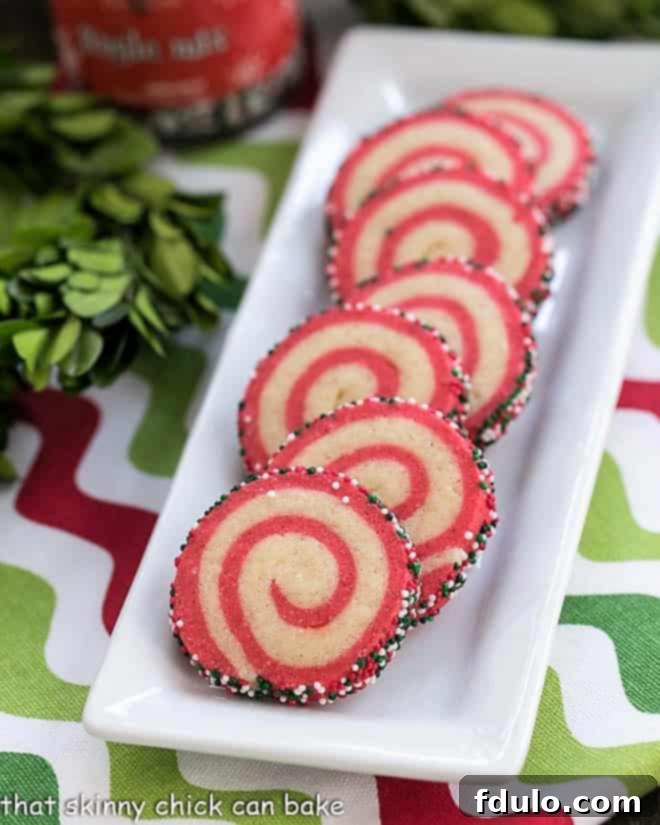
Expert Tips for Perfectly Swirled Pinwheel Cookies
Crafting beautiful pinwheel cookies is an art, but with these expert tips, you’ll achieve perfect spirals every time. Precision and patience are your best friends in this process!
- Achieve Even Color and Dough Distribution: After your dough is thoroughly mixed, use a kitchen scale to divide it precisely in half. This ensures both your vanilla and colored dough sections are perfectly equal, leading to uniform layers in your final pinwheels. One half will remain a classic vanilla hue, while the other will be transformed with vibrant red gel food coloring. Remember, gel food coloring is key here; it provides a much deeper, richer color compared to liquid dyes, which might thin your dough. Don’t be shy – it often takes more coloring than you’d typically use for frosting to achieve that striking, deep red.
- Mastering Measurements for Uniformity: Throughout the rolling process, I highly recommend keeping a clear plastic ruler nearby. This simple tool is invaluable for ensuring your dough rectangles are consistently sized, typically 6 x 7 inches. Consistency in size between your plain and colored dough sheets is paramount for creating a beautifully proportioned pinwheel log.
- Smart Rolling Techniques: When it’s time to roll your dough into precise 6 x 7-inch rectangles, lay a piece of parchment paper on your work surface. Mark the desired dimensions on the back of the parchment. This serves as a helpful guide, ensuring each rectangle is perfectly shaped and sized before stacking.
- Seamless Stacking: Since a plain rectangle of dough is stacked directly onto a red rectangle before rolling, their dimensions must be as similar as possible. After rolling, use your ruler and a sharp knife to carefully trim any excess dough from the edges, creating clean, straight lines for a crisp spiral effect.
- The Critical Role of Chilling: Keeping your dough cold is not just a suggestion; it’s absolutely imperative for success. Cold dough is significantly easier to handle, preventing it from becoming sticky or losing its shape. More importantly, well-chilled dough slices cleanly, resulting in perfectly round cookies rather than squished or oblong shapes. If your dough log develops a flat side from resting in the refrigerator, simply re-roll it gently into a perfect cylinder before you begin slicing. This small step guarantees your pinwheel cookies will impress with their ideal circular form.
- Freezer Storage for Future Baking: These pinwheel dough logs are incredibly versatile for make-ahead baking. When properly wrapped in plastic wrap and then foil, they will keep beautifully in the freezer for up to three months. To bake from frozen, simply transfer a log to the refrigerator overnight to defrost, then slice and bake as directed. This allows you to have fresh, homemade cookies ready in minutes for any occasion.
- Tip of the Day: Thoughtful Holiday Gifts: Rolls of this frozen cookie dough make fantastic and unique holiday gifts. Wrap the frozen logs securely in parchment paper, twist the ends like a candy wrapper, and tie them with festive ribbons. Attach a coordinating tag with simple baking instructions (preheat oven to 350°F, slice 1/4-inch thick, bake 9-11 minutes). It’s a heartfelt, homemade gift that keeps on giving!
How to Make Holiday Pinwheel Cookies: A Step-by-Step Guide
Let’s walk through the enchanting process of creating these stunning pinwheel cookies. While it might look intricate, breaking it down into simple steps makes it very achievable. These process shots will guide you visually through rolling and cutting.
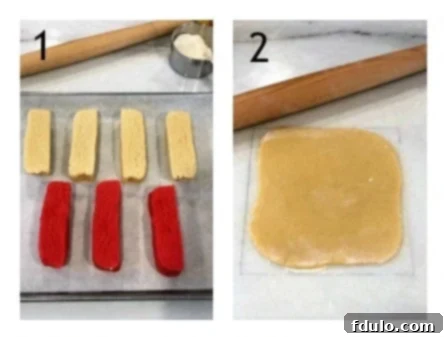
- Prepare the Dough Strips: Once your chilled dough squares are firm, carefully cut each square into four uniform logs or strips. This pre-cutting helps manage the dough more easily during the rolling process and ensures consistent final log sizes.
- Roll the Vanilla Dough: On a lightly floured piece of parchment paper, take one strip of your plain (vanilla) dough. Using a rolling pin, carefully roll it out into a precise 6 x 7-inch rectangle. As mentioned in our tips, using pencil markings on the back of your parchment paper can greatly assist in achieving these exact dimensions. This precision is crucial for a clean spiral.

- Stack and Roll: Similarly, roll out a strip of your red-tinted dough into a 6 x 7-inch rectangle. Carefully transfer the plain dough sheet and gently place it directly over the red dough sheet, ensuring all edges align perfectly. With the aid of the parchment paper, tightly roll this stacked dough into a snug cylinder or log. The tighter the roll, the more distinct your pinwheel pattern will be.
- Add Festive Sprinkles (Optional): For an extra touch of holiday sparkle, gently roll the dough log in your choice of holiday sprinkles or colored sugar. If you find some areas where the sprinkles aren’t adhering well, lightly dampen your finger and gently dab the dough to make it slightly tackier, then re-roll in sprinkles. This step adds both visual appeal and a delightful crunch.

- Slice the Chilled Log: After your dough log has been sufficiently chilled and is firm, use a sharp knife to slice it into uniform 1/4-inch-thick cookie rounds. The cold temperature of the dough is crucial here, as it allows for clean, precise cuts without distorting the beautiful spiral pattern.
- Bake to Perfection: Arrange the sliced cookie rounds on a baking sheet lined with parchment paper, ensuring they are spaced about 1 1/2 inches apart to allow for slight spreading. Bake as directed in the recipe card below, typically until the edges of the vanilla dough are lightly golden. Keep a close eye on them, as baking times can vary slightly.
Frequently Asked Questions About Holiday Pinwheel Cookies
Pinwheel cookies are a delightful type of rolled cookie characterized by their distinctive spiral pattern. They are typically made by layering two different colored or flavored doughs, which are then rolled together into a log. Once chilled, this log is sliced into individual rounds, revealing the beautiful pinwheel design. While often made with two doughs, some variations, like date pinwheels, involve rolling one dough with a flavorful filling.
You might be surprised to learn that pinwheel cookies are easier to make than they appear! The process for these holiday pinwheels begins with a single dough base, which is then divided, with one half tinted with food coloring to create the contrasting layers. The core technique involves rolling out portions of each colored dough, carefully stacking them, and then rolling the stacked dough into a tight log. After a period of chilling to firm up the dough, the log is ready to be sliced into rounds. For an extra festive touch, these rounds can be rolled in sprinkles before baking. While it requires attention to detail and some chilling time, the steps are straightforward and highly rewarding.
Parchment paper is your best friend when rolling pinwheel dough into logs. Lay your rolled dough sheets on parchment before you start rolling them into a cylinder. The parchment assists significantly in creating a tight, even roll, helping to keep the dough’s surface smooth and free of indentations from your fingers. Once the dough log is formed and chilled, you can even gently roll it back and forth a few times while still wrapped in the parchment on your countertop. This helps to ensure the log is perfectly round, preventing any flat spots from forming during chilling and guaranteeing beautifully circular cookies when sliced.
More Festive Cookie Recipes You’ll Adore
If you’re looking to expand your holiday cookie repertoire, here are some other cherished recipes that are perfect for sharing and celebrating:
- 30+ Christmas Cookies
- Turtle Thumbprint Cookies
- Italian Ricotta Cookies
- Rosettes
- Chewy Gingersnaps
- Stained Glass Cookies
- Plus, learn How to Host a Cookie Exchange
- Explore more delightful Cookie Recipes
- Discover a wider range of Holiday Recipes
Stay in touch through social media @ Instagram, Facebook, and Pinterest. Don’t forget to tag me when you try one of my recipes! And if you love the results, please give it a 5-star rating in the recipe card.
The Recipe:
Holiday Pinwheel Cookies
30 minutes
11 minutes
4 hours 41 minutes (including chilling)
80 cookies
These buttery holiday cookies are a festive twist adapted from Gale Gand’s classic pinwheel recipe, perfect for dazzling your guests!
Rated: 4.7 out of 5 stars based on 100 reviews.
Ingredients
- 3 cups all-purpose flour
- 1/2 teaspoon baking powder
- 1/2 teaspoon salt
- 1 cup unsalted butter, softened to room temperature
- 1 1/3 cups granulated sugar
- 2 large eggs
- 2 teaspoons pure vanilla extract
- Red gel food coloring paste (for vibrant color)
- Colored sugar or festive sprinkles of your choice (for decoration)
Instructions
- In the bowl of a standing mixer fitted with the paddle attachment, beat the softened butter until it is light and fluffy, which usually takes about 3 minutes. Add the granulated sugar and continue beating for approximately 2 more minutes until the mixture is light and aerated.
- Add the eggs one at a time, beating well after each addition to ensure they are fully incorporated. Stir in the vanilla extract. In a separate bowl, whisk together the flour, baking powder, and salt. Gradually add the dry ingredients to the wet ingredients in the mixer, beating on low speed until just combined. Be careful not to overmix.
- Carefully divide the dough evenly in half (using a kitchen scale ensures accuracy). Form one half of the dough into a 4-inch by 4-inch square, wrap it tightly in plastic wrap, and set aside. Return the remaining half of the dough to the mixer. Gradually add red gel food coloring paste, mixing until you achieve your desired deep red hue.
- Form the red-tinted dough into another 4-inch by 4-inch square and wrap it tightly in plastic wrap. Refrigerate both squares of dough for at least 30 minutes to firm up slightly, which will make them easier to handle.
- Line a large baking sheet with parchment paper. Take one square of dough (either color) and cut it into 4 equal strips. Repeat with the other dough square. Place 3 strips of the red dough and 4 strips of the vanilla dough back onto the lined baking sheet and refrigerate them while you work. On a lightly floured piece of parchment, roll out one strip of red dough into a precise 6-inch by 7-inch rectangle. Use a ruler to ensure exact dimensions for a perfect swirl.
- Remove one strip of vanilla dough from the refrigerator. On another lightly floured piece of parchment, roll it out into an identical 6-inch by 7-inch rectangle. Carefully invert one dough sheet onto the other (using the parchment to assist), aligning all the edges precisely. Gently run a rolling pin lightly over the stacked doughs to adhere them together without thinning.
- Using the parchment paper to aid you, tightly roll up the stacked dough into a snug log, starting from a 6-inch side. Wrap the log tightly in plastic wrap and refrigerate. Repeat this process with the remaining strips of dough to form 4 total logs.
- Refrigerate all logs for at least 1 hour. After this initial chill, remove them from the refrigerator and gently roll each log on the counter several times. This helps to round out any flat spots that may have formed during chilling. If desired, roll each log in holiday sprinkles or colored sugar for a festive exterior. Rewrap the logs and refrigerate for an additional 3 hours, or until they are very firm, which is crucial for clean slicing.
- Preheat your oven to 350°F (175°C). Line two baking sheets with parchment paper. Using a sharp knife, slice the well-chilled dough logs into 1/4-inch-thick rounds. Place the slices about 1 1/2 inches apart on the prepared baking sheets. Bake for 9 to 11 minutes, or until the edges of the vanilla dough are slightly golden.
- Remove from the oven and let cool on the baking sheets for a few minutes before transferring them to a wire rack to cool completely. Enjoy these beautiful and delicious Holiday Pinwheel Cookies!
Notes
Total active preparation and cook time is around 41 minutes, but the recipe requires a total of 4+ hours, including essential chilling time for the dough.
Watch the video above for a visual guide on making these stunning Holiday Pinwheel Cookies!
Recommended Products
As an Amazon Associate and member of other affiliate programs, I earn from qualifying purchases, at no extra cost to you.
- Reynolds Cookie Baking Sheets Non-Stick Parchment Paper, 25 Sheet, 4 Count
- USA Pan 1603CR X-Large Bakeable Nonstick Cooling Rack, 19.75 x 13.625-Inches
- Wilton 610-906 Icing Gel, 1-Ounce, Red-Red
- Wilton Bulk Nonpareils Christmas Sprinkles
- Immersion Blender
- USA Pan Bakeware Half Sheet Pan, Warp Resistant Nonstick Baking Pan, Made in the USA from Aluminized Steel – 1050HS
- French Rolling Pin
Nutrition Information:
Yield: 40
Serving Size: 2 cookies
Amount Per Serving:
Calories: 106
Total Fat: 5g
Saturated Fat: 3g
Trans Fat: 0g
Unsaturated Fat: 2g
Cholesterol: 22mg
Sodium: 73mg
Carbohydrates: 14g
Fiber: 0g
Sugar: 7g
Protein: 1g
