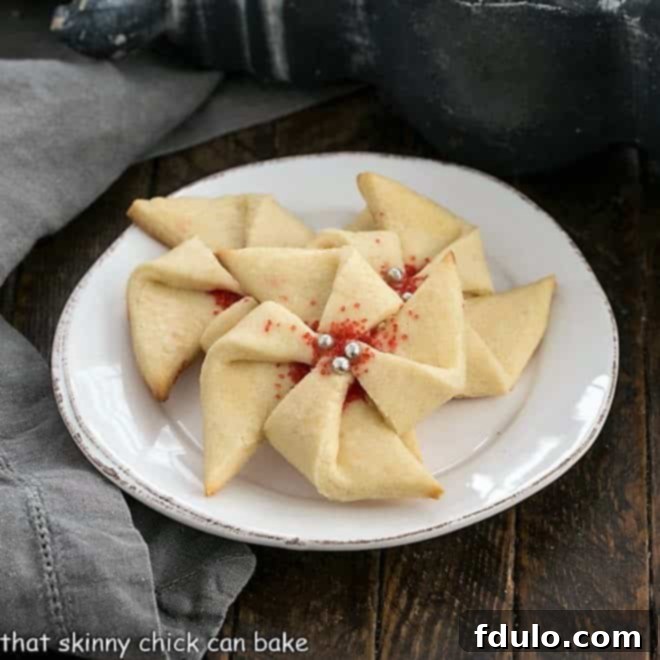
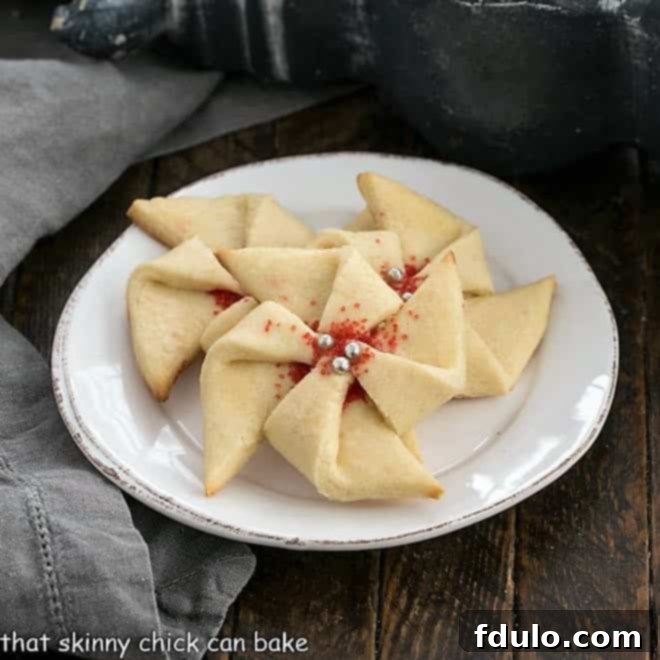
Step into the enchanting world of holiday baking with our delightful Poinsettia Cookies. These aren’t just any ordinary Christmas treats; they are a vibrant celebration of the season, transforming simple sugar cookies into edible works of art. With a few precise cuts, elegant folds, and a generous scattering of festive sprinkles, you can create stunning cookies that mirror the iconic beauty of poinsettia blossoms. Imagine the joyous smiles as loved ones discover these unique, handcrafted delights on your holiday dessert platter!
Originally conceived as charming Pinwheel Christmas Cookies, this versatile recipe transcends the festive season. The magic lies in its adaptability: by simply changing the color of your sprinkles and nonpareils, these cookies can be customized for virtually any celebration. Envision vibrant red and blue for a patriotic Fourth of July gathering, soft pastels for an elegant Easter brunch, or romantic pink and red hues for a heartfelt Valentine’s Day surprise. This makes them a year-round favorite, perfect for adding a touch of personalized charm to any special occasion.
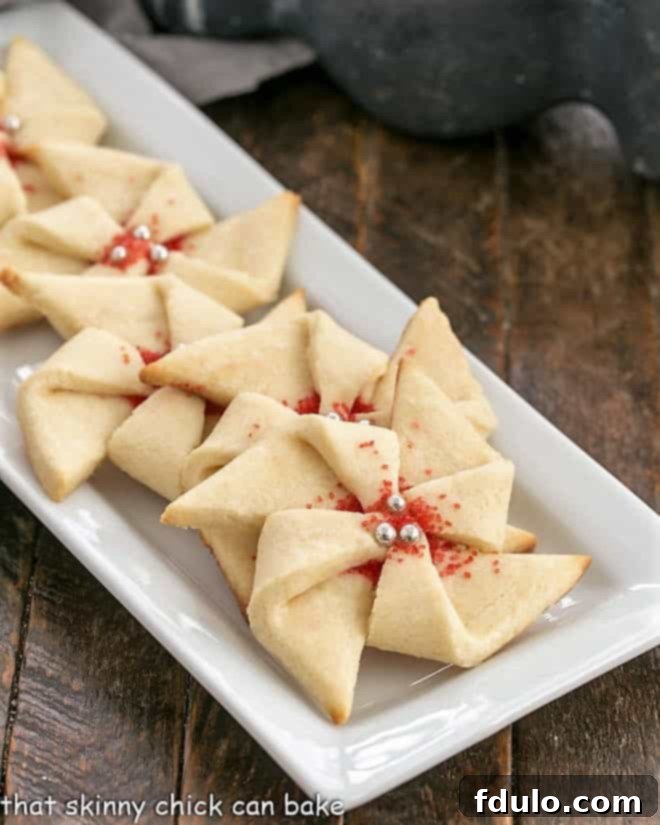
Why These Poinsettia Cookies Are a Must-Bake This Holiday Season
The holiday season is synonymous with delicious treats, and these Poinsettia Cookies stand out as a truly exceptional addition to your baking repertoire. Here’s why you absolutely need to make them:
- Uniquely Festive & Visually Stunning: While classic sugar cookies are always a hit, these Poinsettia Cookies elevate the experience with their distinctive shape and vibrant colors. They’re not just cookies; they’re conversation starters, bringing an unexpected touch of elegance and creativity to your holiday spread. Their resemblance to the beloved poinsettia flower instantly evokes the spirit of Christmas, making them truly special and memorable.
- A Delightful Twist on a Beloved Classic: At their heart, these are tender, buttery sugar cookies – a universally adored treat. We’ve taken a time-honored recipe and given it an exciting, festive makeover, proving that sometimes, a few simple modifications can transform the familiar into the extraordinary. You get the comfort of a classic sugar cookie with the added charm of a holiday design, offering the best of both worlds without the need for intricate frosting.
- The Ultimate Christmas Cookie Exchange Star: (Poinsettia Cookies Shine!) If you participate in cookie exchanges, you know the challenge of bringing something unique and impressive. These Poinsettia Cookies are guaranteed to be a showstopper! Their intricate appearance belies their relatively straightforward preparation, allowing you to impress friends and family with minimal stress. They’re also incredibly sturdy, making them ideal for transport and sharing, ensuring they arrive looking as beautiful as when they left your kitchen.
- A Joyful Baking Experience for All Ages: The process of cutting, folding, and sprinkling these cookies is surprisingly meditative and fun. It’s an excellent activity for involving children in holiday baking, allowing them to contribute to the creation of beautiful treats. The hands-on nature of shaping these cookies adds to the overall enjoyment, making baking a truly memorable family tradition and a wonderful way to create lasting memories together in the kitchen.
Beyond their aesthetic appeal and delicious taste, these cookies offer a chance to infuse your holiday celebrations with homemade warmth and creativity. They embody the spirit of giving and gathering, making every bite a reminder of the joy of the season. They are more than just a sweet treat; they are a delightful centerpiece that truly captures the magic of the holidays.
My journey with these pinwheel cookies began back in November 2012, as a special contribution to a blogger Christmas cookie event. Since then, I’ve continuously refined the recipe, enhancing both its flavor profile and tender texture. My current rendition utilizes my go-to sugar cookie recipe, known for its reliability and deliciousness. This updated approach eliminates the need for any frosting, instead relying on precise cutting, artful twisting, and a colorful dusting of sugar to achieve their signature look. Initially, I adorned these with silver dragees for an extra touch of sparkle, only to later discover their restricted status in California due to FDA guidelines. Don’t worry, I’ll delve into that topic and offer safe, dazzling alternatives below, ensuring your cookies are both beautiful and worry-free!

Crafting Perfect Poinsettia Cookies: A Step-by-Step Guide
Achieving the beautiful, defined shape of Poinsettia Cookies is surprisingly simple, but a few key techniques will ensure your success. The most crucial factors are maintaining a cool dough and using a sharp cutting tool. If your dough becomes too warm and soft, or if your knife isn’t adequately sharp, you risk messy, uneven cuts that won’t twist into those lovely blossom shapes. I often find a pizza cutter excellent for making the initial long, straight cuts for the squares, while a sharp paring knife is indispensable for the more delicate diagonal slices. Let’s walk through the process:
- Prepare and Roll the Dough: Begin by taking approximately half of your chilled sugar cookie dough. On a lightly floured surface, roll it out evenly to a thickness of about 1/8-inch. My preferred method is to roll it slightly larger than the target 9×9-inch square, then use a ruler and a pizza cutter to trim it precisely to size. This ensures crisp, straight edges and a consistent thickness, which is vital for uniform cookies. Place any excess dough scraps and the remaining half of the dough back into the refrigerator to keep them cool and firm.
- Segment the Dough into Squares: Using your ruler and pizza cutter (or a sharp knife), gently mark all four sides of the 9×9-inch rolled dough square at 3-inch and 6-inch intervals. Then, connect these marks to cut the large square into nine perfectly sized 3×3-inch individual squares. This uniform sizing is key to achieving consistent poinsettia shapes, and will make the next steps much easier.
- Prepare for Shaping and Sprinkling: Carefully transfer each dough square to a baking pan lined with parchment paper. This prevents sticking and makes transfer easier later, minimizing disruption to their delicate shape. Next, lightly brush the entire surface of each square with a lightly beaten egg white. This acts as a ‘glue’ for your decorative sugar and helps achieve a lovely golden finish during baking. Generously sprinkle your chosen red sugar in the center of each dough square. This will form the vibrant, festive core of your poinsettia.
- The Crucial Diagonal Slices: This is where the magic begins. With a very sharp paring knife, make a diagonal cut from each corner of the square, moving towards the center. It’s essential to stop your cuts approximately 1/2 inch from the very center, leaving a small, uncut circle in the middle. These four cuts will create eight distinct points around your central sugar area, forming the ‘petals’ of your poinsettia.
- Fold and Form the Poinsettia Petals: Now for the artistic part! Gently fold alternate corners (or points) towards the center of the cookie, carefully pressing where they meet. Imagine you’re folding every other ‘petal’ towards the heart of the blossom. This twisting motion creates the classic pinwheel-like appearance that so beautifully resembles a poinsettia. Press gently but firmly to ensure the folded points adhere to the center and maintain their shape during baking. At this stage, you can add more red sugar or any other desired sprinkles (keeping safety in mind, as discussed below) to the center for extra sparkle and color.
- Repeat and Chill: Continue this process with the remaining dough squares. Collect any dough scraps, gently combine them with the unused portion of dough, and return them to the refrigerator to chill briefly before re-rolling. Keeping the dough cool is paramount for maintaining its shape during handling and baking. If at any point the shaped cookies feel too soft, pop the entire baking sheet into the refrigerator for 10-15 minutes before baking.
- Bake to Perfection: Bake your beautifully shaped cookies according to the recipe’s specific temperature and time recommendations (typically 350°F or 175°C for 9-12 minutes). Watch for the edges to turn a light golden brown, indicating they are perfectly baked. Once removed from the oven, let them cool on the baking sheet for a few minutes before transferring them to a wire rack to cool completely. Then, the most delightful step: dig in and enjoy your festive creations!
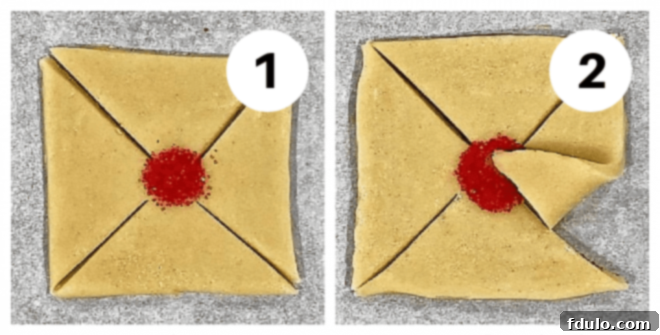
- First, cut your chilled cookie dough into precise squares. Place a vibrant dollop of colored sugar in the middle of each square. Then, using a sharp knife, make slits from each corner, extending towards the edge of the sprinkle area, ensuring you don’t cut all the way through the center.
- Next, take one of the points created by your cuts. Gently fold it upwards and inward, pressing it firmly onto the middle of the sprinkles. This starts to form the elegant pinwheel shape.
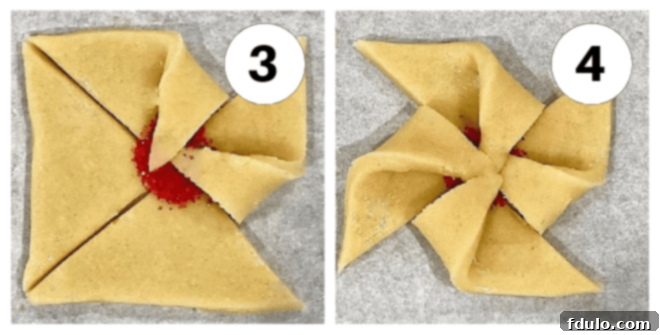
- Continue folding the remaining alternate points. Work your way around the square, bringing every other point to the center and pressing it down firmly. This creates the beautiful layered petal effect, mimicking a poinsettia.
- Once all alternate points are folded, gently but firmly press the entire central area where the points meet. This step is crucial for sealing the dough together, ensuring the cookie maintains its stunning shape during baking. Now, your cookies are ready to be baked as directed in the recipe.
Frequently Asked Questions About Poinsettia Cookies
Baking is full of little nuances, and sometimes a few common questions arise. Here are some of the most frequent queries about making these beautiful Poinsettia Cookies, along with expert advice:
This is a common and important question, especially for those who love to add a touch of sparkle to their holiday treats. According to the U.S. Food and Drug Administration (FDA), silver dragees are classified as a non-edible decoration due to the metallic silver coating. While often sold in other parts of the world and typically used in small quantities, they are actually prohibited from sale for consumption in certain states, such as California. Although there have been no reported deaths directly linked to their ingestion, the FDA’s stance is that silver is not deemed safe for consumption. For safety, particularly when serving children, it’s best to opt for edible alternatives. There’s a wonderful array of sugar decorations, edible glitter, or colorful sprinkles that can provide the same festive sparkle without any concerns, ensuring your cookies are as safe as they are beautiful.
It can be frustrating when beautifully cut cookies spread and lose their intricate details during baking. Several factors contribute to this common issue, especially with cut-out cookies like these poinsettias:
- Dough Temperature: The most frequent culprit is dough that is too warm. Soft dough relaxes quickly in the oven as the butter melts, leading to spreading. Always ensure your dough is thoroughly chilled before rolling and cutting, and if it becomes soft during shaping, return it to the refrigerator for 10-15 minutes before baking.
- Excess Butter or Sugar: A recipe with an overly high ratio of butter or sugar can make dough prone to spreading, as both ingredients melt readily in heat. Ensure you measure your ingredients accurately, preferably using a kitchen scale for precision.
- Warm or Greasy Baking Sheets: Placing chilled dough onto a warm baking sheet will immediately start to melt the butter, causing spread before the structure of the cookie can set. Always use cool baking sheets, ideally lined with parchment paper, which also helps prevent sticking and promotes even baking. Avoid greasing the sheet directly as excess fat can encourage spreading.
- Dough Thickness: If your dough is rolled too thin, it has less structure to hold its shape. Aim for a thickness of about ¼-inch or slightly less (like 1/8-inch as recommended in this recipe) for optimal results, providing enough body to prevent excessive spreading.
- Oven Temperature: An inaccurate oven temperature can also cause issues. If your oven is running too cool, the cookies won’t experience the quick burst of heat needed to set their shape quickly before they have a chance to spread out. Consider investing in an inexpensive oven thermometer to verify your oven’s accuracy.
Once fully cooled, Poinsettia Cookies can be stored in an airtight container at room temperature for up to a week. To maintain their freshness and prevent them from becoming stale, ensure the container is tightly sealed. For longer storage, they freeze exceptionally well. To freeze, arrange cooled cookies in a single layer on a baking sheet to flash freeze for about 30 minutes until solid. Then, transfer them to an airtight freezer-safe bag or container, separating layers with parchment paper to prevent sticking. They can be frozen for up to 3 months. Thaw at room temperature for an hour or two before serving, and they’ll be just as delicious as when freshly baked.
Absolutely! While red sugar creates the classic poinsettia look, feel free to get creative and personalize your cookies. Gold or white nonpareils, edible gold dust, or small white pearl sprinkles can create a beautiful, elegant effect, adding a different kind of festive sparkle. For a fun, kid-friendly twist, you could even use green sprinkles in the center to mimic holly berries, or opt for a cheerful mix of red and green. Just ensure any decorations you choose are clearly labeled as edible and food-safe, especially when serving to children. The possibilities are endless for making these cookies uniquely yours!

Expert Tips for Success and Creative Variations
Mastering these Poinsettia Cookies is all about a few smart techniques and a sprinkle of creativity. Follow these tips for consistently perfect results, and explore some fun variations to make them truly your own, ensuring every batch is a triumph!
- Keep Your Dough Cold: This cannot be stressed enough. Cold dough is stable dough. It’s significantly easier to roll, cuts more cleanly, and holds its intricate shape far better in the oven. If your kitchen is warm or you’re a slow baker, don’t hesitate to pop the dough (or even the cut, unbaked cookies on their baking sheet) back into the fridge for 10-15 minutes whenever it starts to feel soft or sticky.
- Precision Matters for Aesthetics: While baking should be fun, a little precision goes a long way with these cookies. Using a ruler to ensure your squares are evenly sized, and making those diagonal cuts uniform, will result in beautifully symmetrical poinsettias. Even slight variations can impact the final look, so take your time with these steps.
- Sharp Tools Are Your Best Friends: A dull knife will drag and tear your dough, ruining the clean lines needed for the elegant pinwheel effect. Keep your paring knife razor-sharp for the diagonal cuts, and a good pizza cutter will make light work of dividing your rolled dough into squares. Sharp tools make for cleaner cuts and less dough distortion.
- Don’t Overwork the Dough: When re-rolling scraps, handle the dough as little as possible. Overworking develops gluten, which can lead to tougher cookies with a less tender crumb. Gently bring the scraps together, flatten, chill briefly, and then re-roll only as needed.
- Embrace Edible Sparkle: For a dazzling finish, consider using edible glitter or sparkling sugar in various colors. Gold, silver (if edible labeled, unlike traditional dragees), or even iridescent sprinkles can add a magical touch. A tiny dab of royal icing in the center after baking can also act as a ‘glue’ for larger candy pearls or edible flowers if you wish to go all out with your decorations.
Creative Variations:
- Flavor Infusions: Beyond vanilla and almond extract, consider adding a hint of fresh orange zest, a touch of pure peppermint extract (perfect for Christmas!), or even a subtle whisper of cardamom or cinnamon to the dough for a unique and warm flavor profile. These small additions can significantly change the character of the cookie.
- Chocolate Centers: Instead of sprinkles, place a small chocolate candy melt, a mini chocolate chip, or even a tiny piece of white chocolate in the center of each cookie before baking for a delicious, melty surprise and a complementary flavor.
- Savory Twist: While less common for sweet sugar cookies, you could adapt the pinwheel technique for savory appetizers. Imagine using puff pastry with fillings like pesto, cheese, or even tapenade, cut and folded similarly, for a sophisticated party snack.
- Seasonal Adaptations: As mentioned, these cookies are incredibly versatile. Think green sugar for St. Patrick’s Day shamrocks, elegant blue and white for Hanukkah, or a medley of multi-colored sprinkles for a festive birthday celebration or spring garden party. The basic folding technique remains the same, only the decorations and color schemes change to match the occasion!
Explore More Festive Baking Ideas!
If you’ve enjoyed crafting these Poinsettia Cookies, you’re sure to love these other delicious and festive recipes. Expand your holiday baking repertoire or find new favorites for any time of year:
- Holiday Pinwheel Cookies
- Amish Sugar Cookies
- Pecan Tassies (Mini Pecan Pies)
- Linzer Cookie Recipe
- Plus, essential tips on How to Host a Cookie Exchange
- Discover more delightful Cookie Recipes
- Browse a variety of Holiday Recipes
We love connecting with fellow bakers! Stay in touch and share your Poinsettia Cookie creations with us through social media. You can find us on Instagram, Facebook, and Pinterest. Don’t forget to tag us when you try one of our recipes – we’d love to see your beautiful results! And if you absolutely adore these festive cookies, please take a moment to give them a 5-star rating in the recipe card below. Your feedback helps us share the joy of baking!
Festive Poinsettia Cookies Recipe
20 minutes
12 minutes
32 minutes
27-30 cookies
A delicious, festive, and visually stunning sugar cookie that’s absolutely perfect for spreading holiday cheer!
Ingredients
- ½ cup (1 stick) unsalted butter, softened to room temperature
- 3 ounces cream cheese, softened to room temperature
- 1 cup granulated sugar
- 1 large egg, plus 1 egg white (lightly beaten, for brushing)
- ½ teaspoon pure vanilla extract
- ¼ teaspoon almond extract
- ½ teaspoon baking powder
- ¼ teaspoon fine sea salt
- 2 cups all-purpose flour, plus additional for dusting
- Red decorating sugar (or sprinkles of choice)
- Silver dragees (optional, see FAQ for guidance on edibility and alternatives)
Instructions
- Cream Wet Ingredients: In a large bowl, using an electric mixer, beat together the softened butter, cream cheese, and granulated sugar until the mixture is light, fluffy, and well combined (about 2-3 minutes). Scrape down the sides of the bowl as needed.
- Add Flavorings: Beat in the whole egg, vanilla extract, and almond extract until fully incorporated.
- Combine Dry Ingredients: In a separate bowl, whisk together the baking powder, salt, and 2 cups of flour. Gradually add the dry ingredients to the wet ingredients, mixing on low speed just until combined and no streaks of flour remain. Be careful not to overmix to ensure tender cookies. Cover the dough with plastic wrap and refrigerate for at least 1 hour to firm up.
- Preheat Oven & Prep Pans: Preheat your oven to 350°F (175°C). Line several baking sheets with parchment paper and set aside.
- Roll and Cut Dough: On a lightly floured surface, roll out one disk of chilled dough to approximately 1/8-inch thick, aiming for a square slightly larger than 9×9 inches. Using a ruler and a pizza cutter or sharp knife, trim the dough to a precise 9×9-inch square.
- Segment Dough: Cut the 9×9-inch square into nine smaller 3×3-inch squares. Carefully transfer each 3×3-inch dough square to the prepared baking sheets. Gather any dough scraps, gently combine, and return to the refrigerator with the other dough portion for later use.
- Brush & Sprinkle Centers: Lightly brush the surface of each square with the beaten egg white. Generously sprinkle red decorating sugar in the center of each square, leaving about a ½-inch border around the edges.
- Slice & Shape Poinsettias: Using a very sharp paring knife, make a diagonal cut from each corner of the square towards the center, stopping about ¼ to ½ inch from the central sugar (4 cuts per square). Gently fold alternate points (every other point) towards the center of the cookie, overlapping them slightly and pressing gently but firmly to seal them where they meet in the middle, forming a pinwheel.
- Add Decorations: If desired, place 3 silver dragees (if using edible alternatives or in regions where safe) or additional red sugar/sprinkles in the very center of each cookie for added sparkle. Repeat the process with the remaining dough, re-rolling scraps as needed and chilling if the dough gets warm.
- Chill Before Baking (Optional but Recommended): If your shaped cookies have softened significantly after handling, place the baking sheets with the cookies in the refrigerator for 10-15 minutes before baking. This helps them maintain their intricate shape.
- Bake to Golden Perfection: Bake for 9-12 minutes, or until the edges are lightly golden and the cookies are set. Baking time may vary depending on your oven.
- Cool & Serve: Remove the baking sheets from the oven and let the cookies cool on the sheets for a few minutes before carefully transferring them to a wire rack to cool completely. Enjoy your festive Poinsettia Cookies!
Notes
Store cooled Poinsettia Cookies in an airtight container at room temperature for up to one week to maintain freshness.
These cookies freeze beautifully for up to 3 months. Flash freeze them on a baking sheet, then transfer to a freezer-safe container or bag, separating layers with parchment paper. Thaw at room temperature before serving.
Recommended Products
As an Amazon Associate and member of other affiliate programs, I earn from qualifying purchases.
- Pizza Cutter
- French Rolling Pin
- Reynolds Cookie Baking Sheets Non-Stick Parchment Paper, 25 Sheet, 4 Count
- USA Pan Bakeware Half Sheet Pan
Nutrition Information:
Yield:
30
Serving Size:
1 cookie
Amount Per Serving:
Calories: 149Total Fat: 9gSaturated Fat: 5gTrans Fat: 0gUnsaturated Fat: 3gCholesterol: 26mgSodium: 178mgCarbohydrates: 15gFiber: 0gSugar: 4gProtein: 2g
