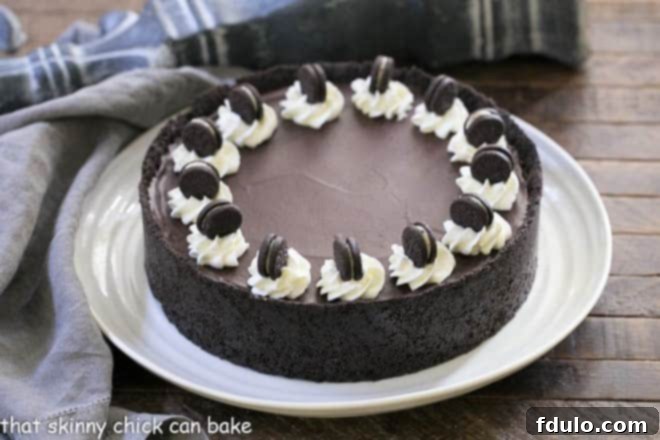
Prepare to be utterly captivated by the ultimate dessert experience: this **No-Bake Oreo Cheesecake**. Imagine an impossibly rich and crunchy Oreo crust, meticulously layered with luscious chocolate ganache, and crowned with a velvety, chocolate chip-speckled cheesecake filling. This magnificent creation redefines decadence, proving that a showstopping dessert doesn’t require a single moment in the oven. If you’ve yet to discover the sheer joy and effortless elegance of a no-bake cheesecake, get ready for a recipe that will undoubtedly become your new go-to. It’s so deliciously rich and satisfying, it promises to impress even the most discerning dessert connoisseur.
With its deep chocolate crust, generous scattering of mini chocolate chips throughout the creamy filling, and a glistening double layer of silky chocolate ganache, this **No-Bake Chocolate Cheesecake** is a masterpiece of flavor and texture. It’s truly impossible to resist, meaning it won’t linger on your dessert table for long!
Why This No-Bake Oreo Cheesecake is a Must-Try
This isn’t just another dessert; it’s a celebration of convenience and indulgence. Designed for both novice bakers and seasoned pros, this no-bake cheesecake eliminates common baking anxieties like cracked tops or uneven cooking. What you get instead is a consistently smooth, rich, and utterly delightful dessert with minimal fuss. It’s particularly perfect for warm weather when turning on the oven is the last thing you want to do, yet you crave something exceptionally satisfying.
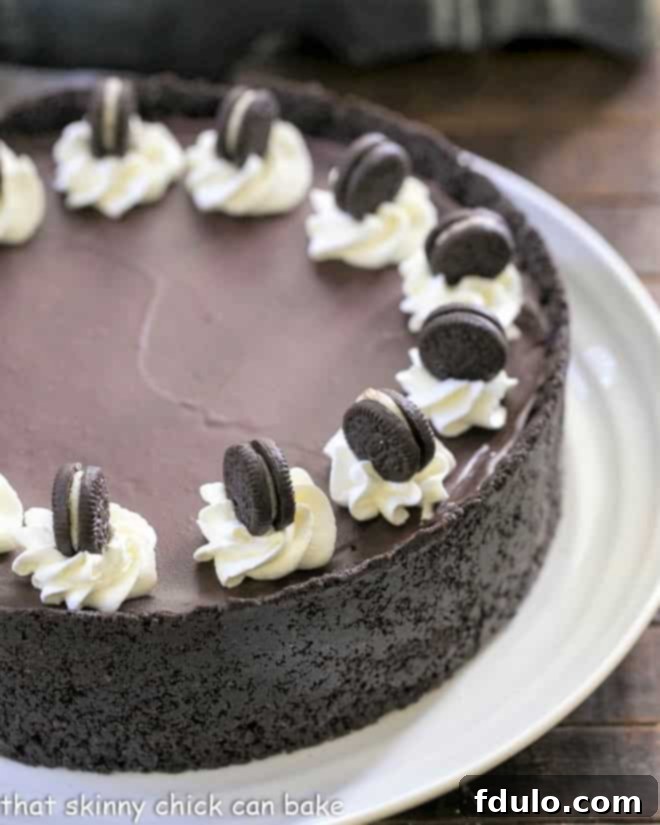
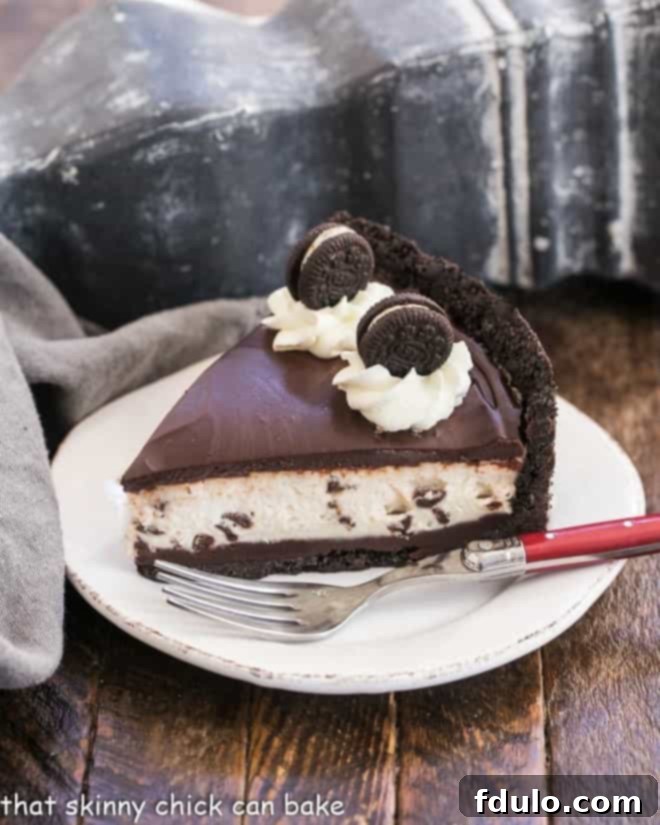
- The Irresistible Oreo Crust: The journey into chocolate heaven begins with the tall, sturdy foundation of this cheesecake: a deep, dark Oreo crust. Made from finely crushed classic Oreo cookies blended with melted butter, this crust provides an unparalleled crunch and a concentrated burst of chocolate flavor that perfectly complements the creamy filling. Its generous height not only offers a beautiful presentation but ensures every bite includes that delightful textural contrast.
- Layers of Luxurious Chocolate Ganache: This recipe takes indulgence to the next level with not one, but two distinct layers of rich chocolate ganache. A decadent layer is carefully spread over the chilled Oreo crust, acting as a delicious barrier and adding another dimension of chocolatey depth. The final layer, poured over the set cheesecake, provides a glossy, smooth finish that’s as beautiful to behold as it is delicious to taste, ensuring chocolate in every single forkful.
- The Creamy Chocolate Chip Filling: While the supporting acts are undeniably stellar, the cheesecake filling itself is the true star. Flavored with pure vanilla extract for a classic, comforting taste, the filling is generously speckled with mini chocolate chips. These tiny bursts of chocolate melt slightly on the tongue, creating a harmonious blend of creamy, sweet, and subtly bitter notes that make the cheesecake filling genuinely unforgettable.
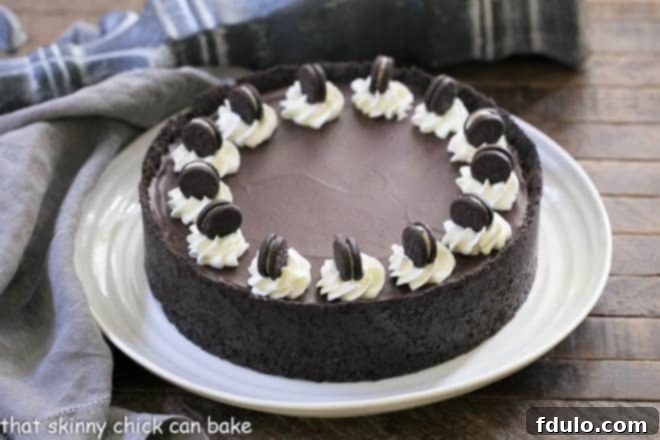
- A Feast for Chocolate Lovers: This is a dessert crafted specifically for those who truly adore chocolate. From the very first bite of the thick Oreo crust to the final flourish of mini Oreos circling the perimeter, this cheesecake delivers a consistent and varied chocolate experience. It’s a symphony of chocolate in multiple forms and textures – crunchy, creamy, smooth, and decadent – making it an absolute dream come true for any chocolate enthusiast.
The Allure of No-Bake Cheesecakes
No-bake cheesecakes hold a special place in the dessert world, offering a delightful blend of simplicity and sophistication. Unlike their baked counterparts, which can sometimes be intimidating with their requirements for water baths, precise oven temperatures, and careful cooling to prevent cracks, no-bake versions are incredibly forgiving. They rely on the magic of chilling to achieve their firm yet creamy texture, making them ideal for busy schedules or those new to dessert making.
The beauty of a no-bake cheesecake lies in its straightforward preparation. Most of the work involves mixing and chilling, transforming simple ingredients into an elegant dessert with minimal hands-on time. This makes them perfect for entertaining, as you can prepare them well in advance, freeing up your time to enjoy your guests. Plus, the absence of eggs and flour results in a lighter, yet still wonderfully rich, texture that’s refreshing, especially during warmer months. It’s a win-win for flavor and convenience.
Key Ingredients for the Perfect No-Bake Oreo Cheesecake
Achieving a truly exceptional no-bake cheesecake starts with understanding the role of each ingredient. Quality and proper preparation of your components are paramount to the success of this creamy, dreamy dessert. Here’s a closer look at what you’ll need and why:
- Kitchen Staples – Butter (salted is fine): Butter is crucial for binding the cookie crumbs together to form a sturdy crust. While unsalted butter is often preferred in baking for precise control over saltiness, salted butter works perfectly here, adding a subtle depth of flavor that complements the sweet Oreo crust. Ensure it’s fully melted for easy incorporation.
- Regular Oreos – Ground in a food processor to make crumbs for the crust: The star of our crust! Classic Oreo cookies provide the iconic flavor and texture. Using a food processor ensures finely ground crumbs, which are essential for a tightly packed, uniform crust that holds its shape beautifully. Don’t worry about removing the cream filling; it adds to the richness.
- Mini Oreos – to garnish if desired: These adorable mini versions are purely for aesthetic appeal and an extra touch of Oreo delight. They make a fantastic decorative element, enhancing the cheesecake’s visual appeal and reinforcing the Oreo theme. While optional, they add a professional and playful touch.
- Chocolate Chips – Both regular and mini chocolate chips: You’ll need chocolate chips for two components: the luscious ganache layers and the creamy cheesecake filling. Regular chocolate chips are ideal for the ganache, melting smoothly to create a rich, pourable sauce. Mini chocolate chips are perfect for folding into the cheesecake batter, as their smaller size ensures even distribution and prevents them from sinking, providing delightful pockets of chocolate in every bite.
- Cream Cheese – Have it at room temperature for easy incorporation and the smoothest filling. Use the bricks of cream cheese, not the soft cream cheese in tubs: This is perhaps the most critical ingredient for the cheesecake’s texture. Always use full-fat cream cheese sold in brick form, as it contains less water and more stabilizers, which are crucial for a firm set in a no-bake recipe. Ensure it’s at room temperature for at least two hours; this allows it to whip up incredibly smooth and lump-free, creating that signature silky cheesecake texture.
- Heavy Cream – Must be whipped to firm or stiff peaks to give the cheesecake structure. Use heavy cream with 36-40% butterfat for the best results: Heavy cream is what gives this no-bake cheesecake its light, airy, yet stable structure. It must be whipped to firm or stiff peaks before being folded into the cream cheese mixture. Look for heavy cream or heavy whipping cream with a butterfat content of 36-40% for optimal whipping ability and a stable, rich filling.
- Powdered Sugar – Sift to remove lumps: Powdered sugar (confectioners’ sugar) not only sweetens the cheesecake filling but also contributes to its smooth texture. Sifting it before use is a non-negotiable step to prevent any lumps from marring the velvety consistency of your cheesecake.
- Sour Cream – Have at room temperature for the easiest incorporation: A touch of sour cream adds a subtle tang that balances the sweetness of the cheesecake, enhancing its overall flavor profile. Like cream cheese, ensure it’s at room temperature to blend seamlessly into the batter, preventing any curdled appearance or textural inconsistencies.
- Vanilla Extract – Make sure you always use real vanilla extract and never artificially flavored. It will be more expensive but tastes much better: The quality of your vanilla can significantly impact the final flavor. Opt for pure vanilla extract over imitation vanilla. While it might be a bit pricier, the rich, complex, and aromatic notes of real vanilla are indispensable for a truly exceptional dessert. Read labels carefully to ensure you’re getting the genuine article.
Crafting Your No-Bake Oreo Cheesecake: A Step-by-Step Guide
The beauty of a no-bake cheesecake lies in its simplicity and the absence of an oven. Since these cheesecakes don’t contain eggs or flour, they set beautifully in the refrigerator or freezer, yielding a consistently smooth and creamy texture without the risks associated with traditional baking. Follow these steps to create your perfect No-Bake Oreo Cheesecake:
- The Foundation – Perfecting the Oreo Crust: Begin by preparing your springform pan, which is an ideal choice for cheesecakes as its removable sides allow for easy unmolding without damaging the dessert. Combine finely crushed Oreo cookies with melted butter until thoroughly moistened. Press this mixture firmly into the bottom and slightly up the sides of the prepared pan. A well-compacted crust is key to stability. This initial chilling step, typically around 30 minutes, is crucial as it solidifies the butter, firming up the crust and preventing it from crumbling when sliced.
- The First Layer of Decadence – Chocolate Ganache: This cheesecake features a double dose of ganache goodness. Prepare the first batch by gently heating heavy cream until almost boiling, then pouring it over chocolate chips. Allow it to sit for a minute to melt the chocolate, then stir until you achieve a silky-smooth, glossy ganache. Immediately pour this over your chilled Oreo crust and return it to the refrigerator for another 30 minutes. This creates a delightful layer that seals the crust and adds an extra dimension of chocolate flavor.
- The Star – Creamy Cheesecake Filling: With your base ready, it’s time to create the star of the show. Ensure your cream cheese and sour cream are at room temperature – this is vital for a smooth, lump-free filling. In one bowl, whip heavy cream to firm peaks; this will give your cheesecake its essential structure and airy texture. In a separate bowl, beat the softened cream cheese until exceptionally smooth, then gradually incorporate powdered sugar, sour cream, and pure vanilla extract. Finally, gently fold in the whipped cream and mini chocolate chips using a rubber spatula, preserving the airiness of the mixture.
- Assembling the Layers: Carefully spoon or pour the creamy cheesecake batter over the chilled ganache layer in your springform pan. Use an offset spatula to gently spread the filling evenly and smooth the top. Once assembled, cover the cheesecake and transfer it to the freezer for a minimum of 2 hours. This extended chill time is essential for the cheesecake to fully set and achieve its sliceable consistency.
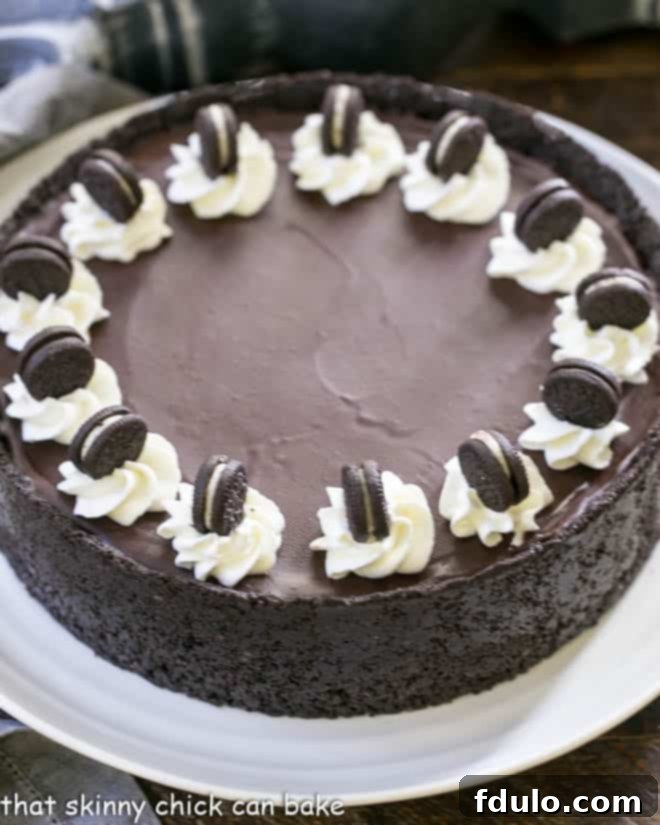
- The Final Flourish – Top Ganache & Garnish: Just before serving, prepare the second batch of ganache in the same manner as the first. Once smooth and slightly cooled (but still pourable), spread it carefully over the firm cheesecake layer. Freeze again for about 10 minutes to allow this top layer to set. After this final chill, delicately remove the sides of the springform pan. Now, for the artistic touch: pipe swirls of lightly sweetened whipped cream around the perimeter and nestle a mini Oreo into each swirl. This not only enhances the visual appeal but adds another delicious textural element.
Mastering Your No-Bake Cheesecake: Expert Tips for Success
Crafting a flawless no-bake cheesecake is incredibly rewarding, and a few expert tips can elevate your results from good to absolutely spectacular. Paying attention to these details will ensure a smooth texture, perfect set, and beautiful presentation every time.
- Temperature Matters for Creaminess: The single most important tip for a lump-free and silky cheesecake filling is to use room temperature cream cheese and sour cream. When these ingredients are softened, they combine effortlessly with sugar and other liquids, preventing any unwanted curdling or grainy textures. Plan ahead and take them out of the refrigerator at least 2 hours before you begin mixing.
- Achieve Stiff Peaks for Structure: The whipped heavy cream is the primary setting agent in a no-bake cheesecake. It’s crucial to whip it to firm or stiff peaks. This means when you lift the beaters from the bowl, the peaks of whipped cream stand tall and straight without flopping over. If your cream isn’t whipped adequately, the cheesecake filling will be too loose and won’t hold its shape when sliced, resulting in a runny, disappointing texture.
- The Art of Folding: Once your heavy cream is perfectly whipped, incorporating it into the cream cheese mixture requires a gentle touch. This technique, known as folding, involves lightly lifting and turning the mixture over itself with a rubber spatula. This method preserves the air you’ve incorporated into the whipped cream, which is vital for maintaining a light and airy consistency in your cheesecake. Avoid vigorous stirring, as this will deflate the cream and compromise the cheesecake’s structure.
- Creative Garnish Ideas: While mini Oreos and whipped cream are classic and delightful, feel free to get creative with your garnishes. A 1M piping tip is excellent for creating elegant swirls of whipped cream, making your cheesecake look professionally decorated. Beyond mini Oreos, consider chocolate shavings, a drizzle of caramel sauce, fresh berries, or even a sprinkle of cocoa powder for an extra touch of sophistication and flavor.
Customizing Your No-Bake Oreo Cheesecake
One of the many joys of no-bake cheesecakes is their incredible versatility. While this Oreo version is a classic for a reason, don’t hesitate to experiment and make it your own! For the crust, consider other types of cookies like graham crackers, vanilla wafers, or even peanut butter cookies for a different flavor profile. You can also experiment with mix-ins for the filling; try different flavored chocolate chips, chopped candy bars (like Snickers or Butterfinger), crushed cookies, or even a swirl of fruit puree for a touch of brightness.
The top ganache layer can also be customized. While chocolate is divine, you could use white chocolate ganache for a contrasting look, or infuse it with a hint of coffee or mint extract. Seasonal fresh fruits like strawberries, raspberries, or blueberries make excellent toppings, adding vibrant color and a fresh, tart counterpoint to the rich chocolate. A sprinkle of sea salt on top of the ganache can also elevate the flavors by providing a delightful sweet and salty contrast.
Serving and Presentation Tips
Presenting your No-Bake Oreo Cheesecake beautifully is just as important as making it taste incredible. Once fully chilled and firm, carefully remove the springform pan sides. For clean slices, use a sharp, thin knife dipped in hot water and wiped dry between each cut. This creates crisp edges and a professional appearance. Garnish individual slices with a dollop of extra whipped cream, a few fresh berries, or a dusting of cocoa powder for an elegant touch.
Consider serving this cheesecake with a light accompaniment to balance its richness. A side of fresh fruit salad, a scoop of vanilla bean ice cream, or a small cup of strong black coffee can wonderfully complement the decadent flavors. For an extra special occasion, a light drizzle of raspberry coulis or a sprinkle of toasted nuts can add another layer of sophistication and texture, transforming a simple dessert into a memorable culinary experience.
Frequently Asked Questions About No-Bake Cheesecakes
A no-bake cheesecake, when properly stored, can be safely kept in the refrigerator for 3 to 5 days. It’s crucial to ensure it hasn’t been left out at room temperature for more than 2 hours in total, as dairy products can quickly spoil. For best quality, especially regarding garnishes like mini Oreos or whipped cream, which may soften over time, it’s often best enjoyed within 3 days. Always keep it tightly covered with plastic wrap to prevent it from absorbing odors or drying out.
Absolutely, both traditional baked and no-bake cheesecakes freeze exceptionally well, making them an excellent make-ahead dessert option. Once your cheesecake is fully chilled and set, wrap it tightly first in plastic wrap, then in aluminum foil. It can be frozen for up to 3 months. Keeping the cheesecake in its springform pan during freezing offers additional protection. For individual servings, slice the cheesecake into wedges before freezing, then wrap each piece separately. This allows you to remove and defrost just the right amount for a quick, decadent dessert whenever a craving strikes. Defrost in the refrigerator for several hours or overnight.
Several factors can contribute to a no-bake cheesecake filling that fails to set properly. The most common culprit is often the whipped cream; if it’s not beaten to firm or stiff peaks, it won’t provide the necessary structure to the filling. The other critical factor is the cream cheese itself. You must use full-fat cream cheese in brick form, not the spreadable cream cheese found in tubs or any low-fat varieties, as these contain too much water and insufficient stabilizers for a firm set. Additionally, ensure all dairy ingredients are at room temperature before mixing, as cold ingredients can inhibit proper emulsion and thickening.
A springform pan is a type of bakeware with sides that can be removed from the base. It typically consists of a base and a removable ring that is clamped around it with a spring mechanism. This design is highly recommended for cheesecakes (both baked and no-bake) because it allows you to easily release the delicate dessert without inverting it or running a knife around the edges, which could damage its structure or presentation. This preserves the integrity of your beautiful cheesecake, making it effortless to transfer to a serving plate.
Explore More Decadent Dessert Recipes
If you’ve fallen in love with the ease and deliciousness of this No-Bake Oreo Cheesecake, you’re in for a treat! Our collection of dessert recipes is brimming with delightful options that are sure to satisfy any sweet craving, from classic baked goods to more innovative no-bake wonders. Whether you’re planning a special occasion or simply looking for a new family favorite, we have something to inspire every baker. Dive into these tempting creations:
- Strawberry Cheesecake Bars
- Tiramisu Cheesecake
- Mini Vanilla Bean Cheesecakes
- Ganache Topped Cheesecake
- Strawberry Topped Cheesecake
- Twix Cheesecake
- And for a small crowd, try this fabulous Mini 4 Inch Instant Pot Cheesecake
- More of my Best Dessert Recipes
Stay connected with us for more delicious recipes and baking inspiration! Find us on Instagram, Facebook, and Pinterest. Don’t forget to tag us when you create one of our recipes! We love seeing your culinary masterpieces. If you adore this recipe, please consider leaving a 5-star rating in the recipe card below.
No Bake Oreo Cheesecake
40 minutes
2 hours 40 minutes
3 hours 20 minutes
12 servings
A luscious no-bake cheesecake with an Oreo crust, 2 layers of chocolate ganache and a creamy cheesecake filling with mini chocolate chips.
Ingredients
Crust
- 14 ounces Oreos, processed in a food processor
- 8 tablespoons salted butter melted
Ganache to top the crust
- 1 cup chocolate chips
- ⅓ cup heavy cream
Cheesecake Filling
- ½ cup heavy cream
- 20 ounces of cream cheese, at room temperature
- ½ cup powdered sugar
- ½ cup sour cream
- 1 teaspoon vanilla
- ½ cup mini chocolate chips
Ganache to top the cheesecake
- ¼ cup + 2 tablespoons heavy cream
- 1 cup chocolate chips
Garnish
- Sweetened whipped cream
- Mini Oreos
Instructions
- Spray a 9-inch springform pan with nonstick spray. Set aside.
- To make the crust, mix the melted butter and cookie crumbs. Press crumbs into the bottom and up the sides of the springform pan. Chill for 30 minutes.
- Make the first batch of ganache. Heat cream in a microwave-safe bowl to almost a boil. Add the chocolate chips and cover the bowl with a paper towel for one minute. Stir until smooth, pour over the bottom of the crust, then chill again for 30 minutes.
- To make the cheesecake filling, beat the cream to stiff peaks and set it aside. In another bowl, beat the cream cheese until smooth. Add sugar and mix, then add the sour cream and vanilla. Fold in the whipped cream and the mini chocolate chips.
- Pour the cheesecake mixture over the ganache in the crust. Cover and freeze for 2 hours.
- To make the ganache topping, heat the cream in a microwave-safe bowl to almost a boil. Add the chocolate chips and cover with a paper towel for one minute. Stir until smooth and spread over the cold cheesecake.
- Freeze for 10 minutes, then remove the springform sides and transfer to the cake plate if desired. Garnish with piped whipped cream swirls around the perimeter and insert a mini Oreo into each swirl.
Notes
Total time does not include freezing times between steps.
This recipe is adapted from Hugs and Cookies XOXO
Recommended Products
As an Amazon Associate and member of other affiliate programs, I earn from qualifying purchases.
- Nielsen-Massey Madagascar Bourbon Pure Vanilla Extract, 4 ounces
- Nordic Ware Leakproof Springform Pan, 10 Cup, 9 Inch
- KitchenAid KSM150PSER Artisan Tilt-Head Stand Mixer with Pouring Shield, 5-Quart, Empire Red
Nutrition Information:
Yield:
12
Serving Size:
1
Amount Per Serving:
Calories: 669Total Fat: 50gSaturated Fat: 28gTrans Fat: 1gUnsaturated Fat: 18gCholesterol: 96mgSodium: 354mgCarbohydrates: 56gFiber: 3gSugar: 41gProtein: 7g
HOW MUCH DID YOU LOVE THIS RECIPE?
Please leave a comment on the blog or share a photo on Pinterest
