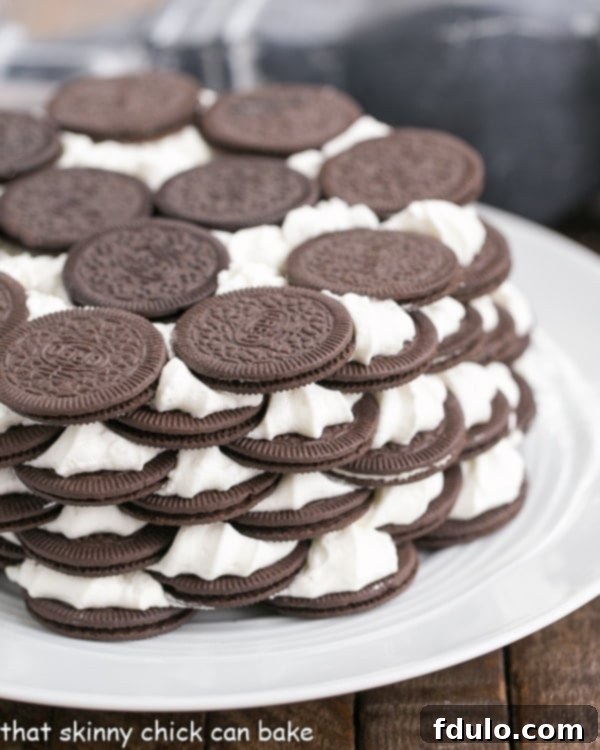
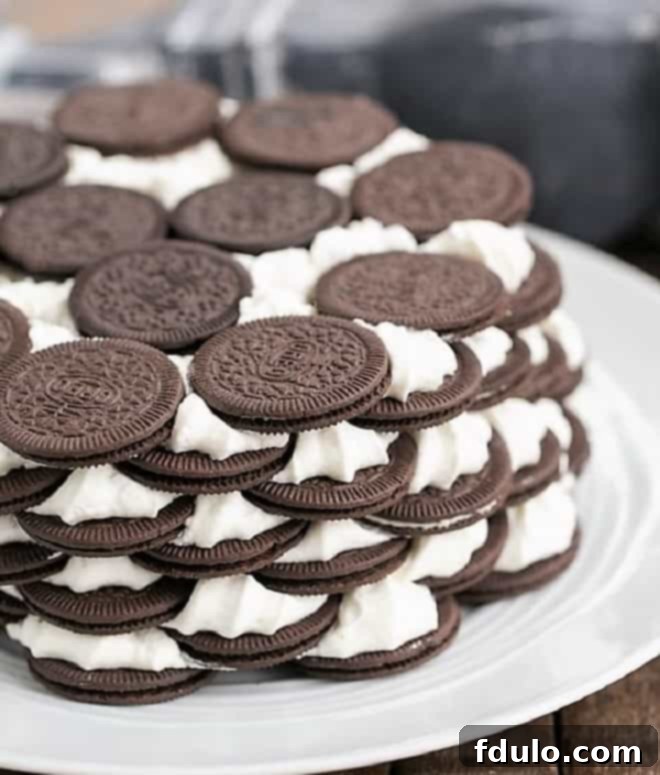
The Ultimate No-Bake Oreo Icebox Cake: A Dream Dessert in Just 3 Ingredients
Imagine a dessert that requires no baking, minimal effort, and only three simple ingredients, yet delivers an explosion of rich chocolate and creamy delight. That’s precisely what you get with this spectacular No-Bake Oreo Icebox Cake! Perfect for busy schedules or when you simply want to impress without the stress, this easy-to-make treat will quickly become a household favorite. Just a little stacking, an overnight chill, and you’ll be serving up a slice of pure happiness that will thrill chocoholics and Oreo enthusiasts alike.
This classic dessert concept, reimagined with the iconic Oreo cookie, offers an irresistible combination of textures and flavors. The magic happens as the crisp Oreo Thins soften overnight, transforming into a tender, cake-like texture, perfectly complemented by layers of fluffy, sweetened whipped cream. It’s an effortlessly elegant dessert that tastes far more complex than its simple preparation suggests. Get ready to add whipped cream and a couple of boxes of Oreo Thins to your shopping list, because this marvelous creation is calling your name!

Why This No-Bake Oreo Icebox Cake Will Be Your New Favorite
There are countless reasons why this No-Bake Oreo Icebox Cake recipe deserves a prime spot in your dessert repertoire. Beyond its undeniably delicious taste, it offers unparalleled convenience and versatility, making it ideal for any occasion.
- Effortless Preparation: With just three core ingredients and no oven required, this dessert is a breeze to assemble. You can have it ready for the refrigerator in under 20 minutes, leaving you more time to enjoy your day.
- A True Time-Saver: Unlike traditional baked cakes that demand precise timing and attention, this icebox cake simply needs to be layered and chilled. The overnight refrigeration does all the heavy lifting, allowing the flavors to meld and textures to transform beautifully.
- Perfect for Planning Ahead: Because it requires an overnight chill, this icebox cake is the ultimate make-ahead dessert. Prepare it the day before your event or gathering, and simply pull it out of the fridge when it’s time to serve. This takes the pressure off last-minute dessert preparations.
- Crowd-Pleasing Flavors: Oreos are a universally loved cookie, and when combined with sweet, airy whipped cream, they create a dessert that appeals to almost everyone. It’s a guaranteed hit at parties, potlucks, or family dinners.
- Minimal Cleanup: No flour, no eggs, no complex mixing bowls means significantly less cleanup after you’re done. A few utensils and a serving plate are all you’ll need.
The Enduring Charm of Icebox Cakes
The concept of an “icebox cake” is a delightful culinary tradition with roots in early 20th-century America. Before the widespread adoption of electric refrigerators, people used “iceboxes” – insulated cabinets cooled by large blocks of ice – to keep food fresh. As these new appliances revolutionized home kitchens in the 1930s, food companies actively promoted recipes that showcased their capabilities. The icebox cake became a star, requiring no oven and relying solely on the chilling power of the icebox or refrigerator.
Typically, these cakes feature layers of crisp cookies (like chocolate wafers or graham crackers) alternated with rich cream. The magic lies in the chilling process: as the cake rests, the moisture from the cream slowly softens the cookies, transforming them into a tender, cake-like consistency. This simple yet ingenious method created a “baked” dessert without the heat, making it particularly popular during hot summer months and cementing its place as a beloved no-bake classic. Our Oreo Icebox Cake is a modern twist on this cherished vintage dessert, bringing contemporary flavor to a timeless concept.
Decoding the Simple Ingredients for Perfect Results
The beauty of this 3-ingredient Oreo Icebox Cake lies in its simplicity, but understanding each component ensures a flawless outcome every time.
Oreo Thins: The Foundation of Flavor and Texture
For this particular recipe, Oreo Thins are highly recommended. Their slender profile allows them to absorb moisture from the whipped cream more efficiently and soften beautifully, creating a tender, cake-like texture after chilling. The classic chocolate flavor of Oreos provides a rich, satisfying base that pairs perfectly with the creamy filling.
- Why Thins? Regular Oreos can be used in a pinch, but they are thicker and might require a slightly longer chilling time or a bit more whipped cream between layers to achieve the desired soft consistency.
- Delicious Alternatives: If Oreo Thins are unavailable, or if you wish to experiment, Nabisco Famous Chocolate Wafers are the traditional choice for many icebox cakes and provide an excellent, deep chocolate flavor. Graham crackers or ladyfingers can also be wonderful substitutes, offering a different flavor profile and texture experience. Consider other Oreo varieties too, such as Mint Oreos for a refreshing twist, or Golden Oreos for a vanilla-based treat.
Heavy Cream: The Cloud-Like Filling
The key to light, airy, and stable whipped cream is using heavy cream. It’s crucial for achieving that delightful, billowy texture that holds up well in the cake.
- Fat Content Matters: For best results, use heavy cream that contains at least 36% milk fat. This high-fat content is what allows the cream to whip into firm, stable peaks. “Whipping cream” typically has 30-35% fat and works well, while “double cream” (often found in the UK) has an even higher fat content (around 48%) and whips beautifully. Single cream, with its lower fat content, is not suitable for making whipped cream as it won’t hold its shape.
- Temperature is Key: Always start with very cold heavy cream. Chilling your mixing bowl and whisk attachments in the freezer for 10-15 minutes beforehand can significantly aid in achieving perfect, stable whipped cream more quickly. Cold cream whips faster and holds its peaks better.
- Whipping Tips: Beat the cream on medium-high speed until soft peaks form. Be careful not to over-whip, as it can quickly turn into butter. Soft peaks will hold their shape but still have a gentle curl at the tip when you lift the whisk.
Powdered Sugar: Sweetness and Stability
While the Oreos provide plenty of sweetness, adding a touch of powdered sugar to your whipped cream enhances the flavor and contributes to its stability.
- Dual Purpose: Powdered sugar (also known as confectioners’ sugar) contains cornstarch, which acts as a stabilizer for the whipped cream, helping it maintain its volume and texture for longer. This is particularly beneficial in a make-ahead dessert like an icebox cake.
- Adjust to Taste: The amount of powdered sugar can be adjusted based on your preference for sweetness. If you prefer a less sweet dessert, you can reduce or even omit the sugar entirely, relying on the Oreos for sweetness.

Step-by-Step Guide to Crafting Your Oreo Icebox Cake
Creating this delightful Oreo Icebox Cake is incredibly straightforward. Follow these detailed steps for a perfectly layered and deliciously creamy dessert.
- Prepare the Whipped Cream: Start by pouring your cold heavy cream into a chilled mixing bowl. If you’re adding powdered sugar, sift it first to prevent lumps, then add it to the cream. Using an electric mixer (handheld or stand mixer with a whisk attachment), beat the cream on medium-high speed. Continue beating until soft peaks form. This means when you lift the whisk, the cream will hold its shape but the very tip will gently curl over. Be vigilant, as over-whipping can turn it grainy or even into butter.
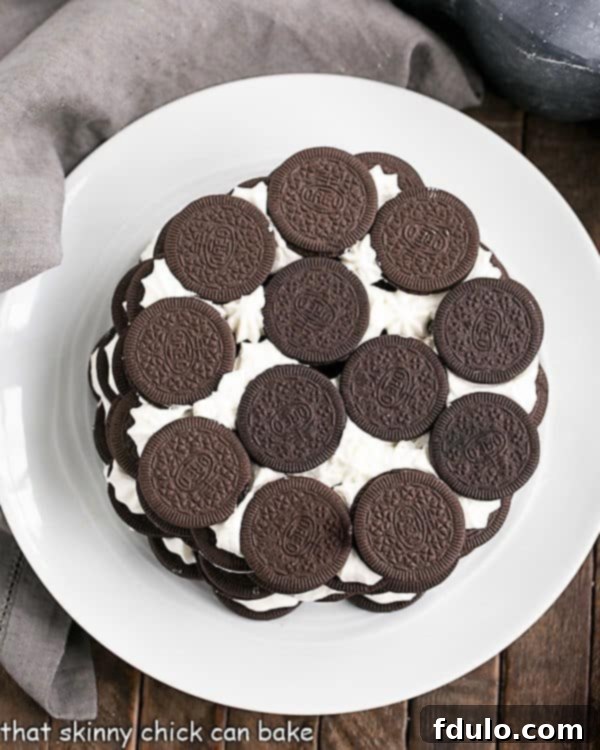
- Assemble the First Layer of Oreos: Choose your serving plate or dish. For a classic round cake, begin by arranging Oreo Thins in a circular pattern. Start with three cookies in the center, then create a ring of nine more around them, filling any gaps to form a solid layer. The goal is to create a sturdy, flat base for your cake. If using a square or rectangular dish, simply arrange the cookies to cover the bottom evenly.
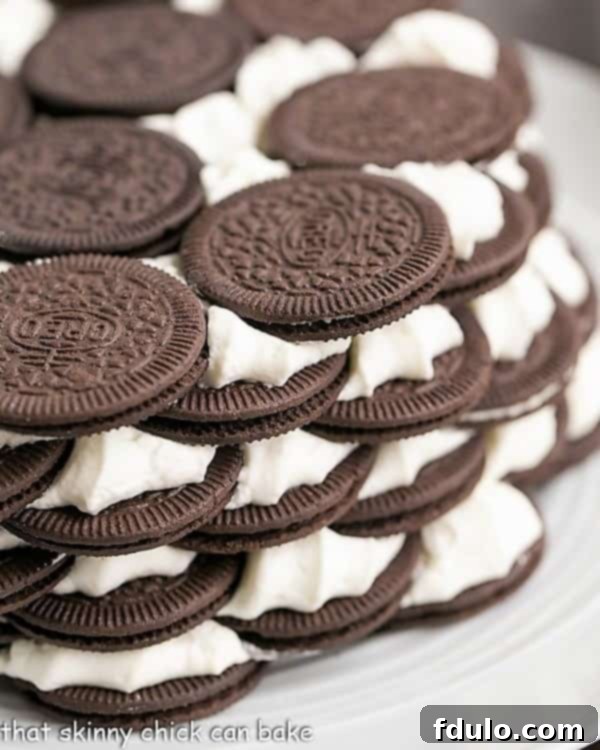
- Add the First Layer of Whipped Cream: Once your cookie base is set, generously spread or pipe a layer of your prepared whipped cream over the Oreos. Aim for an even thickness across the entire layer. If you’re using a piping bag with a star tip, this is where you can create a more decorative finish by piping swirls or dollops of cream. If spreading, use an offset spatula for a smooth surface.
- Repeat the Layers: Continue alternating layers of Oreo Thins and whipped cream. For each cookie layer, try to align the cookies as closely as possible to the previous layer to maintain a consistent shape for your cake. Stack carefully, ensuring each layer is as level as possible before adding the next. This attention to detail helps create a beautiful, even cross-section when you slice into the cake.
- The Final Layer and Chill: Finish with a generous layer of whipped cream on top. You can smooth it out for a clean look or create decorative swirls. For an extra touch, you can crush a few additional Oreo Thins and sprinkle them over the top. Once assembled, cover the cake loosely with plastic wrap and refrigerate it overnight. This extended chill time is crucial; it allows the cookies to fully absorb the moisture from the cream, transforming them into that wonderful cake-like texture.
- Serve and Enjoy: After at least 8-12 hours of chilling, your Oreo Icebox Cake is ready to be sliced and served. The knife should glide through easily thanks to the softened cookies. For clean slices, wipe your knife clean between each cut.
Expert Tips & Creative Variations
Elevate your Oreo Icebox Cake with these expert tips and fun variations, making it uniquely yours every time.
Achieving a Flawless Presentation
- Level Layers are Key: The most “difficult” part of this incredibly easy recipe is ensuring your cookie layers are level. Take a moment to eyeball each layer before adding the whipped cream. A flat surface means a neater slice.
- Piping for Perfection: For a more formal or polished look, use a piping bag fitted with a large star tip (like Wilton 1M) to apply the whipped cream. This creates beautiful ridges and makes for an impressive presentation. Alternatively, simply drop dollops of whipped cream over each cookie layer and gently spread.
- Clean Cuts: Once chilled, the cake will be easy to slice. For ultra-clean cuts, dip your knife in hot water and wipe it clean between each slice. This creates sharp, appealing portions.
Customizing Your Icebox Cake
The basic Oreo Icebox Cake recipe is a fantastic canvas for creativity. Don’t hesitate to experiment with different flavors and toppings:
- Flavor the Cream: Add a teaspoon of vanilla extract, almond extract, or a touch of coffee extract to your whipped cream for an extra dimension of flavor. A tablespoon of cocoa powder can transform it into a chocolate whipped cream, intensifying the overall chocolate experience.
- Cookie Combinations: While Oreo Thins are recommended, consider using other Oreo flavors. Mint Oreos with a hint of mint extract in the cream, or peanut butter Oreos for a nutty twist, are excellent choices.
- Delicious Toppings: Before serving, consider garnishing your cake with fresh berries (strawberries, raspberries), chocolate shavings, a drizzle of chocolate sauce or caramel, or a sprinkle of colorful sprinkles for a festive touch. Crushed nuts can also add a textural contrast.
- Layered Additions: Between your cream layers, you could also add a thin layer of fruit preserves, mini chocolate chips, or finely chopped candy bars for an additional surprise element.
Frequently Asked Questions About No-Bake Icebox Cakes
Here are some common questions about this delightful dessert, providing you with all the information you need for success.
What exactly is an Icebox Cake?
An icebox cake, also known as a refrigerator cake, is a no-bake dessert typically made by layering crisp cookies or wafers with whipped cream or custard. The magic of this dessert unfolds during the chilling process; as the cake rests in the refrigerator, the moisture from the cream gradually softens the cookies, transforming them into a tender, cake-like texture. This results in an incredibly easy, delicious, and sliceable dessert that requires minimal effort and no baking.
How do you cut an Icebox Cake for serving?
Once your icebox cake has properly chilled overnight and the cookies have softened, cutting it becomes quite easy. Use a sharp knife to slice through the layers. For the cleanest possible slices, especially if presentation is key, we recommend wiping the knife blade clean with a warm, damp cloth between each cut. This prevents the cream from sticking and ensures each slice looks as perfect as it tastes.
What are the best ways to store this Oreo Icebox Cake?
Due to the whipped cream content, an icebox cake must always be stored in the refrigerator. It will keep well, covered, in the fridge for 2-3 days. For longer storage, icebox cakes freeze exceptionally well! Wrap the cake tightly in plastic wrap and then in foil, and it can be frozen for up to a month. To serve after freezing, simply transfer it to the refrigerator to defrost overnight.
Can I use regular Oreos instead of Oreo Thins for this recipe?
Yes, you absolutely can use regular Oreos if you can’t find Oreo Thins or prefer them! However, regular Oreos are thicker, which means they might require a bit more whipped cream between layers to ensure they soften adequately. You might also need to extend the overnight chilling time by a few extra hours to allow the thicker cookies to fully absorb the moisture and achieve that desired tender, cake-like consistency. Be patient, and your regular Oreo icebox cake will be just as delicious!

Your Easy 3-Ingredient No-Bake Oreo Icebox Cake Recipe
The Recipe: No Bake Oreo Icebox Cake
A super easy no-bake icebox cake with just 3 ingredients. Adapted for ultimate simplicity and deliciousness.
Ingredients
- 2 boxes Oreo Thins
- 2 cups heavy cream (cold, minimum 36% fat)
- ½ cup powdered sugar, sifted (optional, adjust to taste)
Instructions
- In a chilled bowl, beat the cold heavy cream to soft peaks. If desired, gradually add the sifted powdered sugar during the whipping process until fully incorporated and cream holds soft peaks. Be careful not to over-whip.
- On a small, round cake plate or serving dish, arrange a layer of Oreo Thins in a circular pattern. Typically, this might involve placing 3 cookies in the center and then forming a ring of 9 cookies around them to create an even layer.
- Spread or pipe a generous layer of the whipped cream evenly over the cookies.
- Repeat the layering process, placing another layer of Oreo Thins in a circular pattern, followed by another layer of whipped cream. Continue until you have used all the cookies, finishing with a final layer of whipped cream on top.
- Cover the cake loosely with plastic wrap and chill in the refrigerator overnight (for at least 8-12 hours). This allows the cookies to soften and the flavors to meld beautifully.
- Once thoroughly chilled, cut the cake into slices and serve immediately. Wipe your knife between slices for clean cuts.
Notes
Total time listed does not include the essential overnight chilling period for optimal results.
Recommended Products
As an Amazon Associate and member of other affiliate programs, I earn from qualifying purchases.
- Pampered Chef Accent Decorator (for piping whipped cream)
- KitchenAid 9-Speed Digital Hand Mixer (for whipping cream)
Nutrition Information:
- Calories: 237
- Total Fat: 22g
- Saturated Fat: 14g
- Trans Fat: 1g
- Unsaturated Fat: 7g
- Cholesterol: 67mg
- Sodium: 23mg
- Carbohydrates: 10g
- Fiber: 0g
- Sugar: 9g
- Protein: 2g
More Irresistible No-Bake Desserts to Explore
If you’re a fan of the ease and deliciousness of no-bake treats, you’ll love exploring these other fantastic recipes that require no oven time:
- No-Bake Pistachio Icebox Cake from Spend with Pennies
- Chocolate Lasagna
- Strawberry Fool
- Classic No-BakeCookies
- Milk & Cookies Lasagna
- No-Bake Strawberry Cheesecake
- Mocha Chocolate Chip Cookie Icebox Cake
- Explore More Dessert Recipes
Stay in touch through social media @ Instagram, Facebook, and Pinterest. Don’t forget to tag me when you try one of my recipes! And if you love the results, please give it a 5-star rating in the recipe card.
Indulge in Simplicity: Your New Favorite Oreo Dessert
The No-Bake Oreo Icebox Cake stands as a testament to the idea that some of the most satisfying desserts are also the simplest to create. With its minimal ingredient list, straightforward preparation, and the magical transformation that occurs during its overnight chill, this cake offers an effortless path to a truly delightful treat. Whether you’re a seasoned baker looking for a quick win, a novice in the kitchen, or simply someone who appreciates the classic combination of Oreos and whipped cream, this recipe promises to deliver pure joy with every decadent slice. So go ahead, whip up this chocolatey dream, and discover the sweet rewards of no-bake brilliance!
