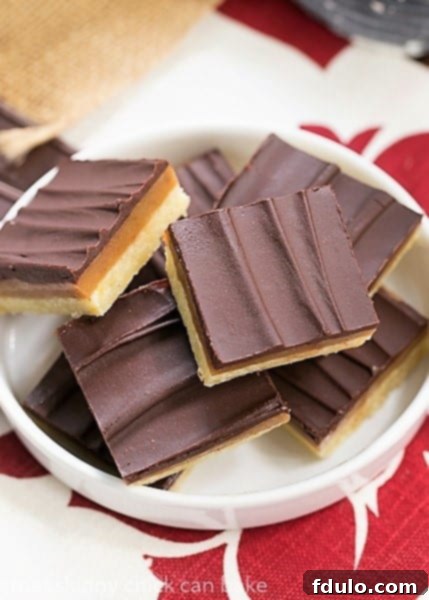
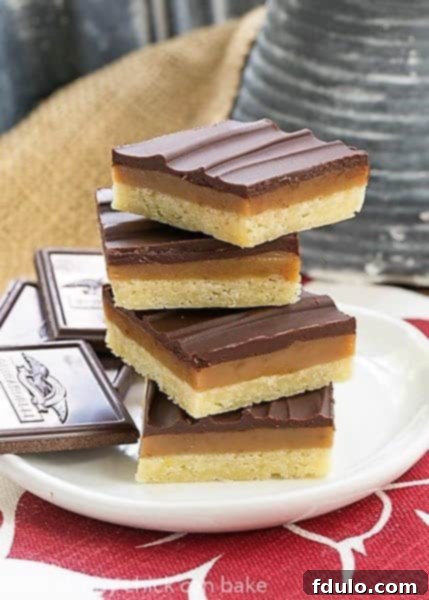
There’s an undeniable joy in sharing homemade treats, especially when they evoke cherished memories and bring smiles to loved ones. As a devoted caramel enthusiast, much like my son Nick, I knew these decadent Ganache Topped Caramel Bars would be the perfect sweet send-off when he returned to college. And they certainly were a hit! These bars are more than just a dessert; they’re a testament to the power of a perfectly crafted treat, blending classic flavors into an irresistible symphony of textures.
Reminiscent of the beloved classic candy bar, these Homemade Twix Bars capture the essence of what makes those treats so universally adored. Featuring three harmonious components – a rich, buttery shortbread crust, a luscious, chewy caramel filling, and a silky smooth chocolate ganache topping – they promise an unparalleled sensory experience. Prepare to fall in love with these exquisite bar cookies from your very first bite.

Why You Must Indulge in These Decadent Caramel Bars
These Ganache Topped Caramel Bars aren’t just another dessert; they’re an experience waiting to happen. Here’s why this recipe deserves a prime spot in your baking repertoire:
- A Classic Reinvented: For those who cherish the simple elegance of a Millionaire Shortbread or the nostalgic charm of a Twix bar, this recipe offers a refined, homemade version. It boasts the familiar three layers of goodness – shortbread, caramel, and chocolate – but elevated to gourmet status with a rich ganache finish.
- Unforgettable Flavor and Texture Profile: The magic truly happens when these three distinct layers come together. The tender, crumbly shortbread provides a delightful buttery base, perfectly contrasting with the gooey, sweet chewiness of the homemade caramel. Capping it all is the luxurious, slightly bitter-sweet ganache, creating a symphony of flavors and textures that will captivate your palate.
- The Superiority of Homemade Caramel: While many recipes opt for the convenience of melted store-bought caramels, this version guides you through crafting a truly exceptional caramel from scratch. The depth of flavor and ideal consistency achieved with homemade caramel are simply unmatched, transforming these bars from good to absolutely extraordinary. This dedication to quality ensures every bite is a pure delight.
- Perfect for Any Occasion: Whether you’re looking for a show-stopping dessert for a dinner party, a thoughtful homemade gift, or simply a luxurious treat to enjoy with your afternoon coffee, these caramel bars fit the bill perfectly. They’re impressive enough for special events, yet comforting enough for everyday indulgence.
My son Nick’s love affair with caramel began in his preschool days. Our weekly errands often included a visit to the local butcher shop. While I discussed cuts of meat, the kind proprietor would always offer Nick a thin slice of ham to sample, followed by the highly anticipated trip to the counter’s candy jar for a coveted caramel. That small ritual sparked a lifelong appreciation for this sweet confection.
As a mother, it was a joy to witness and, frankly, contribute to this developing sweet tooth. Even now, as that curious tot has grown into a young man, the simple pleasure of a perfectly made caramel remains a shared delight between us. It’s this deep-rooted affection for caramel that inspired me to create a bar cookie that truly celebrates its rich, buttery essence.

Mastering the Layers: Essential Recipe Tips for Perfect Caramel Bars
While the shortbread crust for these bars is wonderfully straightforward, achieving the perfect homemade caramel requires a little precision and patience. My first attempt at this particular caramel, which uses sweetened condensed milk, was a minor setback. I cooked the mixture, watching it boil and gradually darken to a lovely amber. However, upon removing it from the heat, the butter had separated, and the caramel was far from the smooth consistency I desired. It was a learning moment – a “flop,” as bakers sometimes experience!
Undeterred, I tried again, making a crucial adjustment: I reduced the amount of butter slightly and, most importantly, employed a candy thermometer. This essential tool allowed me to precisely monitor the temperature, ensuring I pulled the caramel off the heat at the exact moment it reached its ideal consistency. The second attempt was a resounding success! The caramel was perfectly smooth, rich, and chewy.
To ensure your caramel layer is just as flawless, here are some invaluable tips to guide you through the process:
- Understanding Caramel Variations: Not all caramel recipes are created equal. Some rely on white sugar, others on brown sugar. This specific recipe stands out by using sweetened condensed milk, which acts as a substitute for traditional heavy cream and part of the sugar, resulting in a distinctively creamy and flavorful caramel.
- PRO Tip for the Caramel Base: Unlike many traditional caramel recipes that require butter to be added later, for this particular recipe, all caramel ingredients (sweetened condensed milk, brown sugar, butter, corn syrup, and vanilla) are whisked together in the saucepan from the very beginning. This unique method simplifies the process and helps achieve a uniform mixture.
- The Indispensable Candy Thermometer: For caramel perfection – ensuring it’s neither too hard nor too soft – a reliable candy thermometer is absolutely essential. It eliminates guesswork, allowing you to achieve the precise temperature needed for optimal texture.
- Constant Whisking is Key: To prevent the mixture from scorching on the bottom of the pan and to ensure even cooking, whisk constantly while the caramel cooks. Pay close attention as the caramel begins to darken; it should reach a beautiful “caramel” color and a temperature of approximately 225 degrees Fahrenheit (around 6 minutes into the cooking process). As soon as it hits the target temperature, remove it from the heat and pour it immediately over your cooled shortbread crust.
- Patience for Cooling: Before even thinking about adding the chocolate topping, allow the caramel layer to cool completely and solidify. Rushing this step will result in a messy, mixed-up layer rather than distinct, clean layers.
- Spreading the Ganache: A small offset spatula is your best friend for spreading the luscious chocolate ganache evenly over the caramel layer. Its angled blade allows for smooth, precise application without disturbing the delicate layers beneath.
- The Hot Knife Trick for Clean Slices: Since these delectable bars are best stored in the refrigerator, they’ll firm up considerably. To achieve perfectly clean, sharp cuts without cracking the chocolate or dragging the caramel, run a sharp knife under very hot water, wipe it dry, and then slice. Repeat this process for each cut. The heat from the knife helps it glide effortlessly through the chilled layers.
- PRO Tip for Safety: Always remember that the caramel mixture is extremely hot during the cooking and pouring stages. Exercise extreme caution when mixing, pouring, and spreading to prevent burns. A little vigilance goes a long way in ensuring a safe baking experience.

Frequently Asked Questions About Caramel Bars
Twix bars are a popular candy confection produced by the Mars company. The classic version consists of a crunchy shortbread biscuit base, topped with a layer of creamy, chewy caramel, and then entirely coated in smooth milk chocolate. These homemade Ganache Topped Caramel Bars draw inspiration from that iconic combination.
While homemade caramel genuinely offers a superior flavor and texture that elevates these bars to a gourmet level, it is not strictly mandatory. Crafting caramel from scratch can be a rewarding new skill for those who haven’t tried it before. However, if time is a constraint, you can achieve a semi-homemade version by melting good quality store-bought caramels with a splash of heavy cream to create a pourable consistency. Just be aware that the depth of flavor and specific chewiness might differ slightly.
Due to the caramel and ganache layers, these bars are best stored in an airtight container in the refrigerator. They will keep well for up to 5-7 days. For optimal serving, you might want to let them sit at room temperature for 10-15 minutes before cutting and serving, which softens the caramel and chocolate slightly for a more luxurious texture.
Yes, these bars freeze beautifully! Once completely cooled and cut into individual servings, place them in a single layer on a baking sheet lined with parchment paper and freeze until solid. Then, transfer the frozen bars to an airtight freezer-safe container or bag, separating layers with parchment paper to prevent sticking. They can be frozen for up to 2-3 months. Thaw them in the refrigerator overnight or at room temperature for an hour before enjoying.
Explore More Delicious Bar Recipes
If you’ve fallen in love with these Ganache Topped Caramel Bars, you’ll be thrilled to discover more of our delightful bar cookie creations. From fruity and tangy to rich and chocolatey, there’s a bar for every craving:
- Classic Baklava
- Best Lemon Bars
- Blackberry Cheesecake Bars
- Raspberry Crumb Bars
- Homemade Reese’s Bars
- Blueberry Streusel Bars
- Chocolate Chip Cookie Bars with Caramel
- More Yummy Bar Cookies
Stay connected and share your baking adventures with us on social media! Find us on Instagram, Facebook, and Pinterest. Don’t forget to tag us when you try one of my recipes! If you love the results, please consider leaving a 5-star rating in the recipe card below – your feedback means the world!

Ganache Topped Caramel Bars Recipe
15 minutes
25 minutes
40 minutes
24 bars
Three-layered caramel bars with a shortbread crust and rich ganache topping.
Ingredients
Crust:
- 1 ¾ cups all-purpose flour
- ¾ cup granulated sugar
- 2 sticks (1 cup) unsalted butter, cut into ½ tablespoon-sized cubes
- 2 large egg yolks
Caramel:
- 1 14-ounce can sweetened condensed milk
- ½ cup packed light brown sugar
- 6 tablespoons unsalted butter
- 2 tablespoons light corn syrup
- 2 teaspoons pure vanilla extract
Ganache:
- 8 ounces semi-sweet chocolate, finely chopped
- ¼ cup heavy cream
- 1 tablespoon light corn syrup
Instructions
- Preheat your oven to 350ºF (175ºC).
- In a food processor, pulse the flour and granulated sugar together until well combined. Add the cubed butter and pulse until the mixture resembles coarse crumbs, with butter pieces no larger than small peas.
- Add the egg yolks and pulse again until the dough just comes together into a ball. Press the dough evenly into a greased or non-stick foil-lined 9×13-inch baking pan.
- Bake the shortbread crust for 12-14 minutes, or until the edges are lightly golden brown. Let the crust cool completely in the pan while you prepare the caramel layer.
- For the caramel, combine the sweetened condensed milk, brown sugar, butter, corn syrup, and vanilla extract in a medium saucepan. Whisk all ingredients thoroughly. Bring the mixture to a boil over medium heat, continuing to whisk frequently to prevent burning.
- Attach a candy thermometer to the side of the pan. Continue whisking and cooking the caramel until it reaches 225ºF (107ºC). This usually takes about 6 minutes once boiling vigorously.
- Immediately pour the hot caramel evenly over the cooled shortbread crust. Allow the caramel layer to cool completely and set before proceeding to the ganache, which may take at least 30-60 minutes at room temperature, or slightly faster in the refrigerator.
- To make the ganache, combine the finely chopped semi-sweet chocolate, heavy cream, and corn syrup in a microwave-safe bowl.
- Heat the mixture gently in the microwave in 30-second intervals, stopping and stirring well after each interval, until the chocolate is almost melted. Let it rest for 1-2 minutes, then stir vigorously until the ganache is completely smooth and glossy.
- Carefully spread the smooth ganache over the set caramel layer. Chill the bars in the refrigerator for at least one hour (or until firm) before cutting them into squares or rectangles. Store any leftover bars in an airtight container in the refrigerator.
Notes
Using a candy thermometer is the most reliable method to ensure your homemade caramel reaches the perfect consistency – neither too soft nor too brittle. For the neatest cuts, remember to heat your knife under hot water and wipe it dry before slicing through the chilled bars.
Recommended Products
As an Amazon Associate and member of other affiliate programs, I earn from qualifying purchases.
- 3 Pyrex Mixing Bowls
- Deep Frying Thermometer
- 9 x 13 Baking Pan
Nutrition Information:
Yield:
24
Serving Size:
1 bar
Amount Per Serving:
Calories: 236Total Fat: 9gSaturated Fat: 5gTrans Fat: 0gUnsaturated Fat: 3gCholesterol: 33mgSodium: 57mgCarbohydrates: 37gFiber: 1gSugar: 29gProtein: 3g
Thatskinnychickcanbake.com occasionally offers nutritional information for recipes contained on this site. This information is provided as a courtesy and is an estimate only. This information comes from online calculators. Although thatskinnychickcanbake.com attempts to provide accurate nutritional information, these figures are only estimates.
Varying factors such as product types or brands purchased can change the nutritional information in any given recipe. Also, many recipes on thatskinnychickcanbake.com recommend toppings, which may or may not be listed as optional and nutritional information for these added toppings is not listed. Other factors may change the nutritional information such as when the salt amount is listed “to taste,” it is not calculated into the recipe as the amount will vary. Also, different online calculators can provide different results.
To obtain the most accurate representation of the nutritional information in any given recipe, you should calculate the nutritional information with the actual ingredients used in your recipe. You are solely responsible for ensuring that any nutritional information obtained is accurate.
HOW MUCH DID YOU LOVE THIS RECIPE?
Please leave a comment on the blog or share a photo on Pinterest
