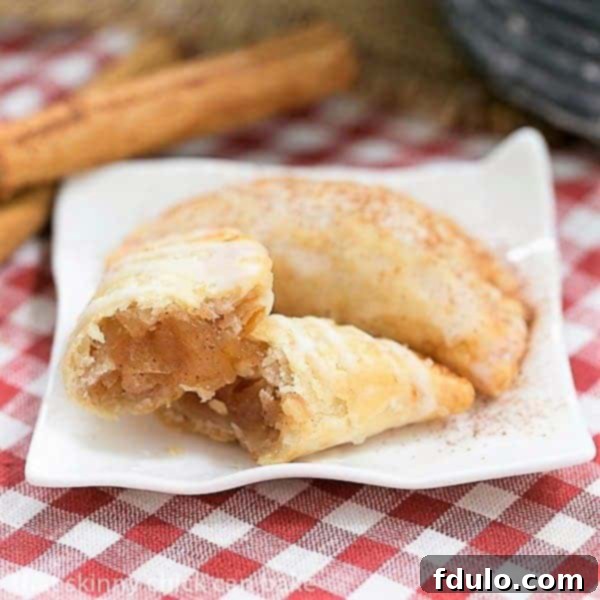
Indulge in the nostalgic charm of Mini Fried Apple Pies, a delightful treat that perfectly blends a flaky, golden crust with a warm, spiced apple filling. These irresistible hand pies are the quintessential grab-and-go dessert, ideal for any occasion from casual picnics to elegant gatherings, or simply as a comforting snack. Easier to manage than a traditional pie, they deliver an equally satisfying burst of homemade goodness in every single bite.
Imagine biting into a perfectly golden, crispy pastry, giving way to a soft, sweet, and tangy apple filling infused with warm cinnamon. These individual Apple Hand Pies offer convenient portion control, making them a fantastic addition to school lunchboxes, family road trips, or as a fuss-free dessert for entertaining. They’re not just delicious; they’re a portable slice of Americana that everyone will adore!

Why These Homemade Apple Hand Pies Are a Must-Try
If you’re looking for a dessert that embodies the spirit of comfort and joy, these homemade apple hand pies are your answer. They combine classic flavors with a convenient, portable format, making them a standout treat. Here’s why you absolutely need to add this easy recipe to your baking repertoire this season:
- Celebrate with Classic American Flavors: Don’t these Golden Apple Turnovers just perfectly capture the essence of celebrations like the 4th of July, Thanksgiving, or even a cozy autumn evening? There’s nothing quite as American and universally loved as apple pie. These individual portions are absolutely perfect for your Independence Day menu or any outdoor event, as no silverware is required – just pure, handheld enjoyment. They evoke a sense of nostalgia and homestyle comfort that makes any gathering feel special.
- Effortlessly Simple Preparation: You might think making pies from scratch is daunting, but these mini apple pies are incredibly simple, designed for both novice and experienced bakers. For ultimate ease, feel free to use a high-quality premade pie crust from your grocery store. This significantly cuts down on prep time, meaning your main task is preparing the aromatic, cinnamon-spiced apple filling. Whether you choose to fry them for that classic crispy texture or bake them for a lighter finish, the process remains wonderfully straightforward and rewarding, promising delicious results with minimal fuss.
- Versatile Cooking Methods: Fry or Bake to Perfection: While the traditional method often involves pan-frying for that iconic golden-brown, crispy exterior that many adore, I understand that not everyone finds deep-frying comfortable or convenient. I initially attempted frying a batch to achieve that authentic “fried apple pie” taste, but quickly found baking to be more to my liking for the second round, resulting in a beautifully golden crust with a simple egg wash. Both techniques yield fantastic results, delivering a perfectly cooked filling and a delightful crust. So, feel free to choose the method that best suits your comfort level, kitchen setup, and dietary preferences – you’ll achieve delicious, flaky perfection either way.
- An Irresistible Dessert for Every Palate: After a delicate drizzle or a generous brushing of an easy powdered sugar glaze, these mini apple pies become utterly irresistible. My family couldn’t wait to dig in, and they were certainly not disappointed. The delightful combination of a flaky, tender crust embracing a warm, cinnamon-spiced apple filling creates a terrific three-bite dessert that will leave everyone craving more. The balance of sweet and tart, combined with the comforting spices, makes these a guaranteed crowd-pleaser. I wouldn’t be surprised if Bill (or anyone!) finds a way to justify enjoying a few for breakfast – they’re that good!
- Perfect for Any Occasion & Portability: From picnic baskets and school lunches to quick snacks, potlucks, and elegant dessert spreads, these easy apple hand pies fit seamlessly into any scenario. Their individual size makes serving and eating a breeze, eliminating the need for plates and forks. They’re robust enough for travel but delicate enough to feel special, making them the ultimate portable dessert.
Key Ingredient Notes for Perfect Apple Hand Pies
Crafting the perfect apple hand pie begins with understanding your ingredients. While the list is simple, the quality and preparation of each component significantly impact the final flavor and texture. Here’s a detailed look at what you’ll need to ensure your homemade apple pies are truly exceptional:
- Essential Kitchen Staples: Gather your basics, which you likely already have on hand. These include Granulated Sugar for sweetness in the filling, Ground Cinnamon for that warm, inviting spice, an Egg for the optional egg wash (if baking), Milk for the powdered sugar glaze, and Water for the egg wash and sealing the crust. These pantry staples form the foundation of our delicious filling and finishing touches, ensuring a well-rounded flavor profile.
- Pie Crust – The Foundation of Flakiness: The crust is paramount to any good pie, especially these apple turnovers! You have two excellent options. For an authentic homemade touch and superior flavor, prepare a recipe for a double pie crust from scratch. This allows you to control the ingredients and achieve a truly bespoke, buttery, and flaky texture. Alternatively, for convenience without compromising much on quality, opt for quality premade crusts from brands like Pillsbury or your preferred local brand. Ensure they are fully thawed but still cold enough to handle easily for the best results and to prevent the dough from becoming sticky or tearing.
- Apples – The Heart of the Pie: The choice of apples is crucial for a balanced and flavorful filling. While Granny Smith apples are a classic for their tartness and ability to hold their shape during cooking, using two varieties often yields the best depth of flavor. Consider combining a tart apple like Granny Smith with a sweeter, softer apple such as Golden Delicious, Honeycrisp, or Fuji. This creates a filling that is neither too sweet nor too tart, with a delightful blend of textures that adds complexity to each bite.
- Butter – For Richness and Flavor: Use unsalted butter for the filling. It’s important to let it soften at room temperature before using, as this ensures it creams smoothly with other ingredients, distributing its rich, creamy flavor evenly throughout the apple mixture. Quality butter makes a noticeable difference in the overall richness and mouthfeel of your filling.
- Vanilla Extract – A Touch of Aromatic Sweetness: Always opt for real vanilla extract, not artificially flavored substitutes. High-quality vanilla, such as the Nielson-Massey brand, brings a deep, aromatic sweetness that elevates the entire flavor profile of your apple filling and glaze. A good vanilla extract truly enhances the comforting essence of these apple hand pies and is well worth the investment.
- Powdered Sugar – For a Smooth Glaze: Powdered sugar (also known as confectioners’ sugar) is essential for creating that silky-smooth, pourable glaze that finishes these pies beautifully. For an exceptionally smooth, lump-free icing that drizzles perfectly and provides a professional appearance, I highly recommend sifting the powdered sugar before mixing it with the milk and vanilla. This simple step prevents any gritty texture and ensures a flawless, elegant finish.

Expert Recipe Tips for Flawless Apple Hand Pies
Achieving the perfect individual apple pie, tart, or turnover (whatever you prefer to call these delightful creations!) is remarkably simple when you follow a few key guidelines. These expert tips will help you create flaky crusts and perfectly cooked fillings every single time, ensuring your fried apple pies are a resounding success and become a favorite in your household.
- Choose the Right Apples for the Best Flavor and Texture: The type of apple dramatically influences your pie’s success. As my mother-in-law always used Granny Smith apples for her famous applesauce, they are an excellent, readily available choice known for their crispness, tartness, and ability to hold shape during cooking. For a more complex and well-rounded flavor profile, I often combine Granny Smith with Golden Delicious. This blend offers a superb balance of sweet and tart, along with varying textures – one crisp and one softer – which creates a more interesting and delightful filling. Experiment with your favorite baking apples to find your ideal combination that delivers both sweetness and a pleasant tang.
- Homemade or Store-Bought Crust: Your Choice for Convenience and Quality: Don’t feel pressured to make everything from scratch, especially if you’re short on time! While a homemade pie crust offers unparalleled flavor and flakiness, a high-quality packaged version can be a fantastic time-saver, particularly if your homemade dough tends to be tricky to work with. If using store-bought, ensure the crust is properly thawed according to package directions, but still cold, for the best handling. A cold crust is easier to work with and helps achieve maximum flakiness. Whichever you choose, aim for a crust that bakes up golden and crisp.
- Enhance Filling Flavor with Brown Sugar: For a deeper, more caramel-like flavor in your apple filling, consider swapping out some or all of the white granulated sugar for light or dark brown sugar. Brown sugar introduces subtle molasses notes that beautifully complement the apples and cinnamon, adding another layer of complexity and richness to your mini apple pie filling. This simple substitution can elevate your flavor profile considerably.
- PRO-Tip: Prevent Leaks – Do Not Overfill Your Pies: This is perhaps the most crucial tip for any hand pie! It’s incredibly tempting to load up each pie with as much delicious apple filling as possible, but overfilling is the primary cause of leaks during cooking. A scant teaspoon of filling is usually sufficient for a 3-inch round. Ensure you leave enough clear edge (at least half an inch) around the perimeter of your pastry circle to properly seal the crust. This allows the edges to adhere firmly, preventing the filling from bubbling out and creating a messy situation in your oven or skillet.
- Master the Seal for Secure Hand Pies: A well-sealed edge is absolutely vital for preventing your apple hand pies from opening up during cooking and losing their delicious filling. Before folding the pastry over, use a little very cold water around the perimeter of your pie rounds; the cold water acts as a natural adhesive, helping the dough surfaces adhere firmly. Then, use the tines of a fork to firmly crimp the edges. This not only creates a beautiful decorative pattern but also reinforces the seal, ensuring your precious apple filling stays safely inside throughout the cooking process.
- Frying vs. Baking: Choose Your Preferred Cooking Method: You have two fantastic options for cooking these delightful apple turnovers. Frying in a shallow amount of oil delivers that classic, irresistibly crispy and golden-brown exterior, reminiscent of old-fashioned apple turnovers from roadside stands. However, if you prefer a less messy approach, desire a slightly lighter pie, or simply want to avoid frying, baking is an excellent alternative. Simply brush your hand pies generously with an egg wash (a whisked egg with a tablespoon of water) for a beautiful golden sheen and bake until deeply golden. Both methods yield superb results, so pick the one that fits your comfort and time.
- The Finishing Touch: A Simple Powdered Sugar Glaze: A delicate, sweet glaze transforms these hand pies into true dessert masterpieces. Prepare a simple mixture of powdered sugar, a touch of pure vanilla extract, and a tablespoon or two of milk. I love to drizzle mine back and forth over the warm pies for a rustic, inviting look, allowing some to melt into the crevices. Alternatively, if you prefer a thinner, more uniform coating, you can thin the icing with a bit more milk and brush it on as a smooth glaze. The glaze adds a perfect touch of sweetness, enhances the overall appeal, and truly completes the experience.
- Allow for Cooling Time: While it might be tempting to eat these directly from the oven or skillet, allowing the pies to cool slightly on a wire rack is crucial. This cooling period allows the hot apple filling to set properly, preventing it from being too runny. It also allows the crust to firm up and become even crispier, delivering the best possible texture.
Frequently Asked Questions About Apple Hand Pies and Turnovers
According to the Food Lover’s Companion, a turnover is a pastry made by folding a square or circular piece of dough over a sweet or savory filling, creating a triangle or semicircle shape. The edges are then sealed (typically by crimping with a fork) before the pastry is baked or fried. Turnovers are incredibly versatile and can be enjoyed as appetizers, main courses, or, in our delicious case, as satisfying individual desserts like these fried apple pies.
To maintain their freshness and delicious taste, these apple hand pies should be stored in an airtight container at room temperature for approximately 2 days. For longer storage, it’s best to transfer them to the refrigerator, where they can last for an additional day or two. When you’re ready to enjoy them again, simply bring them to room temperature or gently reheat them in a preheated oven (or even a toaster oven for crispness) for a few minutes to restore their warmth and flakiness, making them taste freshly made.
Yes, absolutely! Baked apple turnovers freeze beautifully, making them an excellent make-ahead dessert. After baking and allowing them to cool completely, arrange your turnovers in a single layer on a sheet pan and place them in the freezer until solid. Once frozen solid, transfer them to a freezer-safe Ziploc bag or an airtight container, ensuring they are well-protected from freezer burn. They can be frozen for up to 2 months. To serve, simply defrost them at room temperature for a few hours, then gently reheat in a preheated oven (around 300-325°F or 150-160°C) until warmed through and the crust regains its crispness. Freezing them uncooked is also an option; simply freeze on a tray then transfer to a bag, baking directly from frozen with an extra few minutes of cooking time.
For baking, you generally want apples that hold their shape well and offer a good balance of sweet and tartness. Popular choices include Granny Smith (known for its tartness and firm texture), Honeycrisp (sweet, incredibly crisp), Fuji (sweet, firm), Braeburn (sweet-tart, firm), and Golden Delicious (sweet, softer, but still holds up). A mix of two varieties often yields the best flavor and texture in your pies, providing both depth and complexity.
Yes, you can certainly prepare the apple filling in advance! Cook the apples with sugar and cinnamon as directed, then let it cool completely. Once cooled, store the filling in an airtight container in the refrigerator for up to 3-4 days. This makes assembly much quicker on baking day, allowing you to enjoy fresh hand pies with minimal fuss and streamline your baking process.
You May Also Love These Apple Dessert Recipes
- Homemade Apple Pie Filling from Crazy for Crust – Master the perfect pie filling from scratch for all your baking needs.
- Classic Apple Pie – For those times when only a traditional, full-sized apple pie will do, perfect for a crowd.
- Cream Cheese Apple Torte – A rich and creamy twist on apple desserts, offering a delightful blend of flavors.
- Apple Cider Doughnut Cake – Indulge in the comforting flavors of apple cider in a moist and delicious cake form.
- Plus, explore all my Best Pie Recipes for more inspiration and delectable creations that are sure to impress!
Stay in touch and share your baking triumphs! Connect with us through social media on Instagram, Facebook, and Pinterest. Don’t forget to tag me when you try one of my delicious recipes! And if you absolutely love the results, please consider giving it a 5-star rating in the recipe card below – your feedback helps others discover these wonderful treats and helps our community grow!

Irresistible Fried Apple Hand Pies
25 minutes
20 minutes
45 minutes
16 mini pies
These bite-sized mini apple pies are a dream come true for picnics, delightful snacking, or as an enchanting dessert! This wonderful recipe is brought to you courtesy of Kelli’s Kitchen, perfected for your enjoyment.
Rating: 4.9 out of 5 stars based on 47 reviews.
Ingredients
For the Hand Pies:
- 2 Pillsbury Pie Crusts, or a homemade double crust recipe
- 2 medium-sized baking apples (such as Granny Smith and Golden Delicious)
- ¼ cup granulated sugar
- ¼ teaspoon ground cinnamon
For the Icing:
- 1 teaspoon softened unsalted butter
- 1 cup powdered sugar (confectioners’ sugar)
- ½ teaspoon pure vanilla extract
- 1-3 tablespoons milk (start with 1, add more for desired consistency)
For the Egg Wash (if baking):
- 1 large egg
- 1 tablespoon water
Instructions
- Prepare the Apple Filling: Peel, core, and finely chop the apples. Place them in a saucepan with the ¼ cup granulated sugar. Cook on low heat, stirring occasionally, until the apples are tender and softened (about 8-10 minutes). Stir in the ¼ teaspoon cinnamon and gently mash the apples until they reach a chunky, saucy consistency. Remove from heat and allow the filling to cool completely to room temperature before assembling the pies.
- Prepare the Pie Crusts: On a lightly floured work surface, carefully roll out the pie crusts. Using a 3-inch round cookie cutter or a glass rim, cut out 7-8 circles from each crust. Gather and re-roll any scraps to cut out additional circles until all dough is used.
- Fill the Pies: Place a scant teaspoon of the cooled apple filling in the center of each pastry circle. Be careful not to overfill to ensure a proper seal.
- Seal the Hand Pies: Lightly moisten the edges all the way around each pastry circle with very cold water using your finger. Fold the pastry over the filling to create a half-moon shape. Gently press the edges together to seal, then use the tines of a fork to firmly crimp the edges, ensuring they are completely closed. If desired, make a small slit or two on the top of each pie with a knife to allow steam to escape during cooking.
- Cook the Pies (Fry or Bake):
- To Fry: Pour about ½ inch of vegetable oil into a skillet and heat over medium heat until hot (a small piece of dough should sizzle immediately when dropped in). Carefully place the pies in the hot oil, ensuring not to overcrowd the skillet. Fry for 2-3 minutes on each side, or until deeply golden brown and crispy.
- To Bake: Preheat your oven to 375°F (190°C). In a small bowl, whisk together the egg and 1 tablespoon of water to create an egg wash. Brush the tops of the assembled hand pies with the egg wash for a golden, shiny finish. Place the pies on a baking sheet lined with parchment paper and bake for 20 minutes, or until beautifully browned and cooked through.
- Drain Excess Oil (if frying): If frying, remove the cooked pies from the oil and immediately place them on a wire rack lined with paper towels. This will help absorb any excess oil, ensuring a crisp, non-greasy finish.
- Glaze the Pies: While the pies are still warm, prepare the icing. In a small bowl, combine the softened butter, powdered sugar, vanilla extract, and 1 tablespoon of milk. Whisk with a fork until smooth. Add more milk, ½ teaspoon at a time, until you reach your desired drizzling or spreading consistency. Drizzle or spread the glaze generously over the warm apple hand pies.
Notes
For the best apple filling, I highly recommend using a combination of apples. For instance, pairing one tart Granny Smith with one sweeter Golden Delicious apple provides a delightful balance of flavor and texture that truly elevates these hand pies.
Recommended Kitchen Tools
As an Amazon Associate and member of other affiliate programs, I earn from qualifying purchases, at no additional cost to you.
- Biscuit/Cookie Cutters (3-inch)
- USA Pan Bakeware Half Sheet Pan
- French Rolling Pin
- Small Saucepan
- Potato Masher
Nutrition Information:
Yield:
16
Serving Size:
1 Hand Pie
Amount Per Serving (estimated):
Calories: 157Total Fat: 6gSaturated Fat: 2gTrans Fat: 0gUnsaturated Fat: 4gCholesterol: 13mgSodium: 98mgCarbohydrates: 24gFiber: 1gSugar: 13gProtein: 2g
HOW MUCH DID YOU LOVE THIS RECIPE?
Please leave a comment on the blog or share a photo on Pinterest and tag us!

