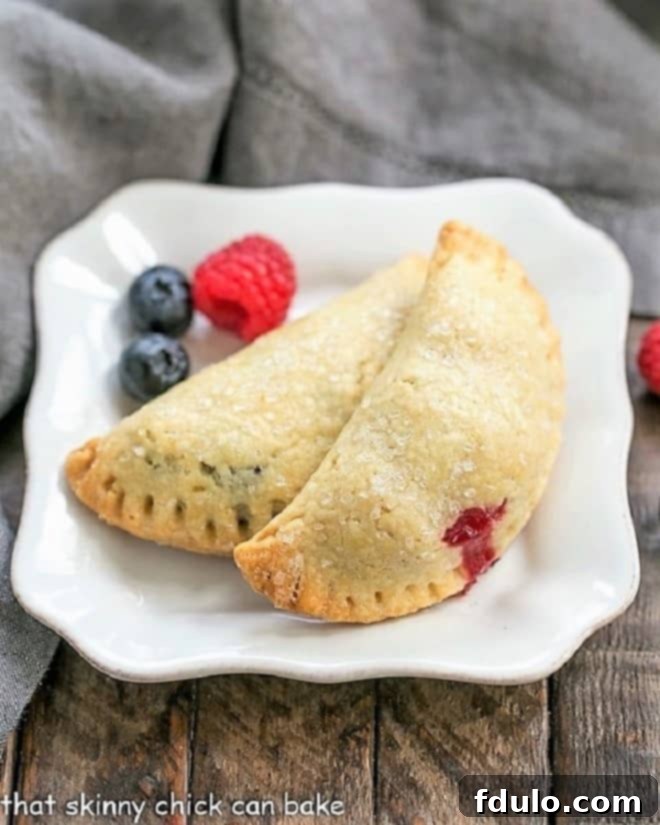
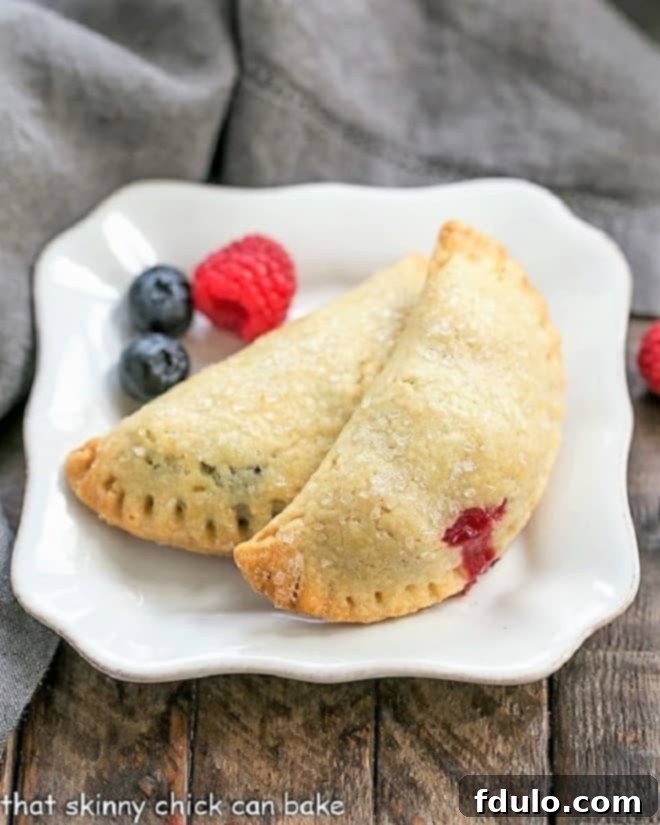
Discover the ultimate comfort dessert with these delightful Rustic Berry Turnovers! Bursting with sweet, juicy berries encased in a golden, flaky pastry, these hand pies are a treat for any time of day. Perfect for breakfast, a snack, or dessert, they’re guaranteed to earn rave reviews!
Often called Hand Pies, these charming mini desserts are designed to be enjoyed directly from your hand. Forget the fuss of plates and silverware; these individual pastries are the epitome of grab-and-go deliciousness. Just be sure to have plenty of napkins ready, as their irresistible fruit filling might just tempt you into a delightful mess!

Why These Rustic Berry Turnovers Are a Must-Bake
There’s a special charm in calling a dessert “rustic.” It’s a liberation, an invitation to embrace imperfection. A rustic dessert isn’t about flawless aesthetics; it’s about authentic flavor and homemade warmth. In the case of these berry turnovers, “rustic” means celebrating the moments where the vibrant, juicy filling peeks through the tender, buttery pastry crust, creating a visual symphony that hints at the deliciousness within. After just about 30 minutes in the oven, you’ll be rewarded with a batch of fabulously delicious mini pies. My husband, for instance, devoured his first one in three bites, a testament to their irresistible appeal!
These aren’t just any pastries; they’re a delightful experience. Here’s why they should top your baking list:
- Perfect Finger Food: Turnovers are inherently designed for convenience. No plates or forks are needed, making them ideal for picnics, potlucks, or simply a cozy treat at home. Just grab, bite, and enjoy!
- Easier Than Traditional Pies: If the thought of crafting a double-crust pie feels daunting, hand pies are your perfect solution. They offer all the delightful flavors and textures of a classic pie without the intricate construction.
- Endless Customization Options: While berries shine in this recipe, the versatility of hand pies is truly remarkable. They can be filled with virtually any fruit you desire, or even transformed into a savory delight with fillings like spiced meat, cheese, or vegetables.
- Versatile Serving Sizes: Depending on how large you cut them, these hand pies can adapt to any occasion. Serve them as delightful appetizers, a satisfying lunch entrée alongside a salad, or as the star dessert of any meal.
- Embrace the “Rustic” Charm: Don’t stress about a perfectly sealed crust! The beauty of a “rustic” turnover lies in its imperfections. When the berry juices bubble out and caramelize around the edges, it’s not a flaw, but a badge of honor – a visual promise of the sweet, gooey goodness inside.
The delightful aroma filling your kitchen as these bake is just a bonus! While my youngest keeps hoping for a peach version (which is definitely on my summer baking list!), you can easily experiment with different fruits. Just like these berry beauties, apple turnovers are a beloved autumn treat that bring similar comfort and joy.
Expert Tips for Crafting Perfect Berry Turnovers
Achieving flaky pastry and a luscious berry filling is simpler than you might think. Follow these expert tips to ensure your rustic berry turnovers are a resounding success every time:
- Dough Matters: While homemade pastry dough truly delivers the best flavor and texture, don’t hesitate to use quality store-bought pie crusts or puff pastry if you’re short on time. They’ll still produce delicious results. If making from scratch, ensure your butter is very cold and avoid overworking the dough for maximum flakiness.
- Precision Cutting: For uniform turnovers, use a biscuit cutter or a round cookie cutter to create perfect dough circles. A 4-inch cutter is ideal for individual serving sizes, providing ample space for filling without making the turnover too cumbersome.
- PRO-Tip on Shape: While classic turnovers are often semi-circles, you can use either a round or square cutter for your dough. Squares are a fantastic choice as they minimize wasted dough scraps, and when folded diagonally, they create charming triangular turnovers. Both shapes are equally delicious!
- Mastering the Filling: Aim for about 1 tablespoon of your sweetened fruit filling per turnover. This amount allows for a generous, flavorful center without overfilling, which can lead to leaks. For firmer fruits like apples or pears, a quick sauté with butter, sugar, and cinnamon before filling will soften them and enhance their flavor, ensuring they’re tender when baked.
- Sealing for Success: Place your spoonful of filling onto one half of the dough round. Lightly brush the perimeter of that half with a little milk – this acts as a natural “glue.” Then, gently fold the other half of the pastry over the filling. Your first turnover is a great gauge: if it’s too hard to seal, reduce the filling; if it looks empty, add a little more next time.
- Reinforce the Seal: After gently pressing the edges together with your fingers to seal, use the tines of a fork to create a decorative crimped pattern around the perimeter. This not only adds a beautiful rustic touch but also provides an extra layer of security, significantly reducing the chances of your delicious filling oozing out during baking.
- Golden Finish: Before baking, brush the tops of your turnovers lightly with milk. This encourages a beautiful golden-brown crust. For an added touch of sparkle and a delightful textural crunch, sprinkle them generously with a coarse sugar. Demerara or turbinado sugar works wonderfully for this!
- Chill for Flakiness: Don’t skip the refrigeration step before baking! Chilling the assembled turnovers for at least 15-30 minutes allows the butter in the pastry to firm up again, which is crucial for achieving that coveted flaky texture.

Frequently Asked Questions About Berry Turnovers
Have more questions about making or enjoying these delightful hand pies? We’ve got answers!
Turnovers, also widely known as Hand Pies, are individual pastries made from a sheet of pastry dough that is filled with either a sweet or savory mixture. The dough is then folded in half to create a semi-circle or triangular shape. The edges are carefully pinched, crimped, or sealed to contain the filling during the cooking process. Once prepared, they are typically baked in an oven until golden brown and flaky, though some regional variations might deep-fry them for a different texture. They are essentially personal-sized pies, designed for easy eating.
Making hand pies involves a few simple steps to achieve that perfect balance of flaky crust and flavorful filling:
1. Prepare the Dough: Start by making your pastry dough from scratch or using a high-quality store-bought option. Roll it out evenly on a floured surface to your desired thickness.
2. Cut the Shapes: Use a round or square cutter (typically 4-5 inches) to cut individual pieces of dough.
3. Add the Filling: Spoon a small, controlled amount of your chosen filling onto one half of each pastry cutout. Avoid overfilling, which can lead to leaks.
4. Moisten the Edges: Lightly brush the edges of the dough without filling with a little milk or water. This helps create a strong seal.
5. Fold and Seal: Carefully fold the unfilled half of the dough over the filling, creating a pocket. Gently press the edges together with your fingers to seal.
6. Crimp for Security & Style: Use the tines of a fork to crimp around the entire edge of the turnover. This reinforces the seal and adds a beautiful, decorative finish.
7. Egg Wash and Sugar: For a golden-brown crust and a touch of sweetness, brush the tops of the pastries with milk or an egg wash (beaten egg mixed with a bit of water), and sprinkle with coarse sugar if desired.
8. Bake: Bake in a preheated oven according to your recipe’s instructions until the crust is golden brown and the filling is bubbly.
The beauty of hand pies lies in their versatility when it comes to eating! It is absolutely, perfectly acceptable to eat turnovers with your hands – that’s why they’re called “hand pies,” after all! They are designed for convenience and portability. However, if you’re serving larger turnovers, perhaps as a savory entrée at a formal luncheon, using a knife and fork might be a more prudent and refined approach. For these rustic berry turnovers, feel free to enjoy them handheld, letting the deliciousness speak for itself!
Absolutely! Frozen berries work wonderfully in turnovers. There are a couple of approaches: you can thaw them completely and drain any excess liquid before mixing with sugar and flour, or you can use them frozen. If using frozen, mix them directly into the filling mixture – the extra moisture will cook off during baking, and the flour helps to thicken the juices. Just be aware that the baking time might need to be extended slightly if starting with frozen berries.
A common concern for bakers! To minimize leaks, ensure you don’t overfill your pastries. About 1 tablespoon per turnover is usually sufficient. Brushing the edges of the dough with milk or water before folding helps create a strong seal. Most importantly, securely crimping the edges with a fork after pressing them together with your fingers provides an extra barrier against leakage. Also, make sure your filling isn’t too runny; adding a bit of flour or cornstarch (as instructed in the recipe) helps thicken the fruit juices.
Baked berry turnovers are best enjoyed fresh, ideally within 1-2 days at room temperature in an airtight container. For longer storage, you can refrigerate them for up to 4-5 days. To reheat, a few minutes in a toaster oven or conventional oven at 300°F (150°C) will crisp up the crust beautifully. You can also freeze unbaked turnovers for up to 3 months. Simply arrange them on a baking sheet, freeze until solid, then transfer to a freezer-safe bag. Bake from frozen, adding about 10-15 minutes to the baking time.
Explore More Delicious Hand Pie & Berry Recipes
If you’ve fallen in love with these rustic berry turnovers, you’ll surely enjoy these other delightful recipes perfect for any occasion:
- Easy Raspberry Cream Cheese Turnovers from Country Cleaver
- Blueberry Almond Turnovers from Real Housemoms
- Mixed Berry Galette
- Berries Cake with Lemon Curd Cream
- Peach Turnovers (Chaussons aux Pêches)
- Southern-Style Fried Apple Pies
- Plus many more Irresistible Dessert Recipes
Stay connected and share your baking adventures! Find us on social media @ Instagram, Facebook, and Pinterest. Don’t forget to tag me when you try one of my recipes! If you love the results, please consider leaving a 5-star rating in the recipe card below – it truly helps!

Rustic Berry Turnovers Recipe
30 minutes
30 minutes
1 hour
12 turnovers
These scrumptious mini berry pies, adapted from Fine Cooking, are a delightful and easy-to-make dessert, perfect for any occasion.
(53 Ratings)
Ingredients
For the Flaky Pastry:
- 2 cups (9 ounces) all-purpose flour
- 14 tablespoons (7 ounces) unsalted cold butter, cut into small cubes
- 1 large egg, lightly beaten
- 2 tablespoons granulated sugar
- 1 tablespoon heavy cream
- 2 teaspoons fresh lemon juice
- 1 teaspoon salt
For the Sweet Berry Filling:
- 3 tablespoons granulated sugar, divided
- 1 tablespoon all-purpose flour
- ½ teaspoon ground cinnamon
- 2 cups fresh mixed berries (such as blueberries, raspberries, or blackberries)
- Milk, for brushing the pastry and sealing edges
Instructions
- Prepare the Pastry Dough: In a food processor, combine the flour, cold butter, beaten egg, 2 tablespoons sugar, cream, lemon juice, and salt. Pulse briefly until the mixture begins to clump together and a rough dough forms. Transfer the dough to a clean counter and gently gather it into a ball. Divide the dough into two equal disks, flatten each slightly, wrap tightly in plastic wrap, and refrigerate for at least 20 minutes (or up to 2 days) to chill thoroughly.
- Prepare the Berry Filling: In a medium bowl, gently toss the fresh berries with 2 tablespoons of sugar, 1 tablespoon of flour, and ½ teaspoon of cinnamon. Set aside while you prepare the pastry.
- Preheat Oven and Prepare Baking Sheets: Preheat your oven to 300°F (150°C). Line one or two rimmed cookie sheets with parchment paper for easy cleanup and to prevent sticking.
- Roll Out the First Dough Disk: On a lightly floured surface, roll out one of the chilled pastry disks into a circle about ⅛ inch (3mm) thick.
- Cut Dough Rounds: Using a 4-inch biscuit cutter or round cookie cutter, cut out six uniform rounds from the rolled dough. Carefully transfer one dough round to your prepared baking sheet using a spatula.
- Fill and Seal Turnovers: Place about one tablespoon of the prepared berry filling onto one side of the dough round. Lightly brush the edges of the dough (the half without filling) with a small amount of milk. Carefully fold the other side of the dough over the berries to create a semi-circle. Gently press the edges together with your fingers to seal, then use the tines of a fork to crimp the edges firmly, reinforcing the seal and adding a decorative touch.
- Repeat and Chill: Repeat the filling and sealing process with the remaining five dough rounds from the first disk. Then, repeat the entire rolling, cutting, filling, and sealing process with the second disk of dough to make a total of 12 turnovers. Once all turnovers are assembled, refrigerate them on the baking sheet for at least 15 minutes, or up to 4 hours, to ensure the pastry is firm before baking.
- Final Touch Before Baking: Just before baking, remove the chilled turnovers from the refrigerator. Lightly brush the tops of each turnover with milk and sprinkle generously with the remaining 1 tablespoon of granulated sugar (or coarse sugar for extra sparkle).
- Bake to Golden Perfection: Bake the turnovers in the preheated oven for approximately 30 minutes, or until they are beautifully golden brown and the filling is bubbly.
- Cool and Serve: Once baked, carefully transfer the turnovers to a wire rack to cool completely. Serve them warm from the oven for a gooey delight, or at room temperature for a firmer, equally delicious treat.
Notes
Feeling adventurous? You can easily make half of your turnovers with one type of berry and the other half with a different berry, just like I sometimes do! Simply divide your berries into separate bowls and mix half of the filling ingredients into each bowl (remembering to use 1 tablespoon of sugar for each batch of filling, as the last tablespoon is reserved for sprinkling over the dough before baking).
Recommended Products for Your Baking Journey
As an Amazon Associate and member of other affiliate programs, I earn from qualifying purchases.
- Professional Biscuit Cutters Set
- Reynolds Pre-Cut Parchment Paper Baking Sheets
- USA Pan Bakeware Half Sheet Pan
- High-Quality Food Processor
Nutrition Information:
Yield:
12
Serving Size:
1 turnover
Amount Per Serving:
Calories: 198
Total Fat: 16g
Saturated Fat: 10g
Trans Fat: 1g
Unsaturated Fat: 5g
Cholesterol: 58mg
Sodium: 324mg
Carbohydrates: 12g
Fiber: 1g
Sugar: 8g
Protein: 2g
How Much Did You Love This Recipe?
Please leave a comment on the blog or share a photo on Pinterest!
