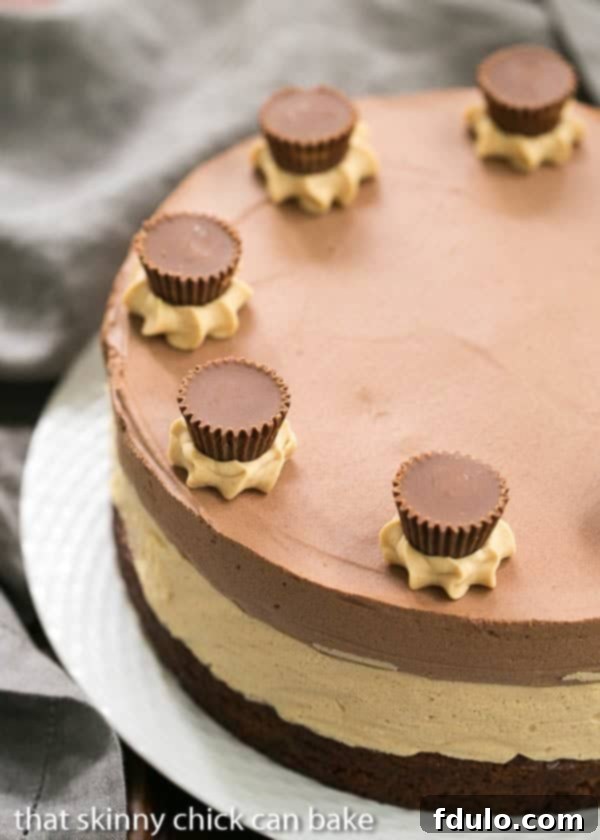
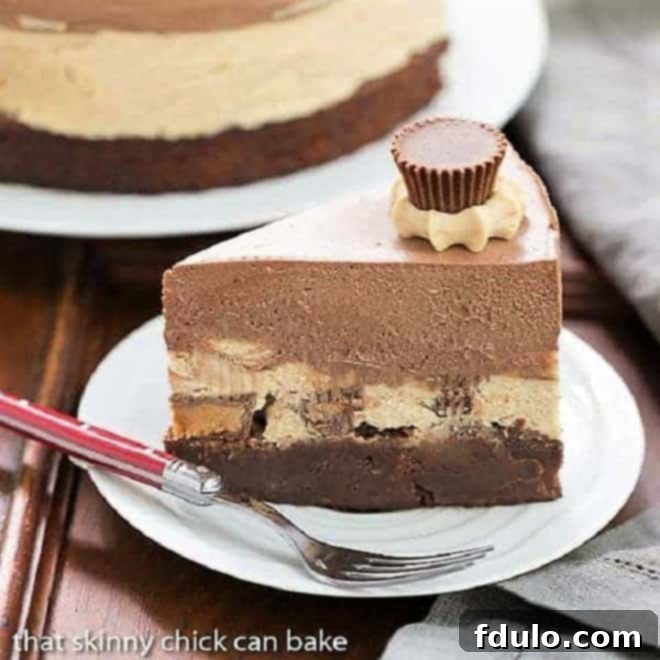
Prepare to delight your senses with this exquisitely rich and utterly luscious **Peanut Butter Chocolate Mousse Cake**! This dessert is the ultimate dream for anyone who adores the timeless combination of creamy peanut butter and decadent chocolate. Imagine a perfectly fudgy brownie base, generously topped with two distinct, velvety layers of mousse: one light and airy chocolate, the other smooth and rich peanut butter. It’s a symphony of textures and flavors, crowned with delightful garnishes, creating an unforgettable dessert experience. If you’ve ever found yourself craving the iconic taste of Reese’s Peanut Butter Cups in cake form, this meticulously crafted mousse cake recipe is destined to become your new obsession. My book club certainly found it irresistible, and I’m confident you will too!
This magnificent layered dessert begins with a moist, chewy brownie, providing a robust foundation that perfectly complements the delicate mousses. Each forkful delivers a harmonious balance of deep chocolate intensity and sweet, salty peanut butter bliss. It’s more than just a cake; it’s an indulgence, an experience, and a guaranteed crowd-pleaser that will have everyone asking for the recipe. This isn’t just another dessert; it’s a celebration of two beloved flavors coming together in a spectacular, show-stopping creation that looks as impressive as it tastes.

Why This Peanut Butter Chocolate Mousse Cake is a Must-Try
This **Peanut Butter Chocolate Mousse Cake** is not just any dessert; it’s a culinary masterpiece that demands a spot in your baking repertoire. Here’s why it’s an absolute must-make:
- An Irresistible Flavor Pairing: If you, like countless others, are utterly devoted to the classic combination of chocolate and peanut butter, then prepare to be utterly captivated. This cake masterfully balances the deep, bittersweet notes of chocolate with the creamy, salty-sweet richness of peanut butter, creating a flavor profile that is both nostalgic and supremely satisfying. It’s like your favorite candy bar elevated to an elegant, sophisticated dessert.
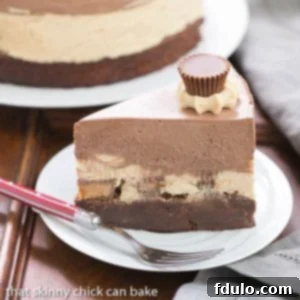
- A Symphony of Textures: This isn’t just about flavor; it’s about the incredible textural experience. You start with a dense, fudgy brownie base that offers a delightful chew. This is then contrasted by two distinct layers of mousse – one light, airy, and melt-in-your-mouth chocolate, and the other a wonderfully smooth, rich peanut butter. The combination of chewy, creamy, and fluffy textures in every bite makes this cake truly extraordinary and keeps your palate engaged.
- Surprisingly Appealing to All Palates: You might think a peanut butter dessert would only appeal to die-hard fans, but this cake has a remarkable ability to win over even the skeptiest. I’ve personally witnessed family members who typically shy away from peanut butter desserts devour a slice and even ask for seconds. The peanut butter mousse in this recipe is perfectly balanced, offering a distinct flavor without being overwhelmingly intense, making it universally appealing.
- Impressive Yet Achievable: Despite its stunning appearance and gourmet taste, this mousse cake is surprisingly approachable for the home baker. While it involves a few steps and some chilling time, none of the individual components are overly complicated. The result is a dessert that looks like it came from a high-end patisserie, making you look like a seasoned pro without requiring advanced pastry skills. It’s perfect for special occasions, holidays, or simply when you want to treat yourself and your loved ones to something truly spectacular.
Our home has always been a microcosm of culinary preferences, particularly when it comes to the great peanut butter debate. No, I’m not referring to the friendly rivalry between my two sons over their beloved Indiana University and Purdue University; I’m talking about the deeply entrenched divisions surrounding peanut butter itself. You see, I absolutely adore peanut butter when it’s transformed into a delightful dessert. Give me peanut butter in a cake, a cookie, or a mousse, and I’m in heaven. However, offer me a plain peanut butter sandwich or a spoonful straight from the jar, and I’ll politely decline. Blech!
Conversely, my husband is a devoted fan of the classic peanut butter sandwich. He enjoys its simplicity and straightforward flavor. Yet, when it comes to sweets like rich peanut butter cookies, whimsical peanut butter Rice Krispie treats, or any of the other delectable peanut butter creations I cherish, he usually gives them a cold shoulder. My eldest son and daughter unequivocally stand on my team, championing all things peanut butter dessert. Our youngest, however, aligns with his dad’s more traditional stance. Knowing these divided loyalties, I often save my most decadent peanut butter creations for gatherings, when I’m entertaining friends, or when bringing a show-stopping dish to a potluck dinner, ensuring every bite is appreciated by a diverse audience of sweet treat lovers.

Key Ingredients for Your Mousse Cake
Crafting this exquisite **Peanut Butter Chocolate Mousse Cake** relies on a selection of quality ingredients. Here’s a closer look at what you’ll need and why:
- Kitchen Staples: You’ll need everyday essentials like water for dissolving gelatin, powdered sugar for sweetening the mousses and frosting, butter for the frosting, and semi-sweet chocolate chips, which provide a rich, classic chocolate flavor without being overly sweet.
- 1 Box Brownie Mix: For convenience, a high-quality box brownie mix works wonderfully as the base. Alternatively, if you prefer to bake from scratch and enjoy a truly homemade foundation, my One Bowl Fudgy Brownies recipe, baked for approximately 35 minutes, is an excellent choice, ensuring a perfectly dense and chewy texture.
- 8 ounces Reese’s Minis: These mini peanut butter cups are a delightful addition, adding extra texture and bursts of iconic Reese’s flavor within the cake and as a garnish. Be sure to reserve some from the bag for decorating the top of your finished masterpiece.
- Powdered Gelatin: This is a crucial stabilizing agent for both mousse layers, giving them their characteristic light yet firm structure. Look for unflavored powdered gelatin, such as the widely available Knox brand, typically found in the baking aisle alongside Jell-O products.
- Reese’s Peanut Butter Chips: These chips are specifically designed to melt smoothly and infuse the peanut butter mousse with an authentic, rich peanut butter taste and a beautiful, creamy consistency. You’ll find them in the baking aisle, usually next to the chocolate chips.
- Heavy Cream: Essential for creating light, airy mousses. Use heavy cream with at least 36% butterfat content for optimal whipping and stability, ensuring your mousses achieve their desired fluffy texture and hold their shape beautifully.
- Creamy Peanut Butter: The star of the peanut butter mousse and frosting! I used Jif, but any good quality creamy peanut butter will work perfectly. It’s imperative to **avoid natural peanut butter** that separates, as its inconsistent texture and oil separation will prevent the mousse from setting correctly and achieving that desired silky smoothness.
Mastering Your Mousse Cake: Expert Tips for Success
Achieving a picture-perfect and delicious **Peanut Butter Chocolate Mousse Cake** is within reach with these expert tips:
- The Essential Springform Pan: A springform pan is truly indispensable for assembling this layered dessert. Its removable sides allow for effortless release of the cake without disturbing the delicate mousse layers, making it ideal for presenting a beautifully structured creation. Ensure your pan is greased and lined with parchment paper for easy removal.
- Perfecting the Brownie Base: Begin by baking your brownie layer and, most importantly, allow it to cool completely before proceeding with any other steps. A warm brownie will melt the delicate mousse layers, compromising the cake’s structure. Cooling it thoroughly, preferably in the refrigerator, ensures a firm foundation for your mousses.
- Strategic Chilling Time is Key (PRO-Tip): Patience is a virtue, especially when it comes to mousse cakes. Both the peanut butter mousse and chocolate mousse require significant chilling time – at least 2 hours each – to properly set. This means that while the individual steps aren’t overly complex, there’s a considerable amount of waiting involved. For best results and stress-free serving, it’s highly recommended to make this magnificent cake the day before you plan to serve it. This allows ample time for all layers to firm up beautifully, ensuring clean slices and optimal texture.
- The Power of an Offset Spatula (PRO-Tip): If you don’t already own one, consider investing in a small offset spatula. This versatile tool is a game-changer for spreading and smoothing layers. Its angled blade allows you to create incredibly even, professional-looking mousse layers with ease, ensuring each slice is as visually appealing as it is delicious.
- Optimal Storage for Freshness: This exquisite mousse cake is perishable and should be kept refrigerated until just before serving. To maintain its quality and freshness, it will keep wonderfully in the refrigerator for up to 4 days, provided it’s not left out at room temperature for longer than two hours. Prolonged exposure to warmth will cause the mousse to soften and potentially lose its structure.
- Storing Your Masterpiece: To store the cake, you have a couple of options. You can carefully place it back into its springform pan and cover it tightly with plastic wrap or aluminum foil. Alternatively, if it’s already on a serving plate, wrap the entire cake with several lengths of plastic wrap, ensuring it’s completely airtight. This prevents drying out and protects the delicate mousse from absorbing refrigerator odors.
- Consider Temperature for Serving: While the cake needs to be chilled to set, taking it out of the refrigerator 15-20 minutes before serving can enhance the texture of the mousse, allowing it to soften slightly to its ideal creamy consistency for the best eating experience.
Even though we were all stuffed to the gills with the marvelous array of food at our book club pitch-in dinner, there was an almost mystical consensus that everyone absolutely had room for a bit of dessert. As I began to dish up delicate slivers of this mousse cake, a chorus of delighted swoons and appreciative groans filled the room. The cake was such a hit that many guests, myself included, ended up taking home extra slices to savor later. It truly was the perfect grand finale to a wonderful evening of good food and great company.
The biggest surprise of all, however, unfolded at home the following night. My husband, Bill, and our youngest son, Nick, both surprisingly requested a slice. Knowing their typical aversion to peanut butter desserts, I half-jokingly told them they could simply scrape off the peanut butter mousse and focus on the rich chocolate elements if they preferred. To my absolute astonishment and delight, they both licked their plates clean! Nick, in particular, commented that the peanut butter flavor wasn’t overly intense or overpowering, which was a huge win. While he still opted not to eat his peanut butter garnish, those were definitely baby steps in the right delicious direction!

Frequently Asked Questions About Mousse Cakes
A mousse is a light, airy, and rich dish that can be either savory or sweet. In the context of desserts, it’s typically made with fruit purees, chocolate, coffee, or other flavorings. The characteristic frothy texture, from which mousse gets its name (French for ‘froth’ or ‘foam’), is achieved by incorporating air through whipped cream, beaten egg whites, or sometimes both. Gelatin is frequently added to stabilize the mixture, ensuring it holds its shape and maintains its delicate texture. The process generally involves preparing a base flavor (like melted chocolate or fruit puree), folding in the aerating agents, and then chilling until set. This creates a luxurious mouthfeel that is both indulgent and surprisingly light.
A mousse cake, at its heart, is defined by having one or more layers of mousse. Beyond this central component, its construction can vary widely, offering a delightful interplay of textures and flavors. Common bases include a fudgy brownie layer, as seen in this Peanut Butter Chocolate Mousse Cake, providing a dense and chewy contrast to the light mousse. Other popular choices for bases or additional layers might include a crisp cookie crust (like an Oreo or graham cracker crust), delicate ladyfingers soaked in syrup, or thin layers of traditional sponge cake. These elements not only add to the flavor profile but also provide essential structural support for the creamy mousse layers, making the cake easier to slice and serve. Often, mousse cakes are finished with glazes, whipped cream, fresh fruit, or chocolate shavings for an extra touch of elegance.
Achieving perfectly even layers in a mousse cake is key to its professional appearance. The simplest and most effective tool for this is an offset spatula. After pouring each mousse layer into the springform pan over the cooled brownie base, use the offset spatula to gently and smoothly spread the mousse right to the edges of the pan. To gauge evenness, look at the distance from the top surface of the mousse layer to the top edge of your springform pan. If this visual assessment isn’t your strong suit, don’t hesitate to pull out a clean ruler and measure various points around the perimeter to ensure uniformity. It’s crucial to make any necessary adjustments to the mousse layer while it is still soft and pliable. Once the gelatin begins to set as it chills, the mousse will firm up, and it will be nearly impossible to correct unevenness without disrupting the layer.
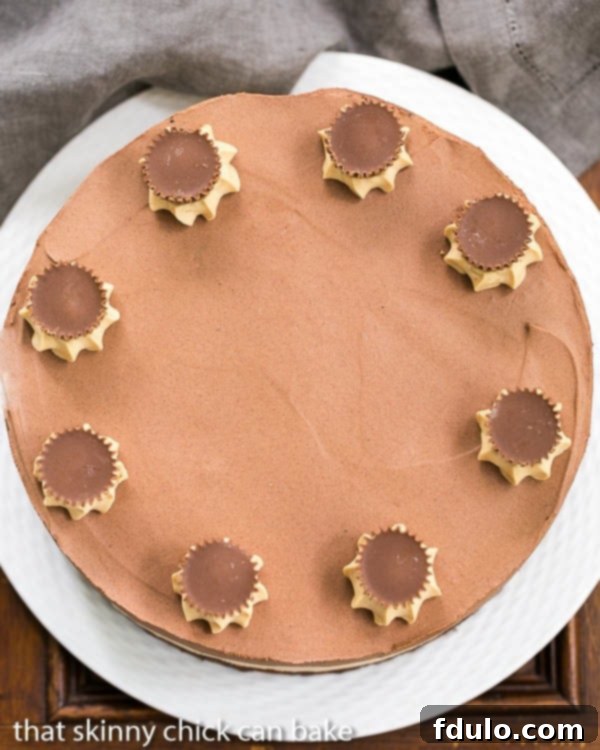
Garnishing your mousse cake is the final flourish that elevates it from delicious to absolutely stunning. For this Peanut Butter Chocolate Mousse Cake, a simple yet elegant buttercream or peanut butter frosting can be piped in decorative swirls or rosettes around the perimeter of the cake. To truly lean into the theme, top each piped swirl with a mini Reese’s peanut butter cup. The distinctive shape and recognizable branding of these candies immediately hint at the delightful flavors within. Beyond this, consider other beautiful options: delicate chocolate curls or shavings scattered over a bed of whipped cream roses create a sophisticated, restaurant-worthy topping. A drizzle of melted chocolate or a swirl of caramel sauce can add an artistic touch. Fresh berries, like raspberries or strawberries, provide a lovely color contrast and a hint of tartness. For a truly professional look, consider using a fine-mesh sieve to dust cocoa powder over the top or create a stencil design with powdered sugar. The possibilities are endless, allowing you to personalize your creation.
You May Also Love These Chocolate & Peanut Butter Desserts:
- Reese’s Peanut Butter Pie: A creamy, dreamy pie showcasing the beloved Reese’s flavor.
- Peanut Butter Cheesecake Bars: Rich cheesecake with a peanut butter twist, perfect for sharing.
- Homemade Reese’s Bars: A delightful no-bake treat mimicking your favorite candy.
- Plus, explore more of the Best Dessert Recipes for every occasion!
Stay connected and share your culinary adventures! Follow me on social media @ Instagram, Facebook, and Pinterest. Don’t forget to tag me when you try one of my delicious recipes! And if you love the delightful results, please show your appreciation by giving it a 5-star rating in the recipe card below. Your feedback helps other dessert enthusiasts discover these wonderful creations!

Peanut Butter Chocolate Mousse Cake Recipe
1 hour
35 minutes
1 hour 35 minutes
16 servings
A decadent chocolate and peanut butter dessert, perfect for any special occasion or a delightful treat.
Ingredients
- 1 box brownie mix (for a homemade touch, use my One Bowl Fudgy Brownies recipe and bake for 35 minutes to ensure a rich, dense base)
- 8 ounces Reese’s minis (these add delightful texture and flavor; remember to reserve some for garnishing your finished cake)
Peanut Butter Mousse Layer:
- 1 ⅛ teaspoon powdered gelatin (ensure it’s unflavored for a pure peanut butter taste)
- 1 ½ tablespoons water (for dissolving the gelatin)
- 9 ounces Reese’s peanut butter chips (these melt beautifully to create a smooth, authentic peanut butter flavor)
- 2 ¼ cups heavy cream (must be cold and with at least 36% butterfat for best whipping results)
- 1/4 cup powdered sugar (to sweeten the mousse without adding graininess)
Chocolate Mousse Layer:
- 1 ⅛ teaspoon powdered gelatin (the key to a stable, yet light mousse)
- 1 ½ tablespoons water (for bloomimg the gelatin)
- 9 ounces semisweet chocolate chips (use a good quality brand for the best chocolate flavor)
- 2 ¼ cups heavy cream (chilled for optimal whipping volume and stability)
- ¼ cup powdered sugar (finely sifted to prevent lumps)
Peanut Butter Frosting for Decorations:
- ⅓ cup creamy peanut butter (do not use natural, separating peanut butter for this)
- 4 tablespoons unsalted butter, at room temperature (softened butter will cream smoothly)
- 1 cup powdered sugar (sifted to ensure a silky-smooth frosting)
Instructions
- Prepare the Brownie Base: Begin by baking your chosen brownie mix (or homemade recipe) in a greased and parchment-lined 9-inch springform pan. Once baked, allow the brownie to cool completely on a wire rack. Carefully remove the cooled brownie from the pan.
- Assemble the Base: Place the completely cooled brownie back into the springform pan. Line the sides of the pan all the way around with a collar of parchment paper, ensuring it extends above the pan’s edge. This parchment collar will help contain the mousse layers as they set and make for a clean release.
- Add Reese’s Minis: Evenly sprinkle the Reese’s mini peanut butter cups over the cooled brownie layer. These will add delightful pockets of flavor and texture.
Peanut Butter Mousse Layer:
- Bloom Gelatin: To prepare the peanut butter mousse, sprinkle the powdered gelatin over the 1 ½ tablespoons of water in a small heatproof bowl. Let it sit undisturbed for 5 minutes to bloom and soften.
- Heat Cream and Dissolve Gelatin: In a separate microwave-safe bowl or small saucepan, heat ¾ cup of heavy cream until it just reaches a boil. Add the bloomed gelatin to the hot cream and whisk continuously until the gelatin is completely dissolved and no granules remain.
- Melt Peanut Butter Chips: Place the Reese’s peanut butter chips in a heatproof bowl. Pour the hot gelatin-cream mixture over the chips. Let it sit for about a minute to allow the chips to soften, then stir vigorously with a spatula or whisk until the mixture is completely smooth and all chips are melted.
- Whip Cream: Allow the peanut butter chip mixture to cool slightly for about 5 minutes. Meanwhile, in a large mixing bowl, beat 1½ cups of cold heavy cream on high speed until it begins to thicken. Gradually add the ¼ cup of powdered sugar and continue beating until stiff peaks form.
- Combine Mousse: Gently and slowly fold the whipped cream into the cooled peanut butter mixture in several additions until fully incorporated, maintaining the light and airy texture.
- Layer Mousse: Carefully spread this creamy peanut butter mousse evenly over the brownie and Reese’s layer in the springform pan. Use an offset spatula for a smooth, level surface.
- Chill: Place the cake in the refrigerator and chill for at least 2 hours, or until the peanut butter mousse layer is completely set and firm.
Chocolate Mousse Layer:
- Bloom Gelatin: For the chocolate mousse, sprinkle the remaining 1 ⅛ teaspoon of gelatin over the 1 ½ tablespoons of water in a clean bowl. Let it dissolve and bloom for approximately 5 minutes.
- Heat Cream: Microwave ¾ cup of heavy cream until it reaches a boil, ensuring it is hot enough to dissolve the gelatin.
- Dissolve Gelatin: Add the bloomed gelatin mixture to the hot cream and whisk thoroughly until the gelatin is fully dissolved and the mixture is smooth.
- Melt Chocolate: Place the semisweet chocolate chips in a clean heatproof bowl. Pour the hot gelatin-cream mixture over the chocolate chips. Let it sit for a couple of minutes, then whisk until the chocolate is completely melted and the mixture is silky smooth. Allow this chocolate mixture to cool slightly.
- Whip Cream: In another large mixing bowl, beat the remaining 1 ½ cups of cold heavy cream on high speed until it begins to thicken. Add the remaining ¼ cup of powdered sugar and continue beating until stiff peaks are achieved.
- Combine Mousse: Carefully fold the whipped cream into the cooled chocolate mixture in small increments, taking care not to deflate the cream. Continue folding until all is incorporated and the chocolate mousse is light and smooth.
- Layer Mousse and Chill: Gently pour this luscious chocolate mousse over the set peanut butter mousse layer. Smooth the top with an offset spatula. Return the cake to the refrigerator and chill for another 2 hours, or even longer, until this chocolate mousse layer is completely firm and set.
To Finish the Cake:
- Release Cake: Once both mousse layers are completely firm, carefully remove the sides of the springform pan and gently peel away the parchment collar from around the cake.
- Prepare Peanut Butter Frosting: In a medium bowl, beat together the creamy peanut butter, softened butter, and 1 cup of powdered sugar until the mixture is light, whipped, and perfectly creamy. This will create your decorative frosting.
- Garnish and Serve: Transfer the peanut butter frosting to a piping bag fitted with your desired tip. Pipe decorative rosettes or swirls around the perimeter of the cake. For the ultimate finishing touch, top each rosette with a reserved mini peanut butter cup. Serve chilled and enjoy this extraordinary dessert!
Notes
Total active preparation and cooking time for this recipe does not include the essential cooling time for the brownie and the cumulative 5+ hours of chilling time required for the mousse layers to set perfectly. Plan ahead to ensure adequate chilling for best results.
Recommended Products
As an Amazon Associate and member of other affiliate programs, I earn from qualifying purchases.
- KitchenAid 9-Speed Digital Hand Mixer
- 3 Pyrex Mixing Bowls
- 9-inch springform pan
Nutrition Information:
Yield:
16
Serving Size:
1 slice
Amount Per Serving:
Calories: 578Total Fat: 45gSaturated Fat: 24gTrans Fat: 1gUnsaturated Fat: 18gCholesterol: 85mgSodium: 188mgCarbohydrates: 43gFiber: 2gSugar: 36gProtein: 8g
HOW MUCH DID YOU LOVE THIS RECIPE?
Please leave a comment on the blog or share a photo on Pinterest
