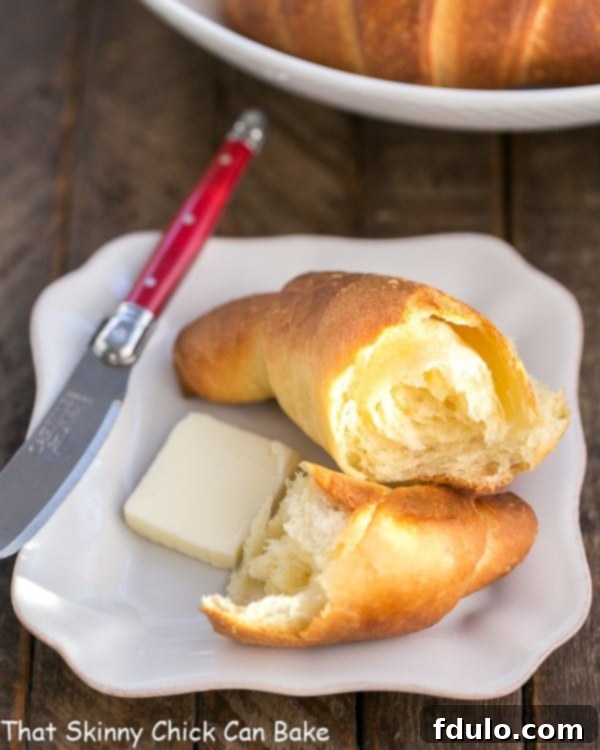
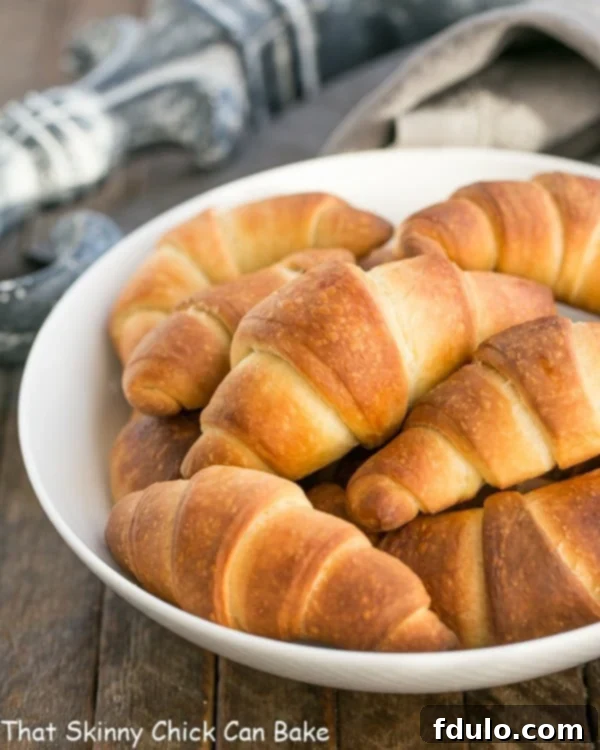
Imagine the aroma: a warm, inviting scent of freshly baked bread filling your home. Now, picture tender, flaky, golden-brown rolls, brushed with butter, melting in your mouth. This isn’t just a dream; it’s the reality of sinking your teeth into our incredible Buttery Homemade Crescent Rolls. This made-from-scratch crescent roll recipe is designed to be so irresistibly delicious, so utterly devoured, that you’ll want to make it a cherished tradition again and again. Forget those rolls from a can – once you experience the sublime texture and rich, buttery flavor of these homemade delights, there’s simply no turning back.
For years, my family adored the convenience of store-bought crescent rolls. But I knew deep down that nothing could compare to the true comfort and quality of homemade. My journey to perfect this crescent rolls recipe began with a desire to create a version that truly outshone its canned counterparts, and I can confidently say, these dinner rolls do just that. They’re a testament to how simple ingredients, a little patience, and a lot of love can transform an ordinary meal into something extraordinary. Get ready to impress everyone at your table, from the pickiest eaters to the most seasoned food critics, with these phenomenal homemade crescent rolls.

Why These Buttery Homemade Crescent Rolls Are a Must-Make
In a world of convenience, sometimes the most rewarding experiences come from a little effort in the kitchen. Making homemade yeast rolls is one of those experiences. Here’s why these buttery crescent rolls will become your new go-to recipe:
- Unmatched Flavor and Texture: There’s simply no comparison between scratch-made dinner rolls and anything you can find on a grocery store shelf or pop from a can. These rolls boast an incredible depth of flavor that comes from real butter and fresh ingredients, combined with a tender, flaky texture that is absolutely divine. Each bite is a symphony of buttery richness and soft chewiness.
- Superior Ingredients: Our recipe champions the use of real butter, and you will taste the difference. This isn’t just a minor detail; it’s the heart of what makes these buttery crescent rolls so exceptional. The butter contributes to their golden crust, rich aroma, and the melt-in-your-mouth tenderness that defines a truly great roll.
- Freezer-Friendly Convenience: Life gets busy, especially around the holidays. The beauty of this crescent rolls recipe is that they freeze exceptionally well. This means you can bake them ahead of time, stash them away, and pull them out whenever you need a freshly baked treat. It’s perfect for meal prepping or ensuring you always have a comforting side dish ready to go.
- The Ultimate Impressive Treat: Prepare to be the star of any gathering! When guests rave about these rolls and ask where you bought them, the pride of saying, “I made them from scratch!” is unparalleled. These flaky yeast rolls are a fantastic way to showcase your baking prowess and add a personal touch to any meal or special occasion.
- Wholesome Goodness: By making your own rolls, you have complete control over the ingredients, avoiding preservatives, artificial flavors, and excess sugars often found in store-bought options. It’s a healthier, more wholesome choice for your family.
During festive seasons, it’s often tempting to rely on store-bought items to ease the burden of cooking. I used to be the same, frequently grabbing pre-made rolls from the bakery aisle. But this year, I decided to tackle the challenge head-on with a little forward planning. I baked a large batch of these utterly delicious, flaky, buttery crescent rolls, and once cooled, I carefully popped half of them into the freezer. Stored securely in a freezer-safe zip-top bag with most of the air removed, these dinner rolls were absolutely fabulous after being defrosted and gently warmed. The quality remained superb, proving that homemade doesn’t have to mean last-minute stress. They truly elevate any meal, making even the simplest dinner feel like a special event.

Unveiling the Key Ingredients for Perfect Buttery Crescent Rolls
Creating extraordinary homemade crescent rolls starts with understanding the role of each ingredient. While the list might seem simple, the quality and preparation of these components are crucial for achieving that tender, flaky, buttery perfection.
- Kitchen Staples: Butter, Sugar, Flour, Salt – These are the foundation of almost any great baking project. For butter, always opt for unsalted to control the sodium levels in your recipe. Good quality all-purpose flour works best here, providing the necessary structure without being too dense. Sugar not only adds a touch of sweetness but also helps activate the yeast and contributes to the golden-brown crust. Salt is vital for enhancing flavor and regulating yeast activity.
- Skim Milk – The recipe specifically calls for skim milk, but don’t feel restricted if you typically keep other fat percentages on hand. I often use 2% milk, and it works wonderfully. The fat content in the milk can contribute to a slightly richer flavor and softer crumb, but the difference is minimal enough that you should use what you have. Ensure the milk is warmed to the correct temperature, as specified in the recipe, to properly activate the yeast without “killing” it with excessive heat.
- Eggs – Always use large eggs for consistency in baking recipes. Eggs add richness, moisture, and help bind the dough together, contributing to its tender texture and golden color. They are essential for a well-structured and flavorful roll.
- Instant Yeast – I highly recommend using Red Star Platinum Yeast for its reliability and consistent results. PRO-Tip: Before you even start mixing, always double-check the expiration date on your yeast package! Expired yeast is the most common culprit for dough that doesn’t rise. If you’re unsure about your yeast’s potency, perform a quick test: combine 1 teaspoon of sugar and 2 ¼ teaspoons of yeast (typically one standard envelope) with ¼ cup of warm water (around 105-115°F or 40-46°C). Let it sit for about 10 minutes. If the mixture becomes foamy, bubbly, and develops a distinct yeasty aroma, your yeast is active and ready to go. If not, it’s time to replace it.
- Egg White Glaze – A simple egg white beaten with 1 teaspoon of water serves as the perfect glaze for these homemade crescent rolls. Brushing this mixture over the rolls just before baking creates a beautiful, shiny, golden crust that adds to their visual appeal and delicious texture. It gives them that professional, bakery-quality finish.
Mastering the Art: Expert Tips for Flawless Buttery Crescent Rolls
While making homemade crescent rolls might seem daunting to some, a few expert tips can transform the process into an enjoyable and rewarding experience. The most critical element of this recipe isn’t just the mixing and baking; it’s the planning. There’s a generous amount of butter in this delightful yeasted dough, which contributes immensely to its flavor and flakiness. This richness means the dough can be a bit sticky, so don’t be alarmed if it requires a little extra flour during the rolling process – that’s perfectly fine and expected!
- Strategic Proofing and Chilling: This crescent rolls recipe involves a structured timeline to develop its incredible flavor and texture. You’ll begin with an initial 3-hour proofing period at room temperature, allowing the yeast to become active and the dough to develop. Following this, the dough undergoes a lengthy 8-12 hour chilling period in the refrigerator. This crucial cold ferment not only deepens the flavor profile of the yeast rolls but also makes the dough much easier to handle and contributes to that desirable flaky texture. After forming the crescents, they are brought back to room temperature for a final rise before baking. Rushing these steps will compromise the final result, so patience is truly a virtue here.
- The Power of Partial Pre-Baking: For ultimate convenience, especially when preparing for large gatherings or holidays, Cook’s Illustrated offers an ingenious tip: partially pre-bake your homemade crescent rolls. After forming, bake them for only 4 minutes at 350°F. Once lightly baked and cooled, you can pop them directly into the freezer. These partially baked rolls can then be defrosted and fully baked for 12-16 minutes whenever you need them. This method is a game-changer for reducing stress on busy days, allowing you to serve fresh, warm rolls without all the last-minute fuss.
- Quality Ingredients are King: As emphasized in the ingredients section, the quality of your butter is paramount for these buttery dinner rolls. Use a good quality, unsalted butter for the best flavor. Equally important is your yeast. Always check the expiration date on your yeast package before you begin. There’s nothing more frustrating than investing time and effort into mixing a dough only to find it doesn’t rise because of inactive yeast. A quick yeast potency test (as detailed above) can save you from disappointment.
- Don’t Overwork the Dough: While a stand mixer is a fantastic tool for this recipe, be mindful not to overwork the dough, especially after adding the flour. Over-mixing can develop too much gluten, resulting in tough rolls rather than the tender, flaky texture you desire. Mix until just combined and then until stronger webs form, as specified in the instructions.
- Patience with Rolling: The chilled dough, rich with butter, will be firm. Allow it a few minutes to slightly soften before attempting to roll it out, but don’t let it get too warm. A lightly floured surface is your friend here. Roll with even pressure to achieve a consistent thickness, which ensures even baking.
Frequently Asked Questions About Buttery Homemade Crescent Rolls
Absolutely! This crescent rolls recipe is wonderfully versatile for make-ahead convenience. You have a couple of excellent options. Firstly, you can follow the partial pre-baking method mentioned in our expert tips: bake the formed rolls for just 4 minutes at 350°F, then cool completely and freeze them in an airtight container or freezer bag. When ready to serve, simply thaw and bake for 12-16 minutes until golden. Alternatively, you can fully bake the rolls, let them cool completely, and then store them in an airtight freezer-safe container or a freezer Ziploc bag, ensuring as much air as possible is removed. Fully baked rolls can be frozen for up to 3 months without compromising their quality. This makes them perfect for holiday meal prep or having fresh dinner rolls ready at a moment’s notice.
Freshly baked homemade crescent rolls are best enjoyed the day they are made. However, if you have leftovers, they can be stored in an airtight container at room temperature for up to 3 days, maintaining a good level of freshness. For an extended shelf life, you can store them in the refrigerator for up to 5-6 days. For even longer storage, as mentioned above, fully baked rolls can be frozen for up to 3 months. Proper storage is key to preserving their soft texture and delightful flavor.
Reviving flaky yeast rolls is incredibly easy! If your rolls are at room temperature or have been refrigerated, a quick warming will bring them back to life. A few seconds in the microwave (start with 10-15 seconds) is often all they need to become soft and warm again. Be careful not to overheat, as this can make them tough. Alternatively, you can wrap them loosely in aluminum foil and warm them in a preheated 350°F (175°C) oven for 5-10 minutes. If your rolls are frozen (either partially or fully baked), make sure to defrost them first (either overnight in the fridge or at room temperature for a few hours) before warming them using the methods described above. This ensures they heat through evenly and retain their tender texture. A revived homemade crescent roll tastes almost as good as one fresh from the oven!
Serving Suggestions for Your Buttery Homemade Crescent Rolls
These magnificent buttery homemade crescent rolls are versatile enough to grace any table, from a casual weeknight dinner to the most festive holiday feast. Their delicate flavor and tender texture make them the perfect accompaniment to a wide variety of dishes.
- Holiday Feasts: They are an absolute essential for Thanksgiving, Christmas, or Easter dinners. Serve them alongside roasted turkey, ham, or prime rib. Their richness complements savory main courses beautifully.
- Hearty Soups and Stews: There’s nothing more comforting than dipping a warm, flaky crescent roll into a bowl of hearty beef stew, creamy tomato soup, or a rich chicken noodle soup. They’re perfect for soaking up every last drop.
- Breakfast or Brunch: While traditionally a dinner roll, these crescents make a delightful addition to a brunch spread. Serve them with scrambled eggs, bacon, fresh fruit, and perhaps a dollop of jam or honey butter.
- Simple Spreads: Sometimes, all you need is a pat of good butter, a drizzle of honey, or a smear of your favorite fruit jam to elevate these rolls to perfection. The natural sweetness and buttery notes truly shine on their own.
- Sandwich Sliders: For a unique twist, slice cooled crescent rolls horizontally and fill them with deli meats, cheese, or even leftover pulled pork for gourmet mini sliders.
These crescent rolls truly are worth every bit of effort. Just plan ahead, and treat your family to the ultimate holiday dinner rolls. They’ll evoke cherished memories of your childhood love for crescent rolls, but elevated to a whole new level of homemade deliciousness!
More Delectable Bread Recipes to Explore
If you’ve fallen in love with the process of making homemade bread and are eager to expand your baking repertoire, you’re in for a treat! Discover more fantastic recipes that will bring warmth and wonderful aromas to your kitchen. From sweet to savory, there’s a yeast bread recipe for every occasion:
- Homemade Orange Rolls: Bright, citrusy, and sweet – a perfect treat for breakfast or brunch.
- Classic Cinnamon Rolls: The ultimate comfort food, gooey and sweet with a delectable cream cheese frosting.
- Whole Wheat Dinner Rolls: A heartier, wholesome option for your next meal, still soft and delicious.
- Japanese Milk Bread: Known for its incredibly soft, fluffy, and pillowy texture.
- Explore more of the Best Yeast Bread Recipes for endless baking inspiration.
Stay in touch with our latest recipes and baking tips through social media! Follow us on Instagram, Facebook, and Pinterest. Don’t forget to tag us when you try one of our recipes! And if you absolutely adore the results, please consider giving it a 5-star rating in the recipe card below – your feedback means the world to us!

Buttery Homemade Crescent Rolls
30 minutes
26 minutes
56 minutes
16 rolls
A truly homemade version of the buttery crescent rolls you know and love, elevated with exceptional flavor and a tender, flaky texture.
Ingredients
- ¾ cup skim milk
- 16 tablespoons unsalted butter, cut into 16 pieces
- ¼ cup granulated sugar
- 3 large eggs
- 4 cups all-purpose flour
- 1 teaspoon instant yeast (Red Star Platinum Yeast recommended)
- 1 ½ teaspoons salt
- 1 large egg white, beaten with 1 teaspoon water (for glazing)
Instructions
- Heat the skim milk, butter, and sugar in a 4-cup Pyrex measuring cup (or a small saucepan) until the butter is mostly melted and the mixture is warm (around 105-115°F or 40-46°C). Whisk thoroughly to combine all ingredients.
- In a separate medium bowl, lightly beat the 3 large eggs. Gradually drizzle in about one-third of the warm milk mixture into the beaten eggs, whisking constantly to temper the eggs. Slowly whisk in the remaining milk mixture until fully incorporated.
- Using a stand mixer fitted with the paddle attachment, combine the flour and instant yeast on low speed for about 15 seconds, ensuring they are well mixed.
- With the mixer running on low speed, add the egg and milk mixture in a slow, steady stream. Mix for approximately 1 minute. Increase the speed to medium and beat for 1 minute. Gradually add the salt and continue beating until stronger gluten webs begin to form, which typically takes about 3 minutes longer. The dough will remain relatively loose rather than forming a cohesive ball.
- Transfer the dough to a large bowl that has been lightly greased. Cover the bowl tightly with plastic wrap and let it rise at room temperature for about 3 hours, or until the dough has doubled in size and the surface feels slightly tacky.
- Line a rimmed baking sheet with plastic wrap. Lightly sprinkle the risen dough with flour (using no more than 2 tablespoons total) to prevent sticking, then gently press down on the dough to deflate it.
- Transfer the dough to a lightly floured counter. Gently press and shape the dough into a rough rectangular form.
- Transfer this dough rectangle to the prepared baking sheet, cover it tightly with plastic wrap, and refrigerate for a minimum of 8 hours, and up to 12 hours. This cold fermentation enhances flavor and texture.
- Once chilled, transfer the dough rectangle back to a lightly floured counter. Line a fresh baking sheet with parchment paper. Roll the dough into a uniform 20-inch by 13-inch rectangle.
- Cut the dough in half lengthwise (to make two 20×6.5-inch rectangles). Then, cut each of these rectangles into 8 triangles, trimming the edges as needed to create uniform crescent shapes. This will yield 16 triangles in total.
- Before rolling each crescent, gently elongate each dough triangle, stretching it an additional 2 to 3 inches in length from the wide end. This creates more layers and a better crescent shape.
- Starting from the wide end of each elongated triangle, gently roll up the dough tightly. Finish with the pointed tip positioned on the bottom. Carefully push the ends of the rolled dough inward towards each other to form the classic crescent shape.
- Arrange the formed crescents in 4 neat rows on the parchment-lined baking sheet. Wrap the entire baking sheet with plastic wrap and refrigerate for at least 2 hours, or up to 3 days. This is an excellent make-ahead step.
- When ready to bake, remove the baking sheet with the chilled rolls from the refrigerator. Let them rise at room temperature for about 1 hour, or until they feel slightly tacky, soft, and have lost their refrigerator chill.
- Thirty minutes before baking, adjust your oven racks. Place one rack in the lower-middle position and another in the lowest position. Place a second clean, rimmed baking sheet on the lowest rack and preheat your oven to 425°F (220°C).
- While the oven preheats, bring 1 cup of water to a boil on your stovetop. Lightly brush the risen crescent rolls with the prepared egg white and water mixture.
- Working quickly to prevent heat loss, place the baking sheet with the glazed rolls onto the upper-middle oven rack. Immediately pour the boiling water onto the empty rimmed baking sheet on the lower rack (this creates steam for a superior crust). Close the oven door promptly.
- Bake for exactly 10 minutes at 425°F (220°C). After 10 minutes, reduce the oven temperature to 350°F (175°C) and continue baking for another 12 to 16 minutes, or until the tops and bottoms of the rolls are a deep, golden brown.
- Carefully transfer the baked rolls to a wire rack. Allow them to cool for 5 minutes before serving warm. Enjoy your delicious homemade masterpiece!
Notes
This recipe for Buttery Homemade Crescent Rolls has been carefully adapted from a trusted Cook’s Illustrated recipe, ensuring reliability and fantastic results.
Recommended Products
As an Amazon Associate and member of other affiliate programs, I earn from qualifying purchases.
- USA Pan Bakeware Half Sheet Pan
- Reynolds Kitchens Non-Stick Baking Parchment Paper Sheets – 12×16 Inch, 22 Count
- KitchenAid KSM150PSER Artisan Tilt-Head Stand Mixer with Pouring Shield, 5-Quart, Empire Red
Nutrition Information:
Yield:
16
Serving Size:
1 roll
Amount Per Serving:
Calories: 247Total Fat: 13gSaturated Fat: 8gTrans Fat: 0gUnsaturated Fat: 4gCholesterol: 66mgSodium: 312mgCarbohydrates: 28gFiber: 1gSugar: 4gProtein: 5g
HOW MUCH DID YOU LOVE THIS RECIPE?
Please leave a comment on the blog or share a photo on Pinterest
