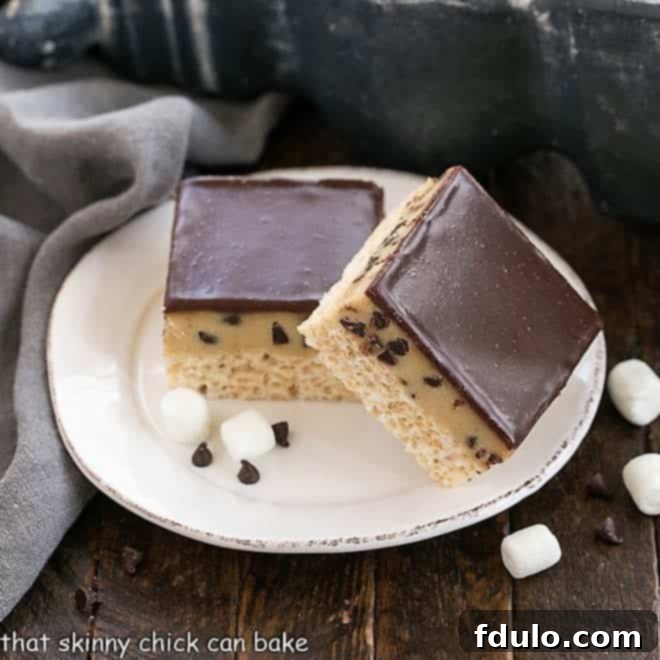
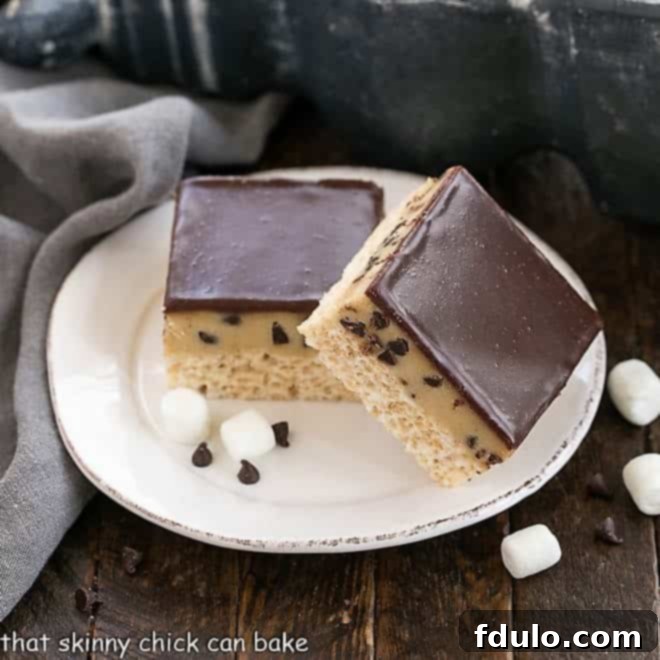
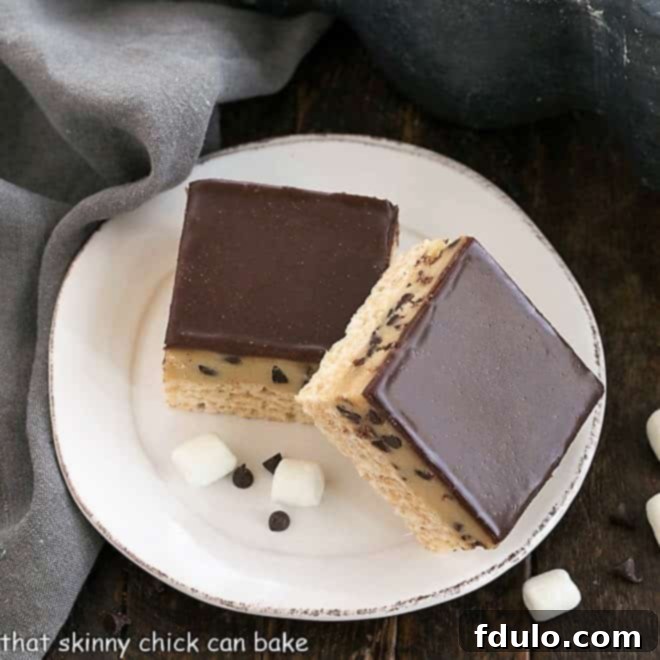
Welcome to the ultimate indulgence! Prepare your taste buds for an extraordinary dessert experience with our irresistible Cookie Dough Rice Krispie Treats. This isn’t just your grandma’s classic cereal bar; we’ve taken that beloved crispy, chewy foundation and elevated it to a whole new level of decadence. Imagine a thick layer of safe-to-eat, buttery cookie dough, crowned with a velvety, rich milk chocolate ganache, all atop a perfectly gooey Rice Krispie base. These aren’t just treats; they’re a celebration in every bite, promising to be the star of any gathering or the perfect secret indulgence for a cozy night in. Be warned: once you try them, you’ll understand why stretchy pants are highly recommended!
There’s something inherently nostalgic and comforting about the simple joy of a Rice Krispie Treat. That satisfying crunch, the sweet stickiness of melted marshmallows – it’s a taste of childhood. But what happens when you infuse that cherished classic with the irresistible allure of homemade cookie dough and a luxurious chocolate topping? Pure magic, that’s what. Our Cookie Dough Rice Krispie Treats transform a humble cereal bar into an unforgettable dessert that’s guaranteed to impress. It’s a no-bake wonder that delivers big on flavor and texture, making it a perfect choice for bakers of all skill levels.
Why These Cookie Dough Rice Krispie Treats Are a Must-Make
These layered delights are more than just a dessert; they’re a culinary adventure that combines three beloved treats into one sensational bar. Here’s why you absolutely need to add this recipe to your must-make list:
- Indulge Safely in Your Cookie Dough Cravings: For many, the raw cookie dough is the best part of baking cookies. However, traditional cookie dough contains raw eggs and untreated flour, posing potential health risks. This recipe uses an eggless cookie dough that’s completely safe to eat raw, providing all the delicious flavor and texture without any worries. Enjoy guilt-free indulgence!
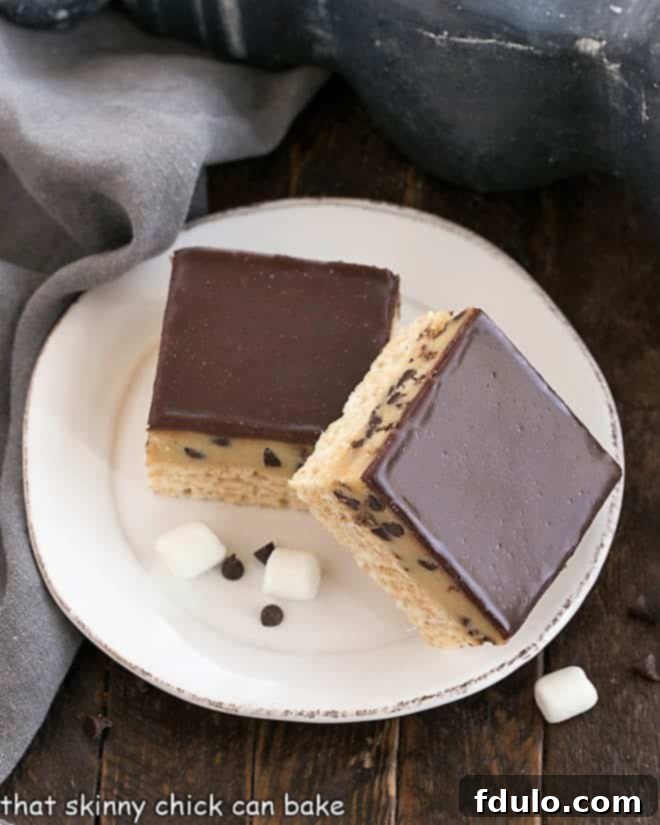
- A Symphony of Flavors and Textures: Prepare for a delightful interplay of textures and tastes. The base is wonderfully crispy and chewy from the classic Rice Krispie Treats. This is perfectly complemented by the creamy, sweet, and slightly salty eggless cookie dough layer, studded with mini chocolate chips. Finally, a silky, rich milk chocolate ganache crowns it all, adding a touch of sophisticated sweetness that brings the entire experience together. It’s a combination that’s truly to die for!
- An Elevated Take on a Classic: Forget ordinary Rice Krispie Treats. This recipe transforms a simple snack into a gourmet dessert that’s perfect for any occasion. Whether you’re looking for a unique treat for a family gathering, a show-stopping dessert for friends, or just a special way to spoil yourself, these bars are an ideal choice. They stand out from the crowd and are sure to become a new favorite.
- Effortless No-Bake Perfection: If the thought of turning on your oven on a hot day or dealing with complex baking steps fills you with dread, fear not! These Cookie Dough Rice Krispie Treats are entirely no-bake. This means less time in the kitchen and more time enjoying your delicious creations. It’s an easy-to-follow recipe that yields impressive results, perfect for busy schedules or beginner bakers.
Crafting Your Decadent Cookie Dough Rice Krispie Treats: A Step-by-Step Guide
Creating these layered masterpieces is surprisingly straightforward. Each layer is designed for simplicity, ensuring a smooth and enjoyable process from start to finish. Let’s walk through the key stages to bring these addictive treats to life.
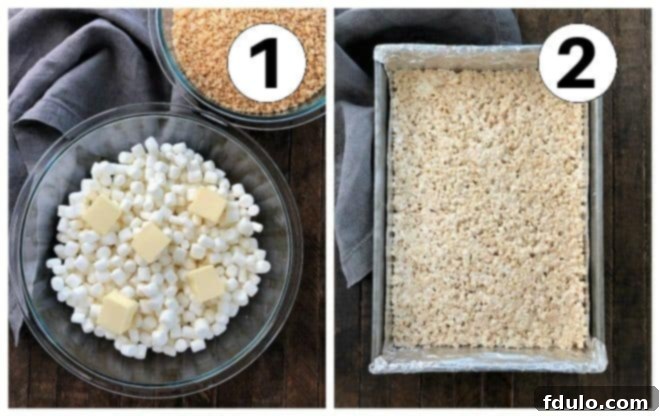
- Melt and Mix the Rice Krispie Treats Ingredients: The foundation of these incredible bars begins with the classic Rice Krispie Treat mixture. Gently melt butter and marshmallows together until smooth and gooey. Once perfectly melted, carefully fold in the Rice Krispies cereal, ensuring every flake is thoroughly coated with the sweet marshmallow mixture. This step is crucial for achieving that signature crispy-chewy texture.
- Press the Mixture into a Foil-lined Pan: Once your cereal mixture is ready, it’s time to prepare your pan. Line a 9×13 inch baking pan with nonstick foil for easy removal. Then, gently press the warm Rice Krispie mixture evenly into the bottom of the prepared pan. Remember, a light hand is key here; don’t compact the mixture too much, as this can lead to hard, dense bars. Aim for an even, slightly loose layer that will be pleasant to bite into.
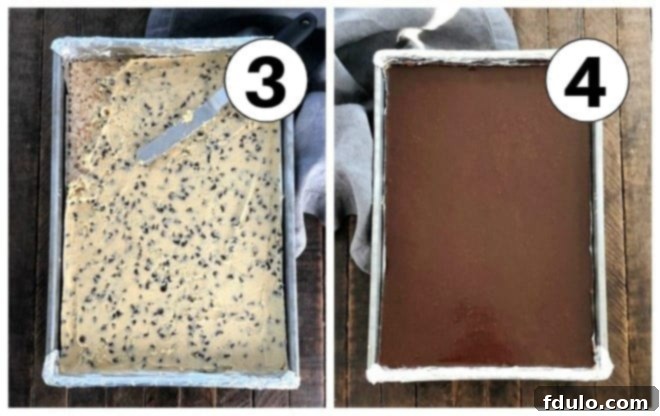
- Spread Cookie Dough over Rice Krispie Layer: With the crispy base set, it’s time for the star layer: the edible cookie dough. Prepare your eggless cookie dough according to the recipe, ensuring your flour is heat-treated for safety. Carefully spread this luscious, chocolate chip-studded dough evenly over the cooled Rice Krispie layer. Take your time to create a smooth, consistent layer that will provide a wonderful contrast in texture and flavor.
- Top with Chocolate Ganache: The grand finale! A rich, glossy milk chocolate ganache is the perfect crowning glory for these treats. Prepare your ganache by heating heavy cream and pouring it over milk chocolate chips, allowing it to sit briefly before whisking until smooth and velvety. Once the ganache is ready, gently pour and spread it over the cookie dough layer. Allow it to set, either at room temperature or in the refrigerator, until firm before slicing.
Mastering Your Cookie Dough Rice Krispie Treats: Expert Advice
While the basic concept of Rice Krispie Treats seems simple, there are nuances that can elevate them from good to absolutely phenomenal. These pro tips will help you achieve the perfect texture and flavor for every layer of your cookie dough and ganache creations. From classic variations like peanut butter Rice Krispie treats to our decadent layered version, these foundational principles ensure success.
- PRO-Tip: Maintain a Generous Marshmallow-to-Cereal Ratio. The key to gooey, perfectly bound Rice Krispie Treats lies in the balance of marshmallows to cereal. Aim for at least a 1:1 ratio, or even slightly more marshmallows, especially when using mini marshmallows. Skimping on the marshmallows will result in a dry, crumbly bar that lacks that signature sticky, chewy goodness. Enough marshmallow ensures every single piece of cereal is coated, creating a cohesive and satisfying base.
- PRO-Tip: Embrace Salted Butter. While unsalted butter is often preferred in baking, salted butter is your secret weapon for these treats. The salt acts as a natural flavor enhancer, beautifully balancing the sweetness of the marshmallows, cookie dough, and ganache. It adds depth and prevents the bars from being overwhelmingly sweet, providing the perfect amount of savory contrast. If you only have unsalted butter, you can add a tiny pinch of fine sea salt (about ¼ teaspoon) to the marshmallow mixture.
- Melt with Care: Low and Slow is Key. When melting the butter and marshmallows, resist the urge to use high heat. A gentle, low heat or short bursts in the microwave (30-second increments, stirring between) is crucial. High heat can overcook the marshmallows, causing them to crystallize and become hard once cooled. This results in brick-like, unpleasantly tough Rice Krispie Treats. Patience in this step pays off with soft, chewy bars.
- Opt for Mini Marshmallows. For ease and consistency, mini marshmallows are always the best choice. Their smaller size means they melt more quickly and evenly than larger marshmallows, reducing the risk of scorching or uneven melting. This ensures a smoother, more uniform marshmallow mixture for coating your cereal.
- PRO-Tip: Always Use Fresh Marshmallows. The freshness of your marshmallows directly impacts the texture of your treats. Old or stale marshmallows tend to be drier and don’t melt as smoothly, leading to a tougher end product. Look for marshmallows that are soft, pliable, and not stuck together in the bag – these are signs of freshness. Check expiration dates and store them properly to maintain their quality.
- Mix Gently but Thoroughly. Once the melted marshmallow mixture is ready, gently but quickly fold in the Rice Krispies cereal. The goal is to coat every cereal piece without crushing them. Over-mixing or aggressive stirring can break down the cereal, leading to a denser, less crispy texture. A light hand will preserve the airy crispness of the cereal.
- Avoid Over-Compressing in the Pan. When pressing the mixture into your prepared pan, use a gentle touch. Too much pressure will compact the Rice Krispies, making the bars overly dense and hard to bite into. You want them to be set, but still have a light, airy quality. Use just enough pressure to form an even layer.
- Greased Hands and Offset Spatulas are Your Friends. To prevent the sticky mixture from clinging to your hands while pressing it into the pan, lightly grease your hands with butter or non-stick spray. For achieving a perfectly level and smooth top layer without applying too much downward pressure, an offset spatula is an invaluable tool. It allows you to spread and gently smooth the layers with ease.
- Prioritize a Level First Layer. Since these are layered bars, the foundation is crucial for a beautiful presentation. Taking the time to ensure your Rice Krispie layer is perfectly level will result in uniformly stacked, aesthetically pleasing bars that are a joy to behold and eat.
Frequently Asked Questions About Cookie Dough Rice Krispie Treats
We’ve gathered some of the most common questions about making and enjoying these decadent treats to ensure you have all the information you need for perfect results every time.
Absolutely! The primary concern with eating raw, homemade cookie dough stems from two ingredients: raw eggs and raw flour. By eliminating raw eggs, this recipe removes the risk of salmonella, a foodborne illness commonly associated with unpasteurized eggs. However, a lesser-known but equally important risk comes from raw flour. In 2016, the FDA issued a warning against consuming raw flour due to potential contamination with E. coli bacteria. To make the cookie dough entirely safe for consumption, the flour needs to be heat-treated. This is easily achieved by spreading the flour on a microwave-safe plate and microwaving it on high for about 1 minute, or until it reaches an internal temperature of 160ºF (71ºC). Use an instant-read thermometer to verify the temperature. Once heat-treated and cooled, your flour is safe to use in the eggless cookie dough layer.
For clean, precise slices that showcase those beautiful layers, chilling your Cookie Dough Rice Krispie Treats is essential. Once the ganache has set, place the entire pan in the refrigerator for at least 30 minutes, or even the freezer for 15-20 minutes, until the layers are firm. When ready to cut, use a large, sharp chef’s knife. To prevent sticking and achieve smooth cuts, lightly spray the knife blade with a non-stick cooking spray, like Pam, before each cut. If the knife starts to drag or stick, simply re-spray it. For even more detailed guidance, you can refer to tips on How to Cut Perfect Bars. Wiping the knife clean between a few cuts can also help maintain sharp edges.
Proper storage ensures your treats remain fresh and delicious. If your kitchen is cool and the ambient temperature is below 70°F (21°C), these Cookie Dough Rice Krispie Treats can be stored in an airtight container at room temperature for 2-3 days. However, due to the chocolate ganache topping, which can become soft and messy in warmer environments, refrigeration is highly recommended, especially during warmer months or if you plan to store them for longer. Store them in an airtight container in the refrigerator for up to a week. Be aware that chilling will make the bars firmer. For the best texture, remove the desired number of servings from the refrigerator about an hour before you plan to serve them, allowing them to soften slightly to a perfect chewy consistency.
Explore More Decadent No-Bake Bar Recipes
If you’ve fallen in love with the ease and deliciousness of these Cookie Dough Rice Krispie Treats, you’re in for a treat! We have a fantastic collection of other no-bake bars and variations on the classic Rice Krispie Treat that you’re sure to enjoy. Perfect for satisfying any sweet craving with minimal effort.
- Chocolate Peanut Butter Krispie Bars: A heavenly combination of two classic flavors.
- Reeses Rice Krispie Treats: For the ultimate peanut butter cup lovers.
- Caramel Rice Krispie Treats: An extra layer of gooey sweetness.
- More Easy Bar Cookies: Discover a wide array of simple and satisfying bar cookie recipes.
Stay in touch through social media @ Instagram, Facebook, and Pinterest. Don’t forget to tag me when you try one of my recipes! And if you love the results, please give it a 5-star rating in the recipe card below.
Cookie Dough Rice Krispie Treats
20 minutes
2 minutes
20 minutes
42 minutes
24
A decadent twist on the classic cereal treats with a layer of safe-to-eat cookie dough and luscious chocolate ganache!
Rated 5 out of 5 stars by 48 reviewers.
Ingredients
Krispie Treats Layer
- 5 tablespoons salted butter
- 8 cups mini marshmallows
- 6 cups Rice Krispies cereal
Cookie Dough Layer
- 1 cup butter, room temperature
- 1 cup light brown sugar
- ½ cup granulated sugar
- ¼ cup milk
- 2 teaspoons vanilla extract
- ½ teaspoon salt
- 2 cups all-purpose flour (heat-treated for safety)
- 1½ cups mini chocolate chips
Milk Chocolate Ganache
- 7 ounces milk chocolate chips
- ½ cup heavy cream
Instructions
- Prepare the Pan: Line a 9×13 inch baking pan with nonstick foil, leaving an overhang on the sides to easily lift the treats out later.
- Make the Rice Krispie Base: In a large microwave-safe bowl, combine marshmallows and butter. Heat in 30-second increments, stirring after each, until melted and smooth. Be careful not to overheat.
- Combine with Cereal: Stir in the Rice Krispies cereal to coat evenly with the marshmallow mixture. Gently press this mixture into the prepared pan, using an offset spatula or greased hands to create an even, slightly loose layer. Set aside to cool.
- Prepare Safe Cookie Dough: To make the eggless cookie dough, first heat-treat your flour (microwave for 1 minute until 160°F). In a stand mixer, cream together room temperature butter, salt, light brown sugar, and granulated sugar until light and fluffy. Beat in the milk and vanilla extract. Gradually add the heat-treated flour on low speed until just combined. Fold in the mini chocolate chips.
- Layer the Cookie Dough: Evenly spread the prepared cookie dough over the cooled Rice Krispie treat layer.
- Make the Ganache: To prepare the ganache, chop milk chocolate and place it in a heat-safe bowl. Heat the heavy cream in the microwave until it’s very hot but not boiling (about 30-60 seconds). Pour the hot cream over the chocolate chips.
- Whisk Ganache: Let the chocolate and cream mixture stand undisturbed for one minute, then whisk gently until smooth, glossy, and fully combined.
- Top with Ganache: Let the ganache cool for just a few minutes until it thickens slightly but is still pourable, then spread it evenly over the cookie dough layer.
- Chill and Serve: Place the pan into the freezer for 15-20 minutes or the refrigerator for at least 30-60 minutes, until the chocolate ganache is completely set. Once firm, lift the treats out using the foil overhang, cut into squares or rectangles with a non-stick sprayed knife, and serve.
Recommended Products
As an Amazon Associate and member of other affiliate programs, I earn from qualifying purchases.
- 3 Pyrex Mixing Bowls
- KitchenAid 9-Speed Digital Hand Mixer
- Nonstick Foil
- 9 x 13 Baking Pan
Nutrition Information:
Yield:
24
Serving Size:
1
Amount Per Serving:
Calories: 367
Total Fat: 18g
Saturated Fat: 11g
Trans Fat: 0g
Unsaturated Fat: 6g
Cholesterol: 34mg
Sodium: 187mg
Carbohydrates: 51g
Fiber: 1g
Sugar: 32g
Protein: 3g
HOW MUCH DID YOU LOVE THIS RECIPE?
Please leave a comment on the blog or share a photo on Pinterest
